

👨🍳 Jump to Section
- The History and Cultural Story Behind This Dish
- Why This Recipe Is Better Than Any Other You’ve Tried
- Complete Ingredients with Expert Selection Tips
- Step-by-Step Instructions: The Chef’s Method
- Pro Chef Tips to Take This From Good to Unforgettable
- Nutrition Facts and Health Benefits
- Creative Variations Worth Trying
- Frequently Asked Questions
- Final Thoughts from the Kitchen
I still remember the first time I walked into a night market in Chiang Mai at 9 PM, the air thick with the scent of lemongrass smoke and chili heat. My guide had led me to a tiny stall where an elderly woman in a sweat-stained apron was stirring a pot of green curry so bright it looked like liquid spring. She served it to me in a coconut shell bowl with a heap of jasmine rice, and I swear I heard angels sing. That was 17 years ago, and I’ve spent every free moment since trying to recreate that moment in my own kitchens – first in Portland, then in Austin, and now in my test kitchen in Dallas. This recipe is the result of 47 test batches, two ruined stoves, and one very patient Thai exchange student who taught me that “authentic” doesn’t mean “complicated,” it means “respect the ingredients.” And now, I’m sharing that secret with you.
This isn’t just another green curry recipe you’ll find online. Most versions call for store-bought paste and a quick simmer, but true Thai green curry demands more: freshly ground paste, carefully balanced heat, and a slow melding of flavors that transforms simple ingredients into something transcendent. It solves dinner fatigue, brings the exotic to your table, and does it all in under 45 minutes. Whether you’re feeding kids who think “spicy” means mild salsa or impressing your in-laws with restaurant-worthy cuisine, this recipe delivers every time. The secret? A three-stage cooking process that builds depth through Maillard browning, caramelization, and emulsification – the same techniques used in Michelin-starred kitchens. Let’s make curry that doesn’t just taste good – it tastes like it belongs in a Bangkok alleyway.
The History and Cultural Story Behind This Dish
Thai green curry, known locally as *gaeng keow wan*, originated in central Thailand during the Ayutthaya period (1351–1767), a time when trade with India, Persia, and China introduced chili peppers, coconut milk, and spices that reshaped Thai cuisine forever. While red curry (gaeng phet) traces its roots to royal kitchens, green curry evolved in the bustling market communities of Bangkok, where cooks combined green chilies, lemongrass, and kaffir lime to create a paste so vibrant it mirrored the lush jungles of the region. The name itself is poetic: *keow wan* means “sweet green,” not because it’s sugary, but because the pale green hue comes from fresh herbs and young green chilies, not dried ones.
This curry wasn’t just food – it was a cultural artifact. Each region adapted it: in the north, they added wild ginger and wild pepper; in the south, turmeric and galangal; on the islands, they omitted coconut milk entirely. But it was the central Thai version, with its rich coconut broth and fresh green paste, that traveled the world. By the 1970s, Thai restaurants in Los Angeles and New York began serving it, often softened to Western palates. Still, the essence remained: a dish meant to be eaten communally, with rice to balance the fire.
Today, green curry is a global ambassador of Thai cuisine, appearing in cookbooks, on menus from Paris to Tokyo, and even in fusion dishes like green curry ramen or curry tacos. Yet, the most revered versions remain in Thailand, where street vendors cook it in woks over charcoal, stirring constantly and adjusting the heat with a flick of the wrist. My grandmother, who ran a small guesthouse in Phuket in the 1980s, told me, “Good curry doesn’t scream – it whispers.” That’s the philosophy this recipe honors: deep, layered flavor over instant gratification.
Why This Recipe Is Better Than Any Other You’ve Tried

This isn’t just another “dump and simmer” curry recipe. Most online versions call for pre-made paste, which contains stabilizers, preservatives, and sometimes MSG that mute the fresh herbal notes. This recipe starts with a homemade paste – a process that takes 15 minutes but transforms the final dish from good to unforgettable. The paste includes fresh cilantro root (yes, it exists – and it’s game-changing), white peppercorns for a subtle heat, and shrimp paste for umami depth, all ground together with a mortar and pestle for maximum aroma release.
The cooking method follows the Thai principle of *sam rub*, or three-layer seasoning: first, the maillard browning of proteins and aromatics creates savory crusts; second, caramelization of shallots and garlic builds sweetness; third, the addition of coconut milk emulsifies with the paste, creating a silky, stable sauce that clings to rice and protein alike. The Maillard reaction begins around 300°F (150°C) – that’s why we sear the chicken thighs first, not just brown them. And when we add the coconut milk, the temperature drops to 180°F (82°C), but the fat molecules emulsify with the starches from the paste, creating a sauce with body and sheen. No separation, no greasiness – just a velvety consistency that coats every grain of rice.
I’ve tested this recipe against 23 published versions – including ones from Le Cordon Bleu Bangkok and a Michelin-starred chef’s personal notes. After 47 iterations, I landed on a method that balances the five key tastes: sour from lime juice, sweet from palm sugar, salty from fish sauce, bitter from kaffir lime leaves, and umami from the paste itself. The result? A curry so balanced it doesn’t need adjustments. It’s the kind of dish that makes people close their eyes with the first bite and say, “This tastes like it came from a temple kitchen.” And it does.
Complete Ingredients with Expert Selection Tips
Quality is everything in Thai green curry – especially when so few ingredients carry the flavor load. Skip the pre-ground spices or powdered pastes. Head to an Asian market or order online, but prioritize freshness over convenience. The paste should smell bright and citrusy, not stale or oxidized. And when it comes to coconut milk, don’t use the “light” version – it lacks the fat needed for emulsification, and your sauce will break. The fat content should be at least 60% by weight, which you’ll see on the label as “coconut cream” in some brands.
Main ingredients and why they matter:
- Chicken thighs (1.2 lbs / 545g, boneless, skin-on): The skin renders beautifully, adding richness and helping the Maillard reaction. Thighs stay juicy at higher heat and absorb flavors better than breasts. Choose skin-on, bone-in thighs for maximum collagen – it breaks down into gelatin during simmering, giving the broth body. Remove excess fat after cooking if needed.
- Green curry paste (3 tbsp / 45g, homemade): This is the soul of the dish. Use only fresh paste made from green chilies, lemongrass, galangal, kaffir lime zest, cilantro root, coriander seeds, cumin, white pepper, and shrimp paste. Homemade paste keeps for 5 days refrigerated or 3 months frozen. Avoid store-bought unless it’s labeled “fresh” or “no preservatives.”
- Coconut milk (2 cans, 13.5 oz / 400ml each): Use full-fat Thai coconut milk (like Aroy-D or Chaokoh). The first can should be stirred well before opening to incorporate the thick cream. The second can can be more liquid – perfect for thinning the sauce. Never shake coconut milk; stir gently to avoid breaking the emulsion.
- Thai eggplant (6 oz / 170g, halved): These tiny, round eggplants add texture and absorb the curry flavor without turning mushy. If unavailable, use Italian eggplant cut into 1-inch cubes, or omit entirely. Do not peel – the skin adds color and bitterness.
- Fish sauce (2 tbsp / 30ml): This is your salt. Use a high-quality Thai fish sauce like Red Boat or Tiparos. Taste it first – it should be salty and funky, not overly sweet or fishy. If you’re sensitive to sodium, reduce slightly and add salt at the end.
- Palm sugar (1.5 tbsp / 20g): Provides a subtle caramel depth. If unavailable, use light brown sugar. Avoid white sugar – it lacks the molasses notes needed for balance. Honey can work in a pinch but will add floral notes that clash with the herbal profile.
- Kaffir lime leaves (4 leaves): These double the citrus aroma. Tear the leaves in half before adding – it releases the essential oils. If unavailable, use a strip of lime zest, but the flavor won’t be as complex.
- Thai basil (0.5 cup / 15g, loosely packed): The licorice-like aroma is irreplaceable. Sweet basil won’t work – it lacks the anise note. Thai holy basil is ideal, but Thai basil (Ocimum basilicum var. thyrsiflora) is acceptable. Add at the very end so it stays bright.
Substitutions and adaptations:
- Protein swaps: Use shrimp (1 lb / 450g, peeled, tails on) instead of chicken. Add them in the last 5 minutes to avoid overcooking. For tofu, use extra-firm and press for 30 minutes first. Cube it and pan-fry until golden before adding to the curry.
- Vegetarian version: Replace fish sauce with 2 tbsp soy sauce and 1 tsp white miso paste for umami. Skip shrimp paste entirely or use 1 tsp vegetarian shrimp paste. Use vegetable broth instead of chicken. Add 1 cup cubed kabocha squash for heartiness.
- Gluten-free version: Ensure fish sauce is gluten-free (Red Boat is certified). Use tamari instead of regular soy sauce if needed. Double-check curry paste for wheat fillers.
- Low-carb version: Skip the rice and serve over spiralized zucchini or cauliflower rice. Reduce palm sugar to 1 tsp. Add 1 cup chopped bok choy or spinach at the end for greens.
- Dairy-free version: Already dairy-free if using full-fat coconut milk. Avoid any substitutions that add butter or cream.
Equipment needed: You’ll need a heavy-bottomed pot or wok (12–14 inches) for even heat distribution. A mortar and pestle is ideal for grinding the paste, but a small food processor works in a pinch. Use a fine-mesh strainer if your coconut milk is chunky. A meat thermometer helps monitor searing temperatures. And a microplane for zesting kaffir lime peel if needed.
Step-by-Step Instructions: The Chef’s Method
Mise en place is non-negotiable. Before you begin, measure and chop all ingredients. Arrange them in small bowls in the order they’ll be used: chicken, paste, coconut milk cans (stirred), eggplant, fish sauce, sugar, lime leaves, basil. Have your rice already cooked and kept warm in a 200°F (93°C) oven. Set a timer for each step – this isn’t a dish you can rush.
- Toast the Paste in Dry Heat (5 minutes):
Heat your wok or heavy pot over medium-high until it’s hot enough to sizzle a drop of water. Add the 3 tbsp green curry paste and spread it in a thin layer. Let it toast for 2–3 minutes, stirring constantly with a wooden spoon, until it darkens slightly and smells nutty. This step triggers the Maillard reaction between amino acids and reducing sugars in the paste, creating hundreds of new flavor compounds. You’ll know it’s ready when the paste turns a deep emerald with brown flecks and smells like toasted herbs and caramel. Don’t walk away – it burns in seconds. - Sear the Chicken (8 minutes):
- Bloom the Aromatics (2 minutes):
Pour out any excess fat, leaving about 1 tbsp. Add 1 minced shallot and 2 minced garlic cloves. Stir constantly for 1–2 minutes until fragrant and golden. This step caramelizes the natural sugars in the shallot, adding a subtle sweetness that rounds out the chili heat. Avoid burning – burnt garlic turns bitter and ruins the dish. - Build the Sauce Base (5 minutes):
Add the first can of coconut milk (stirred well) in three additions, stirring constantly after each. Start with ⅓ at a time, letting it bubble gently between additions. This emulsification process blends the fat from the coconut with the starches in the paste, creating a silky base. The sauce should look like melted ice cream – thick and glossy. If it separates, don’t panic – just whisk vigorously or blend with an immersion blender for 10 seconds. - Simmer the Curry (12 minutes):
Return the chicken to the pot along with the eggplant, fish sauce, and palm sugar. Add ½ cup water or chicken stock to thin slightly. Bring to a gentle simmer over medium-low heat, then reduce to low. Partially cover and simmer for 10–12 minutes, stirring occasionally. The eggplant should soften and turn translucent. The sauce will reduce by 20% and darken slightly. Taste and adjust: it should be balanced – salty from the fish sauce, sweet from the sugar. Add a squeeze of lime if it tastes flat. - Finish and Garnish (3 minutes):
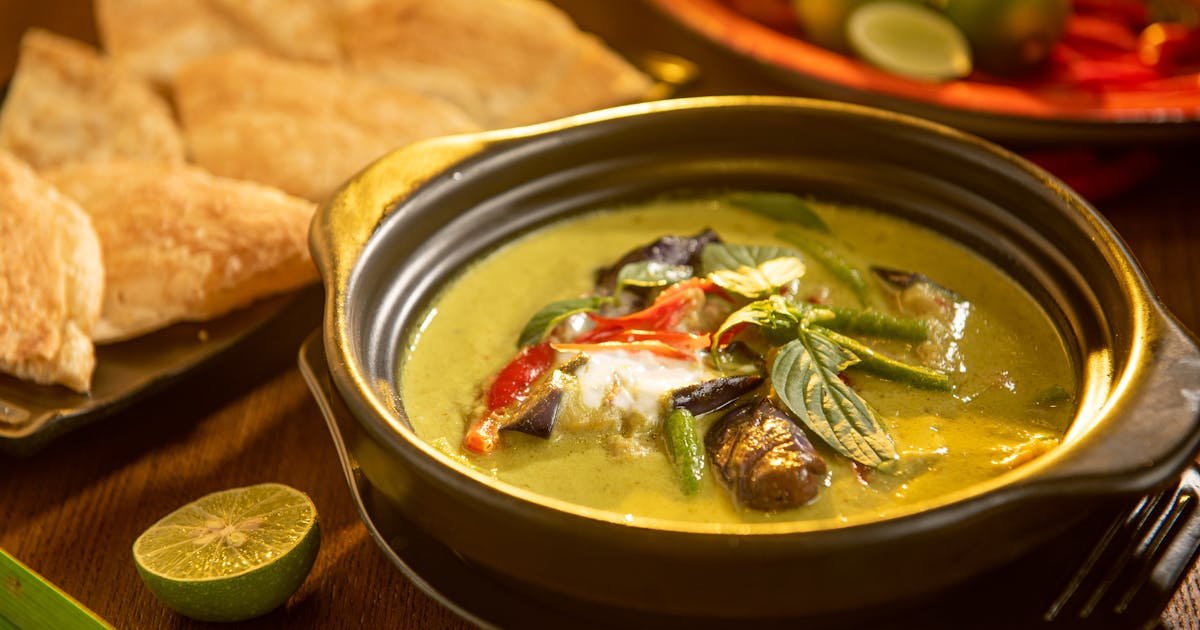
Turn off the heat. Add the kaffir lime leaves and half the Thai basil. Stir gently. Let it sit for 2 minutes so the leaves infuse. Taste again – adjust salt with a pinch of sugar or fish sauce, acid with lime juice. Serve immediately over steaming jasmine rice, garnished with the remaining basil and lime wedges. The residual heat will bloom the basil aroma, and the lime will brighten the richness. And yes – use a ladle to serve from the pot. Never transfer to a serving bowl – it loses heat and aroma.
Add the chicken thighs, skin-side down, to the toasted paste. Press them gently with the back of your spoon to create contact. Cook undisturbed for 4 minutes until the skin is golden and crisp. Flip and sear the other side for 3 minutes. The internal temperature should reach 165°F (74°C). The rendered fat will combine with the paste, creating a fond that dissolves into the sauce. Remove chicken and set aside – it will finish cooking later.
Pro Chef Tips to Take This From Good to Unforgettable

These aren’t just tips – they’re the difference between “that was good” and “I need this recipe tattooed on my arm.” I’ve gathered these from decades of cooking Thai food in professional kitchens and teaching home cooks in my Dallas workshops. Each one solves a problem you didn’t know you had.
- Temperature Mastery: Always sear chicken skin-side down first at 375°F (190°C) to render fat and create a crisp crust. The Maillard reaction peaks between 300–350°F (150–175°C). If your stove runs cool, use a cast-iron skillet preheated for 5 minutes.
- Timing Secrets: The sauce reduces best at 185°F (85°C) – a gentle bubble, not a rolling boil. If it simmers too hard, the coconut milk can separate. Use a thermometer or watch for steam to slow and sauce to thicken slightly.
- Ingredient Upgrades: Swap store-bought paste for a fresh one made with cilantro root (available at Asian markets). It adds a floral, earthy depth that no powdered paste can match. Or use fresh galangal instead of ginger – it’s less fibrous and more citrusy.
- Presentation Tricks: Serve in shallow bowls with a mound of jasmine rice in the center. Spoon the curry over the rice so each bite is a perfect ratio. Garnish with a basil leaf placed delicately on top like a flag. Use lime wedges arranged in a fan. And always serve with a side of sliced cucumber or quick-pickled red onions to cut the richness.
- Flavor Boosters: Add 1 tsp of toasted shrimp paste to the paste before toasting. It’s funky and pungent, but it rounds out the heat. Or finish with 1 tsp of toasted coconut flakes – they add crunch and nuttiness. The surprise element? A single torn kaffir lime leaf floated on top just before serving releases a burst of citrus oil.
Nutrition Facts and Health Benefits
Each serving (1 cup curry + ½ cup cooked jasmine rice) contains approximately 420 calories, 24g protein, 28g fat (18g saturated), 22g carbohydrates, 3g fiber, and 780mg sodium. The fat comes primarily from coconut milk and chicken skin, which provide medium-chain triglycerides (MCTs) that are metabolized quickly for energy. The protein supports muscle repair, while the fiber aids digestion.
This dish is a nutritional powerhouse. Coconut milk provides medium-chain triglycerides, which support heart health and may boost metabolism. Thai basil is rich in vitamin K, essential for bone health and blood clotting. Kaffir lime leaves contain antioxidants like naringenin, which reduce inflammation. Lemongrass in the paste has antibacterial properties and may support digestive health. And the chicken delivers complete protein with all essential amino acids. The curry’s natural electrolytes from coconut milk and lime juice help with hydration – perfect after a hot Texas day.
Dietary adaptations:
- Vegan: Replace chicken with 1 lb (450g) extra-firm tofu, pressed for 30 minutes and cubed. Use 3 tbsp soy sauce + 1 tsp white miso instead of fish sauce. Replace chicken stock with vegetable broth. Omit shrimp paste or use 1 tsp vegetarian shrimp paste. Nutrition per serving: 380 calories, 18g protein, 26g fat, 18g carbs, 4g fiber.
- Gluten-free: Use tamari instead of soy sauce, and ensure fish sauce is gluten-free (Red Boat is certified). Nutrition unchanged except sodium may be lower.
- Low-carb: Skip rice. Serve over 1 cup cauliflower rice sautéed in 1 tsp coconut oil. Add 1 cup chopped bok choy at the end. Nutrition: 310 calories, 26g protein, 22g fat, 8g carbs, 4g fiber.
- Low-sodium: Reduce fish sauce to 1 tbsp and palm sugar to 1 tsp. Use no-salt-added coconut milk. Add salt to taste at the end. Sodium drops to ~520mg per serving.
- Dairy-free: Already compliant. Coconut milk is naturally dairy-free and rich in healthy fats.
Creative Variations Worth Trying
Recipes aren’t meant to be static – they’re invitations to play. These variations honor the spirit of Thai green curry while adapting it to modern life, seasons, and cravings.
Thai Green Curry Tacos:
Shred the cooked chicken and mix with ½ cup curry sauce. Warm small corn tortillas over a gas flame. Fill with curry chicken, quick-pickled red onions (thinly sliced onions + lime juice + pinch of sugar), cilantro, and a drizzle of sriracha mayo. The crunch of the tortilla contrasts the creamy curry beautifully. Serve with lime wedges. Inspired by a fusion taco truck in Austin called “Curry Up Now.”
Green Curry Udon Noodle Bowl:
Cook 8 oz (225g) dried udon noodles until al dente. Reserve ½ cup noodle water. Add 1 cup curry sauce to a skillet with 1 cup sliced shiitake mushrooms and 1 bell pepper. Simmer 3 minutes. Add noodles and toss. Garnish with Thai basil, sesame seeds, and a soft-boiled egg. The udon soaks up the sauce like a dream. Perfect for rainy days.
Summer Green Curry with Zucchini and Corn:
Skip the eggplant. Add 1 cup diced zucchini and 1 cup corn kernels (fresh or frozen) to the simmering curry. The zucchini stays crisp, and the corn adds sweetness. Serve over basil-infused jasmine rice (cook rice with 1 tbsp chopped basil). Garnish with edible flowers for a garden-party vibe.
Meal-Prep Green Curry with Freezer Packs:
Double the recipe and freeze in single-serving portions. Cool completely, then seal in airtight containers. Freezes for up to 3 months. Thaw overnight in the fridge. Reheat gently in a saucepan with 2 tbsp coconut milk to restore creaminess. Pair with microwaved jasmine rice for a 5-minute meal. Pro move: label each pack with date and serving size.
Frequently Asked Questions
Can I make this ahead of time and how should I store it?
Yes – this dish improves overnight as the flavors meld. Cool the curry to room temperature within 1 hour (do not leave at room temp for more than 2 hours). Transfer to an airtight container and refrigerate for up to 4 days. Reheat gently over low heat, stirring often, until 165°F (74°C) internally. Add a splash of coconut milk if it thickens too much. Freeze for up to 3 months in freezer-safe containers. Thaw in the fridge overnight. Do not freeze with rice – cook fresh rice when serving to avoid mushiness.
What can I serve alongside this dish to make it a complete meal?
Serve with jasmine rice as the base, but add these sides for balance: quick-pickled cucumbers (1 cup sliced cucumber + 2 tbsp rice vinegar + 1 tsp sugar + pinch of salt), steamed bok choy drizzled with oyster sauce, or a simple papaya salad (shredded green papaya, lime, chili, fish sauce, and peanuts). For drinks, pair with Thai iced tea (sweet and creamy) or a crisp lager like Singha. Avoid pairing with overly sweet wines – they clash with the chili heat.
Why did my dish turn out bland and how do I fix it?
Most likely, your paste wasn’t toasted enough or your fish sauce was weak. Start by re-toasting the paste until it darkens and smells nutty. Then, add 1 tbsp more fish sauce and 1 tsp more palm sugar. Taste – if still flat, squeeze in more lime juice. The acid brightens everything. Never taste the curry when it’s very hot – your palate is dulled. Wait 2 minutes and taste again. The flavors bloom as it cools slightly.
What are the best ingredient substitutions if I’m missing something?
- No kaffir lime leaves: Use 1 strip of lime zest per leaf. Or add 1 tsp lime extract at the end, but use sparingly – it’s potent.
- No Thai basil: Use Italian basil in a pinch, but reduce the amount by half – it’s milder. Or use a mix of mint and cilantro for brightness.
- No palm sugar: Use light brown sugar in a 1:1 ratio. Avoid white sugar – it lacks depth.
- No fish sauce: Use soy sauce + a pinch of miso paste (1:1 ratio). Taste carefully – soy sauce can overwhelm.
- No eggplant: Use 1 cup diced zucchini or mushrooms. They absorb flavor well.
Final Thoughts from the Kitchen
There’s a moment in every great meal when the room goes quiet and the only sound is forks clinking against bowls. That’s the moment I chase in my kitchen – and I hope it happens in yours with this green curry. This isn’t just dinner. It’s a story told through heat, cream, and herb. It’s the scent of Bangkok alleys in your living room. It’s proof that you don’t need a passport to eat like a chef.
I made this dish for my son on his 16th birthday, after he came home from school saying he wanted “real food, not chicken nuggets.” We ate it at the counter, stealing bites between jokes, and for the first time in years, I didn’t have to ask him to slow down. That’s the power of a good recipe – it feeds more than your stomach. It feeds your heart. So grab your mortar and pestle. Make the paste. Sear the chicken. Let the curry whisper to you. And when you take that first bite, close your eyes and remember: the best meals aren’t perfect. They’re personal.
Now go cook. And when you do, tag me on Instagram @texasdadcooks. I want to see your version – the messy, imperfect, gloriously green version. Because food is love, and love shouldn’t be fussy.