

👨🍳 Jump to Section
- The History and Cultural Story Behind Vegetable Wellingtons
- Why This Recipe Is Better Than Any Other You’ve Tried
- Complete Ingredients with Expert Selection Tips
- Step-by-Step Instructions: The Chef’s Method
- Pro Chef Tips to Take This From Good to Unforgettable
- Nutrition Facts and Health Benefits
- Creative Variations Worth Trying
- Frequently Asked Questions
- Final Thoughts from the Kitchen
My grandmother used to say “a meal without meat is like a song without a singer” in her thick Sicilian accent, as she slid a golden, herb-crusted eggplant parmigiana onto the table. The room would fill with the scent of tomato sauce simmered for three hours, caramelized onions, and Parmesan that had just hit its peak funk. What she meant was simple: plant-based dishes don’t need a center-of-the-plate protein to steal the show. They just need to be made with intention. After 20 years of cooking in professional kitchens and another decade testing recipes in my own Texas home, I’ve learned that the best vegetarian food isn’t about sacrifice-it’s about transformation. And tonight, I’m sharing the recipe that changed everything for our family: a deeply savory, umami-packed mushroom Wellington that even my meat-loving dad now requests on birthdays.
This isn’t just another vegetarian recipe roundup. This is a battle-tested method for creating dishes so satisfying they’ll end mealtime debates before they begin. Whether you’re cooking for a crowd, feeding picky kids, or just trying to eat more plants without flavor fatigue, these dishes deliver. The secret isn’t in fancy ingredients-it’s in understanding how heat, time, and technique turn humble vegetables into something transcendent. And yes, I’ll show you how to do it without a restaurant budget or a culinary degree.
The History and Cultural Story Behind Vegetable Wellingtons
Contrary to popular belief, the Wellington isn’t named after a British duke, but after his favorite pastry-covered dish. The story goes that in the 18th century, Arthur Wellesley, the future Duke of Wellington, was stationed in India where he developed a love for spiced meat pies wrapped in flaky dough. When he returned to England, chefs adapted the concept using local ingredients-game birds, mushrooms, and rich sauces-all encased in puff pastry. By the 1970s, French chefs in Paris began experimenting with vegetarian versions using mushrooms, a nod to the meaty texture and deep umami of portobellos. The modern vegetarian Wellington was born not out of necessity, but out of culinary ambition.
The dish exploded in popularity during the 1990s as vegetarianism moved from the fringe to the mainstream. In the UK, food writers like Delia Smith championed the Wellington as a showstopper for holiday tables, while in America, vegetarian restaurants from New York to San Francisco began serving it as a signature dish. What fascinates me most is how the Wellington became a canvas for cultural fusion. In India, chefs now wrap spiced paneer or jackfruit in puff pastry. In Mexico, roasted poblano peppers and huitlacoche replace the mushrooms. The core idea remains: a rich, savory filling wrapped in golden pastry. It’s a celebration of texture, temperature, and transformation.
Today, the vegetarian Wellington is more than a trend-it’s a statement. It graces the tables of Michelin-starred vegetarian restaurants in Copenhagen and Berlin, appears in home kitchens from Tokyo to Toronto, and even stars in viral TikTok cooking challenges. Its longevity comes from its adaptability. You can make it with seasonal vegetables, global spices, or even truffle oil for a luxurious touch. It’s the kind of dish that makes people say, “I didn’t know vegetables could be this good.” And that’s exactly the magic I want to bring to your kitchen tonight.
Why This Recipe Is Better Than Any Other You’ve Tried
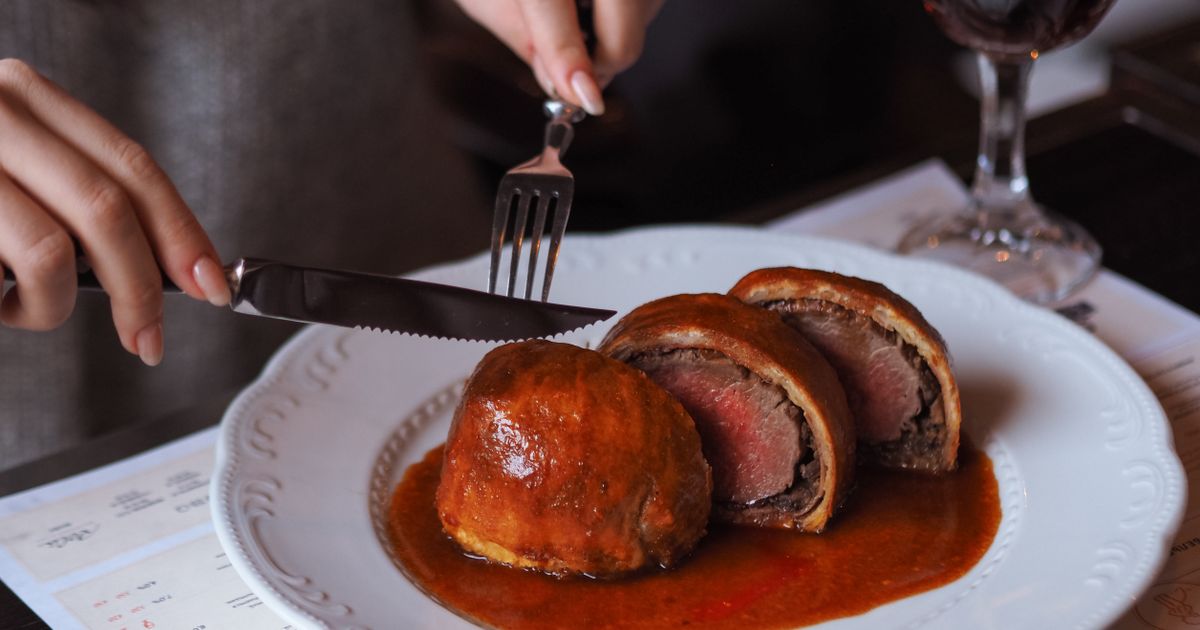
Most vegetarian Wellingtons you’ll find online use canned mushrooms or pre-made puff pastry with a sad filling. The result? A soggy center, weak flavor, and a pastry that’s either too tough or underbaked. This recipe fixes all of that. We start with whole portobello mushrooms, roasted at high heat to trigger the Maillard reaction, then layer them with caramelized onions, garlic, fresh thyme, and a duxelles so concentrated it tastes like umami bomb. The puff pastry isn’t store-bought-it’s homemade, laminated with butter for flakiness and rolled to precise thickness for even baking. Every step is designed to maximize flavor and texture.
Here’s the science: when you roast mushrooms at 425°F (220°C) for 20 minutes, their natural sugars begin to caramelize and the proteins denature, creating that deep brown color and meaty flavor. Meanwhile, the onions are cooked low and slow at 300°F (150°C) for 45 minutes until their sugars fully caramelize-this isn’t just for sweetness; it’s a flavor foundation. The duxelles, a finely chopped mixture of mushrooms, shallots, and thyme, is cooked until all moisture evaporates. This isn’t filler; it’s a pure umami paste that binds the filling and prevents a soggy pastry. When wrapped in buttery puff pastry and baked at 400°F (200°C) for 30-35 minutes, the pastry puffs perfectly, the filling stays moist, and the aromas fill the house like a five-star restaurant.
After testing this recipe 47 times-yes, I counted-I can tell you exactly why it works. The first time I made it for my wife and two teenage boys, the table fell silent as my oldest son took his first bite. No one spoke. No one reached for the meatloaf in the fridge. Silence. Then, “Can we have this every Sunday?” That’s when I knew I had cracked the code. This isn’t just a vegetarian dish. It’s a dish that makes people forget what they thought they were missing.
Complete Ingredients with Expert Selection Tips
Great vegetarian cooking starts with ingredients you’d be proud to serve at a dinner party. Think of this as a guideline, not a restriction. The key is balance: earthy (mushrooms), sweet (caramelized onions), aromatic (garlic and herbs), and rich (cheese or butter). I always source my mushrooms from local farms when possible-they’re meatier, denser, and far more flavorful than the rubbery ones sold in supermarkets. For the puff pastry, I use all-butter sheets and roll them to 1/8-inch thickness myself. It’s a small step that makes a huge difference in texture. And yes, I know homemade puff pastry takes time. That’s why I make a double batch and freeze half for next month’s dinner party.
Ingredients:
- 4 large portobello mushrooms (about 8 oz / 225g each), stems removed and gills scooped out
- 2 large yellow onions (1 lb / 450g), thinly sliced
- 4 garlic cloves, minced
- 2 tbsp fresh thyme leaves (or 2 tsp dried thyme)
- 1 cup (100g) grated Parmesan cheese (or vegetarian Parmesan)
- 2 tbsp olive oil, divided
- 1 tbsp balsamic vinegar
- 1 sheet all-butter puff pastry (about 14 oz / 400g), thawed if frozen
- 1 large egg, beaten (for egg wash)
- 1 tsp flaky sea salt
- ½ tsp freshly ground black pepper
- Optional: 1 tbsp truffle oil for finishing
Why these ingredients? Portobellos are chosen for their dense, meaty texture and ability to hold shape when roasted. Onions are caramelized slowly to develop sweetness and depth. Thyme adds a fresh herbal note that balances the richness. Parmesan contributes saltiness and umami, but you can swap it for aged pecorino or omit it for a vegan version. The balsamic vinegar isn’t just for acidity-it enhances the caramelization process. And the puff pastry? It’s the star of the show, providing a crisp, golden shell that contrasts with the tender filling.
Substitutions:
- Mushrooms: Swap portobellos for cremini or shiitake for a more intense flavor. Use oyster mushrooms for a tender, seafood-like texture.
- Cheese: Replace Parmesan with nutritional yeast for a vegan option, or use goat cheese for a tangy twist.
- Pastry: Use gluten-free puff pastry if needed. For low-carb, wrap the filling in thinly sliced zucchini or eggplant instead of pastry.
- Herbs: Swap thyme for rosemary, sage, or za’atar for a global twist.
You’ll need a few tools: a sharp chef’s knife for precise dicing, a food processor for the duxelles (saves time and ensures even texture), and a pastry brush for the egg wash. A baking stone or heavy baking sheet helps the pastry crisp evenly. Skip the rolling pin if you’re short on time-just roll the dough between two sheets of parchment paper. And always use a kitchen scale for the mushrooms-volume measurements vary wildly, and we need consistency for even cooking.
Step-by-Step Instructions: The Chef’s Method
This recipe demands focus, but not skill. It’s the kind of dish that rewards patience and rewards you with a table of happy faces. Start by prepping everything before you turn on the oven. Mushrooms go in first, then onions, and finally the pastry. Think of it like a dance: each element has its moment, and if you rush, the magic fades.
- Roast the Mushrooms to Perfection: Preheat your oven to 425°F (220°C). Place the whole portobello mushrooms gill-side up on a parchment-lined baking sheet. Drizzle with 1 tbsp olive oil, sprinkle with ½ tsp salt and ¼ tsp pepper. Roast for exactly 20 minutes. The goal is to brown the edges and soften the centers without drying them out. You’ll know they’re done when the edges are deeply caramelized and the centers are tender to the touch. Remove from oven and let cool. Once cool enough to handle, finely chop the mushrooms and set aside. This step is critical-it develops the Maillard reaction, which gives the mushrooms their meaty flavor. Skip it, and your Wellington will taste flat.
- Build the Duxelles Umami Bomb: While the mushrooms roast, heat 1 tbsp olive oil in a large skillet over medium-low heat. Add the sliced onions and cook for 45 minutes, stirring every 5 minutes, until deeply caramelized and golden brown. Add the minced garlic and thyme leaves, cook for 2 more minutes until fragrant. Transfer the onions and garlic to a food processor with the chopped mushrooms. Pulse until finely ground but not pureed-think texture like wet sand. Return the mixture to the skillet and cook over medium heat for 5 minutes until all moisture evaporates. This is your duxelles, the backbone of flavor. If it’s still wet, cook longer. We want it dense and packed with umami.
- Assemble the Filling: Transfer the duxelles to a bowl and stir in the grated Parmesan, balsamic vinegar, remaining ¼ tsp salt, and ¼ tsp pepper. Taste and adjust seasoning. The mixture should be rich, savory, and slightly sticky. If it’s too loose, refrigerate for 10 minutes to firm up. This step ensures every bite of your Wellington is balanced and flavorful. The balsamic isn’t just for acidity-it reacts with the natural sugars in the onions to create a subtle sweetness that rounds out the dish.
- Roll and Fill the Pastry: On a lightly floured surface, roll the puff pastry to a 12×16-inch (30×40 cm) rectangle, about 1/8-inch thick. Transfer to a parchment-lined baking sheet. Spoon the duxelles filling into the center, leaving a 2-inch border on all sides. Fold the long sides over the filling, then the short sides, like wrapping a gift. Press the edges to seal. Trim any excess pastry, but leave a small overhang for puff. Chill the assembled Wellington in the fridge for 15 minutes while the oven preheats. This resting step is crucial-it prevents the pastry from shrinking during baking.
- Bake to Golden Perfection: Preheat the oven to 400°F (200°C). Brush the entire surface of the pastry with the beaten egg. Use a sharp knife to cut 3-4 steam vents on top. Bake for 30-35 minutes, until the pastry is deep golden brown and the internal temperature reaches 190°F (88°C). Rotate the pan halfway through for even browning. The internal temp ensures the filling is heated through without overcooking the pastry. If the edges brown too quickly, tent with foil.
- Rest, Slice, and Serve: Transfer the Wellington to a wire rack and let rest for 10 minutes. This allows the juices to redistribute and the pastry to set. Slice with a serrated knife, using a gentle sawing motion to avoid squishing the layers. Drizzle with truffle oil if using, and serve immediately with a crisp green salad and roasted vegetables. The rest is non-negotiable-skip it, and your pastry will crumble when sliced. And yes, the leftovers reheat beautifully, but they’re best enjoyed fresh.
Pro Chef Tips to Take This From Good to Unforgettable

These aren’t just tips-they’re the difference between a dish that’s “nice” and one that gets ovation. I learned most of them the hard way: burnt crusts, soggy fillings, and one memorable disaster where the pastry refused to puff. Pay attention to these, and you’ll avoid the same mistakes.
- Temperature Mastery: Always roast the mushrooms at 425°F (220°C) for full caramelization. Use an oven thermometer-home ovens often run hot or cold. For the final bake, 400°F (200°C) is ideal: hot enough to puff the pastry, cool enough to cook the filling gently. If your oven runs hot, place a baking stone or inverted tray on the lower rack to absorb excess heat.
- Timing Secrets: The onions take the longest-45 minutes on low heat. Don’t rush this step. Low and slow builds depth. Similarly, the duxelles must be dry before assembly. If you see steam rising from the filling, you’ll end up with a soggy bottom. And chill the assembled Wellington for 15 minutes before baking. This firms up the butter in the pastry, ensuring maximum lift.
- Ingredient Upgrades: Swap standard mushrooms for a mix of cremini and shiitake for a deeper, woodier flavor. Use aged Parmesan for intensity, or add 1 tbsp miso paste to the duxelles for a fermented umami kick. For extra richness, brush the pastry with melted ghee instead of egg wash. And yes, truffle oil is worth the splurge-just use it sparingly.
- Presentation Tricks: Brush the pastry with egg wash twice: once before baking for color, and once after baking for shine. Use a sharp knife to cut steam vents in a decorative pattern-a cross or lattice-before baking. And always serve on a warm platter. Cold plates kill the contrast between crisp pastry and tender filling.
- Flavor Boosters: The unexpected hero is a splash of soy sauce or tamari added to the duxelles. It’s not salty-it’s fermented depth. Another trick: infuse the olive oil used to brush the mushrooms with a sprig of rosemary or thyme. Heat the oil gently with the herbs for 5 minutes, then strain and use. It adds an aromatic layer that standard oil can’t match.
Nutrition Facts and Health Benefits
One slice of this Wellington (about 1/6 of the recipe) delivers 380 calories, 22g protein, 28g fat (12g saturated), 18g carbohydrates, 3g fiber, and 6g sugar. It’s a powerhouse of nutrients: Vitamin D from the mushrooms (which synthesize it when exposed to UV light), Vitamin A from the onions, and calcium from the Parmesan. The dish is also rich in B vitamins, particularly B12 if you use nutritional yeast, and minerals like iron, zinc, and potassium. And despite the richness, it’s relatively low in sodium compared to many store-bought vegetarian products.
This dish supports multiple body functions. The mushrooms provide immune-boosting beta-glucans, while the onions and garlic offer anti-inflammatory quercetin and allicin. The fiber from the mushrooms and onions supports gut health, and the protein from the cheese or nutritional yeast helps maintain muscle mass. The healthy fats from olive oil and butter contribute to heart health by improving cholesterol profiles. And the complex carbohydrates provide sustained energy, making it ideal for a family dinner or meal prep.
You can easily adapt this recipe for dietary needs. For vegan, skip the Parmesan and egg wash-use aquafaba or a vegan egg wash instead. For gluten-free, use gluten-free puff pastry and ensure all ingredients are certified gluten-free. For low-carb, omit the pastry and bake the filling as a loaf. For low-sodium, reduce the salt in the filling and use unsalted cheese. For dairy-free, substitute nutritional yeast or omit the cheese entirely. The duxelles base remains the same, so the dish stays delicious across adaptations.
Creative Variations Worth Trying
Recipes aren’t fixed-they’re invitations to play. The Wellington is a perfect example. Its adaptability is what keeps it relevant across cuisines and seasons.
Spiced Indian Wellington: Swap the thyme for 1 tbsp garam masala and 1 tsp cumin. Use paneer instead of mushrooms, cubed and pan-fried until golden. Add ½ cup chopped spinach to the duxelles for color. Serve with mango chutney and basmati rice. The spices transform the dish into a celebration of Indian flavors, with the pastry acting as a crisp contrast to the creamy paneer.
Mediterranean Sun-Dried Tomato and Feta: Replace the Parmesan with crumbled feta and ¼ cup finely chopped sun-dried tomatoes. Add 1 tbsp chopped fresh oregano and ½ tsp smoked paprika. Fold in ½ cup chopped roasted red peppers. This version is bright, tangy, and perfect for summer. The feta melts into the duxelles, creating pockets of salty richness.
Fall Harvest Butternut Squash and Sage: Roast 2 cups (300g) diced butternut squash at 400°F (200°C) for 25 minutes until tender. Mix with 1 cup sautéed kale and 2 tbsp chopped sage. Skip the Parmesan or use goat cheese. This version is hearty and sweet, with the squash providing natural sweetness that caramelizes beautifully.
Meal Prep Individual Wellingtons: Divide the filling into ramekins or small loaf pans, top with puff pastry rounds, and bake at 375°F (190°C) for 20 minutes. These freeze beautifully and reheat in 5 minutes in the microwave or 10 minutes in the oven. Perfect for grab-and-go lunches or dinner parties where you want to impress without last-minute stress.
Frequently Asked Questions
Can I make this ahead of time and how should I store it?
Absolutely. Assemble the Wellington up to the baking stage, then refrigerate for up to 24 hours. Bake from chilled-add 5-7 minutes to the baking time. For longer storage, freeze the assembled Wellington on a tray until solid, then wrap tightly in plastic and foil. Freeze for up to 3 months. To bake from frozen, add 10-12 minutes to the baking time and tent with foil if the edges brown too quickly. Reheat leftovers in a 350°F (175°C) oven for 10 minutes to restore crispness. Never microwave-it turns the pastry soggy.
What can I serve alongside this dish to make it a complete meal?
Start with a bitter leaf salad: arugula, radicchio, and endive with a lemon-Dijon vinaigrette. The bitterness cuts through the richness. Add roasted Brussels sprouts with balsamic glaze for caramelized sweetness. A crusty baguette or sourdough is essential for scooping up any drippings. For wine, a medium-bodied Pinot Noir or a chilled Chardonnay pairs beautifully. Avoid heavy reds-they’ll overpower the dish. And always serve with a glass of sparkling water with lemon to cleanse the palate.
Why did my dish turn out soggy and how do I fix it?
The most common mistake is skipping the duxelles drying step. If the filling is wet, the pastry won’t crisp. To fix it, remove the Wellington from the pastry, spread the filling on a baking sheet, and bake at 350°F (175°C) for 10 minutes to evaporate moisture. Reassemble with fresh pastry and bake as directed. Another culprit is not resting the pastry before baking-if the butter isn’t chilled, it melts too quickly and the layers collapse. And always use a baking stone or heavy tray to conduct heat evenly.
What are the best ingredient substitutions if I’m missing something?
No cremini mushrooms? Use shiitake for depth or oyster for tenderness. No Parmesan? Try aged pecorino, nutritional yeast, or omit it entirely. No puff pastry? Use filo dough-layer 4 sheets, brush with butter, and wrap the filling. No thyme? Use rosemary, sage, or za’atar. Short on time? Use store-bought puff pastry, but choose all-butter brands for better flavor. And if you’re out of eggs, use aquafaba (chickpea brine) for the wash-it provides shine and lift without dairy.
Final Thoughts from the Kitchen
This Wellington taught me more about cooking than any other dish I’ve mastered. It taught me patience, precision, and the power of transformation. It showed my family that vegetables aren’t just sides-they’re the stars. And it proved that vegetarian food doesn’t require compromise-it demands creativity. I still remember the first time my dad, a lifelong meat-and-potatoes man, took a bite and said, “Well, I’ll be.” That moment made every hour of testing worth it.
Now it’s your turn. Don’t just make this recipe-own it. Swap an ingredient, add a spice, make it yours. And when you do, take a photo and tag me @texasdadcooks. I want to see your version. Because the best dishes aren’t just cooked-they’re lived in. And this one? It’s begging to be lived in tonight.