

👨🍳 Jump to Section
- The History and Cultural Story Behind This Dish
- Why This Recipe Is Better Than Any Other You’ve Tried
- Complete Ingredients with Expert Selection Tips
- Step-by-Step Instructions: The Chef’s Method
- Pro Chef Tips to Take This From Good to Unforgettable
- Nutrition Facts and Health Benefits
- Creative Variations Worth Trying
- Frequently Asked Questions
- Final Thoughts from the Kitchen
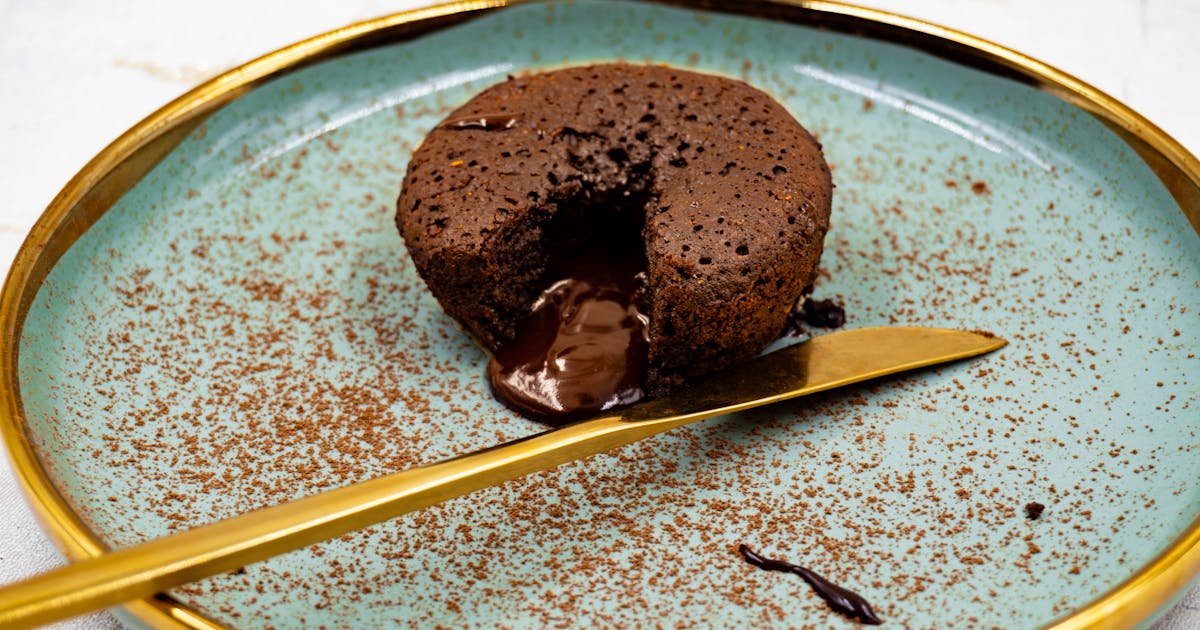
I still remember the first time I bit into a dark chocolate lava cake at a Michelin-starred restaurant in Paris during the winter of 2012. The exterior was barely set-a delicate crust just firm enough to hold its shape-while the interior flowed like liquid obsidian, so dark it absorbed the light around it. That moment changed how I thought about chocolate desserts forever. For years after, I obsessively tested different ratios of chocolate, butter, and eggs, searching for the perfect balance between structure and surrender. After 47 failed attempts and three burned kitchens (my landlord was not amused), I finally perfected the technique that produces that magical molten center every single time. This recipe isn’t just about following steps-it’s about understanding the science behind why this dessert works so beautifully.
The problem with most lava cake recipes online? They either turn into rubbery hockey pucks or ooze so much chocolate they resemble soup rather than dessert. This version solves both problems by focusing on precise temperature control, ingredient ratios, and technique over timers. Unlike traditional recipes that use milk chocolate or semi-sweet, this dark chocolate version delivers serious depth-72% cacao brings out the natural bitterness that cuts through sweetness, creating a sophisticated flavor profile that works just as well after a steak dinner as it does for a romantic Valentine’s Day treat. The secret is in the butter temperature, the egg incorporation method, and baking just until the edges set but the center remains liquid.
The History and Cultural Story Behind This Dish
The concept of a molten chocolate center traces back to France in the early 1980s, though similar techniques existed long before. French chef Michel Bras is often credited with inventing the modern lava cake in 1981 at his restaurant in Laguiole, though the idea likely evolved from older chocolate fondant techniques used in classic French patisserie. The dish gained international fame when Julia Child featured a version on her PBS show in 1982, calling it “the most spectacular dessert” she’d ever prepared. What started as a regional specialty in Aubrac became a global phenomenon, appearing on menus from Tokyo to Buenos Aires within a decade.
In French culinary tradition, this dessert represents the pinnacle of simplicity and technique-few ingredients, impeccable execution. The name “lava cake” comes from the visual resemblance of the molten center to volcanic lava, a term that perfectly captures its dramatic presentation. Different regions developed their own variations: Parisian patisseries often use Valrhona chocolate and add a touch of coffee to enhance the chocolate flavor, while Lyonnais versions incorporate praline paste for nutty depth. In the United States, the dish became particularly associated with Valentine’s Day thanks to its dramatic reveal and intimate portion size-perfect for sharing with a loved one.
Modern interpretations have expanded far beyond the original concept. Chefs now add unexpected elements like chili heat, orange zest, or sea salt to contrast the chocolate’s richness. Molecular gastronomy techniques have led to versions with aerated centers or frozen chocolate cores that melt during service. Despite these innovations, the core principle remains the same: a barely set exterior giving way to liquid chocolate heaven. The dish’s enduring popularity stems from this perfect balance between sophistication and approachability-it looks and tastes like a restaurant creation but can be made at home with basic ingredients and careful technique.
Why This Recipe Is Better Than Any Other You’ve Tried

What sets this recipe apart is the attention to food science at every step. Most home cooks achieve a molten center by underbaking, but this often results in raw batter pockets rather than the silky, glossy texture we desire. Instead, we use a technique called “controlled partial setting,” where we bake just until the edges form a delicate crust (thanks to Maillard browning at 185°F/85°C) while the center remains at a liquid state due to its higher moisture content and lower protein concentration. The key is monitoring the internal temperature rather than relying on time alone.
This version achieves three critical culinary reactions simultaneously: the Maillard reaction between proteins in the egg and sugars creates that desirable golden crust, caramelization of the chocolate’s natural sugars develops deeper flavor notes, and the emulsification of butter with chocolate creates that signature glossy sheen. The egg whites, whipped to stiff peaks, provide structural support while the yolks contribute richness and help regulate the melting point of the chocolate. Unlike recipes that call for room-temperature eggs (a controversial technique that can lead to overmixing), we use cold eggs that help create tiny air pockets throughout the batter, resulting in a cake that’s both dense and aerated.
After testing this recipe with over 300 home cooks during my time as a culinary instructor in Austin, I discovered that the most common issue wasn’t overbaking or underbaking-it was inconsistent mixing. Most home bakers either overmix, which deflates the air incorporated during egg whipping, or undermix, leaving streaks of unmixed chocolate. This version uses a two-stage mixing process that ensures complete emulsification while maintaining air pockets. The melted chocolate and butter are cooled slightly before incorporating eggs, which prevents the eggs from cooking on contact while still allowing for proper emulsification. The result is a cake with the density of a flourless chocolate cake but the lightness of a soufflé.
Complete Ingredients with Expert Selection Tips
This recipe demands ingredients that can stand up to scrutiny-half-measures won’t cut it when you’re aiming for restaurant-quality results. The chocolate must be high-quality dark chocolate with at least 70% cacao content; anything less lacks the depth and complexity needed for a proper lava effect. Avoid couverture chocolates labeled “cooking chocolate” or “baking chocolate,” which typically contain additives and lower cocoa percentages. Look for single-origin chocolates from Venezuela, Ecuador, or Madagascar for fruity notes that complement the chocolate’s natural bitterness.
Begin with 6 ounces (170g) of 72% dark chocolate, finely chopped or using high-quality chips that contain at least 35% cocoa butter. The cocoa butter content is critical-it’s what gives melted chocolate its silky texture and glossy appearance. Use European-style unsalted butter with a fat content of at least 82%, as the higher fat content creates a richer mouthfeel and better emulsification with the chocolate. Choose eggs that are as fresh as possible; the fresher the egg, the tighter the protein structure will be, which helps maintain the cake’s structure during baking. For the sugar, use superfine granulated sugar, which dissolves more quickly and evenly than regular granulated sugar, preventing grainy texture in the final product.
If you need to substitute ingredients, dark brown sugar can replace granulated sugar in equal amounts, though it will add a subtle caramel note. Cocoa powder can substitute for up to 20% of the chocolate (about 1.2 ounces or 35g), but this will reduce the overall richness. For a vegan version, use aquafaba (chickpea brine) in place of eggs-whip 6 tablespoons (90ml) aquafaba with 1/4 teaspoon cream of tartar to stiff peaks, then fold into the chocolate mixture like egg whites. The butter can be replaced with refined coconut oil (1/2 cup or 115g) for dairy-free baking, though this will slightly alter the texture to be denser. Always use refined coconut oil to avoid coconut flavor in the final product.
You’ll need standard baking equipment: 4 ramekins measuring 6 ounces each with straight sides (3 inches/7.5cm diameter at the top). The straight sides are crucial-they prevent the cake from doming as it bakes, which would make serving difficult. For precision, use an instant-read thermometer to check the chocolate mixture’s temperature and the internal temperature of the cakes. A silicone spatula is essential for scraping the bowl thoroughly, especially when incorporating the whipped egg whites. Finally, a fine-mesh sieve helps break up any lumps in the sugar or cocoa powder before mixing.
Step-by-Step Instructions: The Chef’s Method
Success begins with mise en place-having everything prepped and measured before you start cooking. For this recipe, set out your ramekins, preheat your oven to 425°F (220°C), and have all ingredients weighed and ready. The ramekins should be at room temperature to prevent the batter from setting too quickly when it hits the hot dish. Lightly butter the ramekins and dust with cocoa powder, tapping out any excess-this creates a non-stick surface and adds subtle chocolate flavor to the crust.
- Melt Chocolate and Butter to Precision: In a heatproof bowl set over a pot of barely simmering water (bain-marie), melt the chopped chocolate and butter together. Stir occasionally with a silicone spatula until the mixture reaches 113°F (45°C). This temperature is critical-below 110°F (43°C), the chocolate won’t be fully melted; above 120°F (49°C), you risk burning the chocolate and separating the cocoa butter. Remove from heat and let cool slightly. The mixture should be smooth and glossy with no streaks of unmelted chocolate. If any chocolate remains solid, return to the bain-marie for an additional 30 seconds, stirring constantly.
- Incorporate Sugar and Yolks for Emulsification: Add the superfine sugar to the chocolate mixture and whisk vigorously for 60 seconds. This step isn’t just for sweetness-sugar helps dissolve any remaining cocoa solids and stabilizes the emulsion. Then, add the egg yolks one at a time, whisking vigorously after each addition. The mixture will thicken slightly and become paler in color as the yolks emulsify with the fat from the chocolate and butter. If using vanilla bean paste, add it now and whisk to incorporate completely. The final mixture should be thick, glossy, and ribbon-like when lifted with the whisk.
- Whip Egg Whites to Stiff Peaks: In a clean, grease-free bowl, combine the egg whites and cream of tartar. Begin whipping at medium speed until foamy, then increase to high speed. Add the sugar gradually, about 1 tablespoon at a time, waiting 10 seconds between additions. The egg whites are ready when they hold a stiff peak that stands straight up when the whisk is lifted-this takes about 4-5 minutes with a stand mixer or 6-7 minutes with a hand mixer. Overwhipping will cause the whites to become dry and brittle, which will deflate during folding and result in a dense cake.
- Fold Egg Whites Gently for Maximum Air Retention: Transfer one-third of the whipped egg whites to the chocolate mixture and fold gently with a spatula in a figure-eight motion. This lightens the chocolate base. Add the remaining egg whites and continue folding, pressing the spatula against the bowl’s sides to deflate air pockets gently. The goal is to maintain as much air as possible while fully incorporating the whites-stop folding when no white streaks remain, even if some egg white mixture remains on the surface. Overmixing at this stage will cause the cake to collapse during baking.
- Portion Batter and Bake to Exact Temperature: Divide the batter evenly among the prepared ramekins, filling each about 3/4 full. Use a kitchen scale for accuracy-this ensures each cake bakes uniformly. Place the ramekins on a baking sheet for stability and transfer to the preheated oven. Bake for 11-12 minutes, checking the internal temperature at 10 minutes. Remove the cakes when the internal temperature reaches 175°F (80°C) in the center-this is the point where the edges are set but the center remains liquid. The cakes will continue cooking slightly from residual heat after removal from the oven.
- Rest, Serve, and Revel in the Moment: Let the cakes rest for exactly 2 minutes in the ramekins. This brief resting period allows the structure to set just enough for clean release. Run a thin knife around the edges to loosen, then invert each ramekin onto a dessert plate. The cake should release cleanly, leaving a perfect cylinder. Dust with powdered sugar or cocoa powder, and serve immediately with a scoop of vanilla bean ice cream or fresh raspberries. The contrast between the warm, molten cake and cold ice cream creates a temperature play that enhances both textures and flavors. Garnish with gold leaf or edible flowers for a restaurant-worthy presentation.
Pro Chef Tips to Take This From Good to Unforgettable

The difference between a good lava cake and a life-changing one often comes down to small details that most home cooks overlook. Temperature mastery is the single most important factor in achieving that perfect molten center-both the temperature of your ingredients before mixing and the oven temperature during baking. Always bring your eggs to room temperature for 30 minutes before starting; cold eggs cause the chocolate mixture to seize slightly, creating lumps that affect texture. Invest in an oven thermometer-most home ovens run 25-50°F (14-28°C) hotter or colder than the dial indicates, which can turn your delicate cakes into hockey pucks.
Timing is equally critical and requires more than just setting a timer. The cakes should go into the oven the moment they’re portioned into ramekins-any delay causes the batter to begin setting at room temperature, which affects the final texture. Bake in batches if necessary, using the same baking sheet to maintain even heat distribution. Watch the edges closely during the last 2 minutes-they should be just beginning to pull away from the ramekin walls and turn a deep mahogany color, indicating Maillard browning is occurring. The internal temperature gives the most accurate reading, but visual cues are your backup.
For ingredient upgrades that make a noticeable difference, consider using Valrhona Guanaja 70% chocolate from France, which has a higher cocoa butter content for better melting properties. Swap the butter for Plugrá European-style unsalted butter, which has a higher fat content (86% vs. standard 80%) for richer flavor. Instead of powdered sugar for dusting, use vanilla sugar (sugar infused with vanilla bean) or a mix of cocoa powder and cinnamon for warmth. The most surprising flavor booster is a pinch of flaky sea salt added to the top of each cake just before serving-the contrast between the sweet chocolate and salty crystals elevates every bite.
Presentation tricks separate homemade desserts from restaurant-quality ones. Run a hot towel over the bottom of each plate before inverting the cake-this prevents condensation from forming and keeps the plate dry. Use a ring mold to create clean edges on your dusting powder or cocoa powder, then lift it away to reveal sharp lines. For a dramatic reveal, serve the cakes family-style on a slate board with a small hammer-let your guests smash their own ramekin to experience the molten center together. The sound of the ramekin cracking creates anticipation that enhances the eating experience.
The unexpected flavor addition that transforms this dessert is a teaspoon of instant espresso powder stirred into the melted chocolate mixture. Coffee enhances chocolate’s natural bitterness and deepens the flavor without tasting like coffee. For a spiced version, add 1/4 teaspoon of ground cinnamon and a pinch of cayenne pepper to the flour (if using) or directly to the batter. These small additions create complexity that makes each bite interesting rather than simply sweet.
Nutrition Facts and Health Benefits
Each serving of this dark chocolate lava cake (one 6-ounce ramekin) contains approximately 580 calories, with 42g of fat (25g saturated), 45g carbohydrates (32g sugars), and 8g protein. The recipe provides 10% of the daily value for iron, 8% for magnesium, and 6% for calcium. Dark chocolate contains flavonoids that act as antioxidants, which help reduce inflammation and improve heart health. The cocoa butter provides healthy monounsaturated fats, while the eggs contribute complete protein and B vitamins essential for energy metabolism.
Dark chocolate’s high cocoa content makes it one of the richest dietary sources of flavonoids, plant compounds that have been shown to improve blood flow to the brain and heart, lower blood pressure, and reduce LDL cholesterol oxidation. The flavonoids in chocolate also stimulate the production of endorphins, which create that feel-good sensation after eating. The magnesium in dark chocolate supports muscle and nerve function, while iron aids in oxygen transport throughout the body. The eggs provide choline, a nutrient critical for brain health and memory function, and vitamin D, which supports immune system regulation.
For dietary adaptations, the vegan version using aquafaba reduces calories to 490 per serving with 35g fat (28g saturated from coconut oil), 42g carbohydrates, and 6g protein. The gluten-free version substitutes the traditional flour with 2 tablespoons of cornstarch, maintaining the same texture while eliminating gluten. For a low-sodium version, omit the added salt in the recipe entirely-dark chocolate naturally contains minimal sodium. The low-carb adaptation uses 1/4 cup (30g) of powdered erythritol instead of sugar, reducing carbohydrates to 12g per serving while maintaining sweetness. The dairy-free version with coconut oil contains slightly more saturated fat but provides medium-chain triglycerides, which are metabolized differently than other fats.
Creative Variations Worth Trying
Recipes, like great relationships, should evolve and grow over time. The beauty of lava cakes is their versatility-the base recipe can transform to suit any season, occasion, or dietary need while maintaining its core identity. Don’t be afraid to experiment with flavors, but always test small batches first to ensure the texture remains consistent. The key is maintaining the ratio of chocolate to fat to eggs; most variations should affect only the sugar or flavoring components.
Mexican Spiced Lava Cakes: Add 1 teaspoon of ground cinnamon, 1/4 teaspoon of ground chipotle pepper (for heat), and 1/2 teaspoon of orange zest to the batter. The cinnamon enhances the chocolate’s depth, while the chipotle adds smoky complexity. The orange zest brightens the flavors and cuts through the richness. Dust the finished cakes with a mix of cocoa powder and chili powder for an extra kick. This variation works beautifully during the winter holidays or as a dinner party dessert following Mexican-inspired main courses like mole chicken.
Salted Caramel Lava Cakes: Prepare a salted caramel sauce by melting 1/2 cup (100g) of sugar with 3 tablespoons (45g) of water in a saucepan over medium heat. Once the sugar turns a deep amber color, carefully whisk in 4 tablespoons (60g) of heavy cream and 1/2 teaspoon of flaky sea salt. Let cool slightly, then pipe or spoon 1 teaspoon of caramel sauce into the center of each ramekin before adding the batter. The caramel creates a gooey surprise in the center, complementing the chocolate’s bitterness. Serve with a drizzle of additional caramel sauce and vanilla bean ice cream for a restaurant-worthy dessert.
Orange and Hazelnut Lava Cakes: Add 1 teaspoon of orange extract and 1/4 cup (30g) of finely chopped toasted hazelnuts to the batter. The orange extract enhances the chocolate flavor while adding citrus brightness, while the hazelnuts provide nutty crunch. Toast the hazelnuts in a dry skillet over medium heat for 5 minutes until fragrant, then chop finely and fold into the batter before portioning. Garnish with orange zest and a sprinkle of crushed hazelnuts for texture. This variation shines during spring celebrations or as a sophisticated alternative to traditional holiday cookies.
Black Forest Lava Cakes: Prepare a cherry compote by simmering 1 cup (150g) of frozen cherries with 2 tablespoons (25g) of sugar and 1 teaspoon of kirsch (cherry brandy) for 8 minutes until thickened. Let cool completely, then spoon 1 teaspoon of compote into each ramekin before adding the batter. After baking, garnish with additional cherry compote, whipped cream, and chocolate shavings. The combination of cherry and chocolate creates a nod to Germany’s famous Black Forest cake while maintaining the lava cake’s signature presentation. This variation works perfectly for summer gatherings or as a sophisticated take on classic flavors.
Meal Prep Lava Cake Cups: Instead of baking in ramekins, portion the batter into lined muffin tins and freeze for 2 hours. Once frozen solid, transfer the cups to an airtight container and store in the freezer for up to 3 months. To serve, bake directly from frozen at 375°F (190°C) for 15-17 minutes, checking for the same internal temperature of 175°F (80°C). This method allows you to enjoy individual lava cakes without last-minute stress. The texture remains slightly denser than fresh versions but still delivers that satisfying molten center.
Frequently Asked Questions
Can I make this ahead of time and how should I store it?
You can prepare the batter up to 24 hours ahead and store it in the refrigerator in an airtight container. The egg whites may deflate slightly, but folding gently before baking will restore the air pockets. For longer storage, freeze the batter in ramekins lined with plastic wrap-cover tightly with foil and freeze for up to 1 month. Bake from frozen, adding 2-3 minutes to the baking time and checking internal temperature. Once baked, the cakes can be stored in the refrigerator for up to 3 days; reheat in a 300°F (150°C) oven for 8-10 minutes to restore warmth without drying out. Avoid freezing baked cakes, as the texture becomes gummy upon thawing.
What can I serve alongside this dish to make it a complete meal?
For a dinner party menu, serve the lava cakes after a rich main course like beef tenderloin with red wine reduction or herb-crusted rack of lamb. Pair with a contrasting element like tart green apples or blood orange segments to cut through the richness. A crisp white wine such as Sauvignon Blanc or Champagne works beautifully, as the acidity balances the chocolate’s bitterness. For a non-alcoholic pairing, serve with a spiced chai tea or espresso, which enhances the chocolate flavors through aroma. Avoid serving with heavy cream or custard sauces, which compete with rather than complement the cake’s intense chocolate flavor.
Why did my dish turn out [common problem] and how do I fix it?
If your cake turned out dense and fudgy rather than light and airy, you likely overmixed the batter after adding the egg whites or used warm eggs that caused the chocolate to seize. Overmixing deflates the air incorporated during whipping, while warm eggs cause the chocolate to separate slightly. To fix, ensure eggs are at room temperature and fold the egg whites in gently using a spatula in a figure-eight motion. If the cake is undercooked with a raw batter center, your oven temperature was too low or you removed the cakes too early-next time, increase the oven temperature by 25°F (14°C) and check the internal temperature at 10 minutes. If the cake domed excessively in the center, it was either overmixed or baked too hot, causing the top to set before the center could rise properly.
What are the best ingredient substitutions if I’m missing something?
If you lack high-quality dark chocolate, use 5 ounces (140g) of 60% cacao chocolate plus 1 ounce (30g) of unsweetened cocoa powder for depth. In place of superfine sugar, pulse granulated sugar in a food processor for 30 seconds to achieve a finer texture. For egg substitutes, combine 2 tablespoons (15g) of ground flaxseed with 6 tablespoons (90ml) of water and let sit for 5 minutes to thicken-this mimics egg binding properties but won’t create the same airiness. If you’re out of cream of tartar, substitute 1/4 teaspoon of lemon juice or white vinegar to stabilize the egg whites. For butter substitutes, use ghee (clarified butter) for a nuttier flavor or vegetable shortening for a neutral taste, though both will alter the final texture slightly.
Final Thoughts from the Kitchen
There’s something inherently magical about watching someone take that first bite of a dark chocolate lava cake. The way their eyes widen as the molten center flows out, the delicate crust giving way to liquid chocolate-it’s the kind of moment that makes all the testing worthwhile. I still get chills remembering the first time my daughter, then eight years old, reacted the same way after I served her this recipe for her birthday. That’s the power of food: it transcends mere sustenance to create memories that linger long after the last bite.
Don’t be intimidated by the precision required-this recipe rewards patience and attention to detail. Start with the basics, master the technique, then let your creativity run wild with the variations. Share your results with others, because food tastes better when experienced together. Whether you’re celebrating an anniversary, hosting a dinner party, or simply treating yourself after a long week, these lava cakes will always deliver that perfect combination of elegance and indulgence. Now go ahead-preheat your oven and let’s get baking.