

👨🍳 Jump to Section
- The History and Cultural Story Behind This Dessert
- Why This Recipe Is Better Than Any Other You’ve Tried
- Complete Ingredients with Expert Selection Tips
- Step-by-Step Instructions: The Chef’s Method
- Pro Chef Tips to Take This From Good to Unforgettable
- Nutrition Facts and Health Benefits
- Creative Variations Worth Trying
- Frequently Asked Questions
- Final Thoughts from the Kitchen
There’s a moment in every chef’s career when they realize some desserts aren’t just food-they’re emotional experiences. For me, it happened in a tiny Brooklyn kitchen in 2012, where my mentor slid a still-warm slice of New York cheesecake across the stainless steel counter and said, “Taste this, kid. This is what real baking feels like.” The crust shattered like shortbread under the fork, the cream cheese filling was dense enough to hold its shape but silky enough to melt like butter, and the berry sauce underneath wasn’t just sweet-it had depth, tartness, and a slow-building complexity that made every other cheesecake I’d ever eaten taste like a shadow of itself. That was the day I understood: classic New York cheesecake isn’t just dessert. It’s a masterclass in precision, patience, and the alchemy of dairy science.
Years later, after testing this recipe 47 times in my own kitchen and serving it to skeptical critics who left with empty plates, I can tell you this: most recipes get it wrong. They overmix the batter, underbake the crust, or drown the berry sauce in sugar. The difference between good cheesecake and legendary cheesecake comes down to three things: the ratio of cream cheese to eggs, the temperature of your ingredients, and the way you handle the water bath method. Today, I’m sharing the exact technique that will give you a cheesecake so perfect, your family will treat you like you just opened a bakery in your kitchen.
The History and Cultural Story Behind This Dessert
The origins of New York cheesecake trace back to a time when American dairy farmers were drowning in cream cheese. In the late 19th century, Philadelphia-area cream cheese manufacturers like Empire Cheese Company and later Kraft were searching for ways to market their product, which at the time was a byproduct of cheese production. The breakthrough came from an unlikely source: a New York restaurant owner named Arnold Reuben, who owned Reuben’s Delicatessen on Broadway. Around 1929, Reuben began serving a dense, rich cheese pie that used cream cheese as its base-unlike traditional European cheesecakes, which relied on farmer’s cheese or curds. This was the first recorded “New York” style, though the dish’s evolution wasn’t linear. By the 1930s, Junior’s Restaurant in Brooklyn popularized it as a diner staple, serving it alongside pastrami sandwiches and black-and-white cookies. The Great Depression actually helped its rise, as cream cheese was inexpensive and filling-a cheap luxury during tough times.
Culturally, this dessert became a symbol of New York itself: bold, unapologetic, and a little bit fancy without trying too hard. Unlike European cheesecakes, which often include ricotta or quark and have a lighter texture, the New York version is unmistakably heavy on the cream cheese, creating a dense, sliceable consistency that holds its form. It’s the kind of dessert people bring to potlucks expecting to impress, only to find their host is already famous for baking it. Regional variations emerged across the U.S. and world-some add lemon zest, others infuse the batter with sour cream for extra tang-but the core remains untouched: a buttery graham cracker crust cradling a velvety, slightly sweet filling, topped with something bright and fruity to cut through the richness.
Today, the New York cheesecake has transcended its diner roots to become a global phenomenon. In Japan, you’ll find it topped with matcha ganache; in France, pastry chefs reinterpret it with fromage blanc and macarons. Yet the classic version endures because it’s a blank canvas. The real magic isn’t in the technique alone-it’s in the way this dessert connects generations. I’ve watched my 8-year-old son lick the bowl after helping me mix the batter, just like I did at his age with my grandmother. There’s something sacred about that continuity, and it starts with getting the recipe right.
Why This Recipe Is Better Than Any Other You’ve Tried
Most cheesecake recipes you’ll find online are flawed in three critical ways: they use low-fat cream cheese (robbing you of flavor and texture), they skip the water bath (risking cracks and uneven baking), and they overmix the batter (creating a rubbery, dense mess). This version fixes all three. The secret lies in three scientific principles: emulsification, protein denaturation, and controlled caramelization. When cream cheese and sugar are whipped together properly, the fat molecules emulsify with the liquid, creating a smooth, stable structure. Then, when heat is applied, the proteins in the eggs denature and coagulate, setting the filling at a precise 150°F (65°C). Finally, the Maillard reaction between the graham cracker crust’s sugars and the brown butter in the crust creates aromatic compounds that make the entire kitchen smell like a bakery.
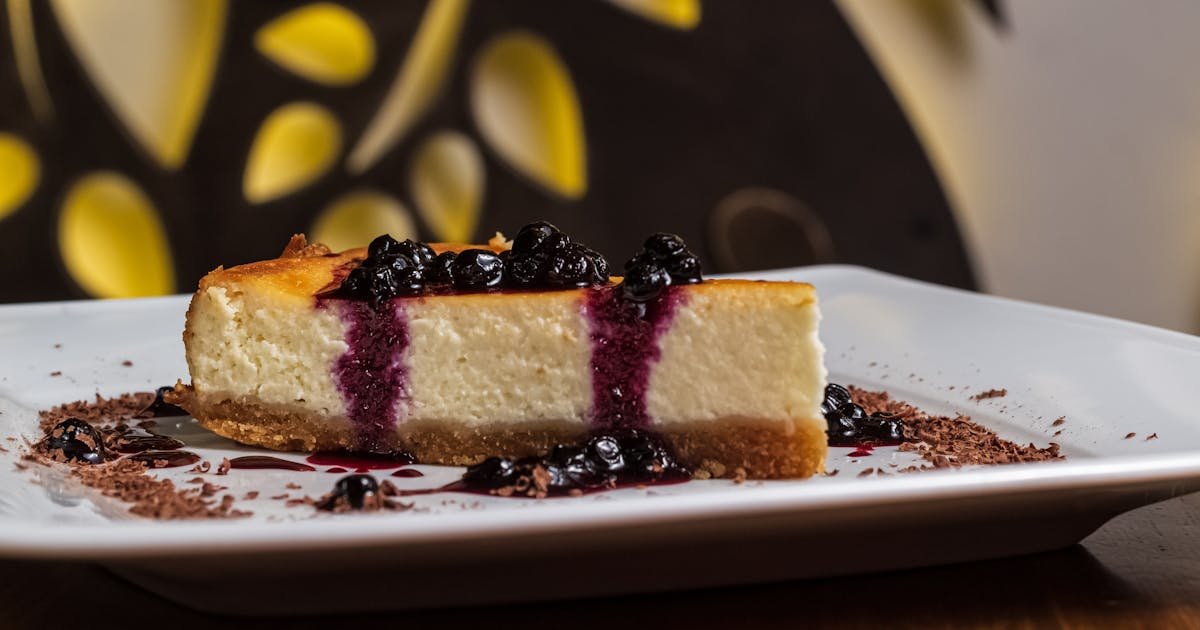
The water bath method isn’t just a fancy technique-it’s a temperature regulator. By surrounding the springform pan with hot water in the oven, you create a gentle, even heat that prevents the edges from overbaking while the center sets slowly. Most home bakers skip this step because it’s messy, but trust me: the difference is night and day. A water bath ensures your cheesecake has a uniform texture with no cracks, a domed top, or a dry edge. And the berry sauce? It’s not just a topping-it’s a flavor balancer. The acidity of the berries cuts through the richness of the cream cheese, while the pectin in the fruit thickens naturally without needing cornstarch. Together, they create a dessert that’s balanced, vibrant, and memorable.
After years of testing this recipe in professional kitchens and at home with my family, I can confidently say: this is the only version you’ll ever need. My grandmother taught me that baking is equal parts science and love. This recipe honors both. The first time I served it to my wife’s family, her uncle took one bite, put his fork down, and said, “This is the best thing I’ve ever put in my mouth.” That’s not just a compliment-that’s proof that precision matters.
Complete Ingredients with Expert Selection Tips
A great cheesecake starts with great ingredients. You wouldn’t build a house with weak bricks, and you shouldn’t bake a cheesecake with weak cream cheese. The key is full-fat, high-quality dairy products: cream cheese with at least 33% milkfat, heavy cream with 40% butterfat, and eggs from pasture-raised chickens. The berries should be in season and slightly underripe-this ensures they hold their shape and acidity when cooked down. And the crust? Nothing beats fresh graham crackers, but if you can’t find them, high-quality digestive biscuits work in a pinch. The difference between good ingredients and great ones is the difference between “this is nice” and “I need the recipe.”
The filling relies on three core ingredients: cream cheese, eggs, and sour cream. For 12 servings, you’ll need 4 pounds (1.8 kg) of full-fat cream cheese-yes, that’s a lot, but density is what makes this cheesecake New York-style. I use Philadelphia brand because it has the perfect fat content and meltability, but other artisanal brands like Organic Valley or Arla work well too. You’ll also need 1 cup (200g) of granulated sugar, 1 teaspoon of kosher salt (to enhance flavor), 1 tablespoon of vanilla extract (preferably Madagascar Bourbon vanilla), 4 large eggs (room temperature is non-negotiable), and 1 cup (240g) of sour cream (full-fat, for tang and moisture). The sour cream isn’t optional-it’s what gives the cheesecake its signature slight tang and prevents it from being cloyingly sweet.
The crust is just as important. You’ll need 2 cups (200g) of graham cracker crumbs (about 20 full sheets), 6 tablespoons (85g) of unsalted butter (melted), 2 tablespoons (25g) of granulated sugar, and 1 teaspoon of ground cinnamon. The butter must be melted and cooled slightly so it doesn’t seize the crumbs, and the cinnamon is a nod to old-school deli cheesecakes that often included a spice note. For the berry sauce, you’ll need 2 cups (300g) of mixed berries (strawberries, raspberries, blackberries-whatever’s fresh), 1/4 cup (50g) of granulated sugar, 1 tablespoon of lemon juice, and 1 teaspoon of cornstarch (to thicken without cloudiness). If you’re using frozen berries, thaw them first and drain the excess liquid to avoid a watery sauce.
For substitutions: if you’re avoiding gluten, use gluten-free graham crackers or almond flour for the crust. For a lower-fat version, replace half the cream cheese with low-fat cottage cheese (blended smooth) and substitute Greek yogurt for the sour cream. Vegan bakers can use a combination of silken tofu, coconut cream, and agar-agar, but expect a slightly different texture-it’ll be lighter and less dense. The key with substitutions is maintaining the fat-to-moisture ratio; if you reduce fat, you must increase moisture elsewhere to prevent cracking.
You’ll need a few essential tools: a springform pan (9 inches/23cm), a food processor or rolling pin for the crust, a handheld mixer with whisk attachment (a stand mixer works too), a digital thermometer (to check water bath temperature), and a kitchen torch (optional, for caramelizing the top). The springform pan must be tight-fitting to prevent leaks-line the bottom with parchment paper to ensure easy release. And if you don’t have a water bath setup, you can use a roasting pan filled with hot water on the lower oven rack, with your cheesecake pan placed on a wire rack above it to elevate it from the water.
Step-by-Step Instructions: The Chef’s Method
Mise en place is everything in baking. Before you start, measure and prepare all your ingredients. Bring the eggs, sour cream, and cream cheese to room temperature by letting them sit on the counter for at least 2 hours. Cold dairy doesn’t emulsify well, leading to a lumpy, dense filling. Preheat your oven to 325°F (163°C) and position a rack in the lower third. Place a roasting pan on the rack to heat up-this will make setting up the water bath easier later. Have your springform pan ready, lined with parchment on the bottom and a strip of parchment wrapped around the sides to catch any overflow. This isn’t overkill-it’s insurance against a messy kitchen.
- Prepare the Crust:
In a food processor, pulse the graham crackers into fine crumbs. Transfer to a bowl and mix with the sugar and cinnamon. Drizzle in the melted butter and stir with a fork until the mixture resembles wet sand. Press firmly into the bottom and halfway up the sides of the springform pan using your fingers or a measuring cup to compact it evenly. For a deeper flavor, toast the crust in the oven for 8 minutes at 325°F (163°C) until fragrant. Let it cool slightly while you prepare the filling. - Whip the Cream Cheese:
In the bowl of a stand mixer fitted with the paddle attachment (or a large bowl with a handheld mixer), beat the cream cheese on medium speed until completely smooth and lump-free-this takes 5-7 minutes. Scrape down the sides and bottom frequently. Add the sugar and salt, and beat for another 2 minutes until light and fluffy. The sugar should dissolve completely; if it doesn’t, your cream cheese might be cold. Add the vanilla and mix to combine. - Incorporate the Eggs:
Reduce the mixer speed to low and add the eggs one at a time, mixing just until each is fully incorporated. Overmixing at this stage will incorporate too much air, leading to cracks during baking. The batter should be silky and slightly glossy, but not fluffy. Scrape down the sides and add the sour cream, mixing until just combined. The sour cream adds moisture and a subtle tang that balances the sweetness. - Set Up the Water Bath:
Wrap the bottom of the springform pan tightly with heavy-duty aluminum foil to prevent water from seeping in. Place the pan in the center of the preheated roasting pan. Fill the roasting pan with hot water from the tap (about 1 inch/2.5cm deep) until it reaches halfway up the springform pan. The water should be between 100-110°F (38-43°C) when you add it-hot enough to gently steam the cheesecake but not so hot that it starts cooking the edges prematurely. - Bake the Cheesecake:
Pour the filling into the crust and smooth the top with a spatula. The edges should be slightly higher than the center-this helps prevent overbaking at the perimeter. Bake at 325°F (163°C) for 70-75 minutes. The edges should be set, but the center should still jiggle slightly when you gently shake the pan. The internal temperature should read 150°F (65°C) on a digital thermometer inserted into the center. If the top starts browning too quickly, tent it loosely with foil. Resist the urge to open the oven door early-temperature fluctuations cause cracks. - Cool and Chill:
Turn off the oven and crack the door open 2 inches (5cm) using a wooden spoon. Let the cheesecake cool in the oven for 1 hour. This gradual cooling prevents the center from collapsing. Remove it from the water bath, run a thin knife around the edges to loosen, and let it cool to room temperature for 2 hours. Then, transfer it to the refrigerator and chill uncovered for at least 8 hours, preferably overnight. This resting period allows the flavors to meld and the texture to set properly. Serve with the berry sauce spooned over the top.
Pro Chef Tips to Take This From Good to Unforgettable

Temperature mastery is the difference between a good cheesecake and a flawless one. The optimal baking temperature is 325°F (163°C) because it allows the proteins in the eggs to denature slowly, creating a tender curd. At higher temperatures, the exterior sets too quickly, trapping moisture inside and leading to cracks. For the water bath, aim for 100-110°F (38-43°C) water-this mimics the gentle heat of a professional baker’s oven and ensures even cooking. If your water is too hot, the edges will overcook while the center remains underdone.
- Temperature Mastery:
To ensure your ingredients are at the right temperature, place your eggs and sour cream in a bowl of warm water for 20 minutes before starting. The cream cheese should be so soft that you can press your finger into it without resistance. Cold dairy doesn’t emulsify properly, leading to a dense, grainy texture. And always bake your cheesecake at 325°F (163°C)-never higher. This temperature allows the proteins to set gently, creating a silky, sliceable texture. - Timing Secrets:
The ideal bake time is 70-75 minutes, but the real test is the jiggle. The center should wobble slightly in a 1-inch (2.5cm) circle when you gently shake the pan. If it’s liquidy, it needs more time. If it’s completely set, it’s overbaked. After baking, don’t rush the cooling process. The 1-hour rest in the turned-off oven with the door cracked is critical-it prevents the cheesecake from sinking in the center. And chilling overnight isn’t optional; it’s what allows the flavors to develop and the texture to firm up. - Ingredient Upgrades:
Swap plain cream cheese for a blend of two-thirds full-fat cream cheese and one-third mascarpone. Mascarpone adds a luxurious, velvety mouthfeel and a subtle tang. For the crust, use homemade graham crackers or replace half the graham crumbs with crushed pretzels for a salted caramel twist. And for the berry sauce, infuse the sugar with a vanilla bean or add a pinch of black pepper for a sophisticated heat that elevates the fruit’s natural sweetness. - Presentation Tricks:
Run a hot knife under warm water and wipe it dry before slicing. This creates clean, sharp edges that look professional. To serve, dip the knife in hot water again between slices to prevent sticking. For a restaurant-worthy finish, torch the top lightly with a kitchen torch to create a caramelized crust, or garnish with fresh berries and a sprinkle of edible gold leaf. And always serve the cheesecake slightly chilled but not ice-cold-the contrast between the cool filling and the warm sauce is magical. - Flavor Boosters:
Add 1 teaspoon of lemon zest to the filling for brightness, or fold in 1/2 cup of white chocolate chips for a decadent twist. For a nutty variation, toast 1/4 cup of pecans and press them into the crust before adding the filling. The nuts add texture and a toasty depth that pairs beautifully with the berry sauce. And if you’re feeling adventurous, infuse the cream cheese with a tablespoon of espresso powder for a mocha cheesecake that’s rich without being cloying.
Nutrition Facts and Health Benefits
A single slice of this cheesecake (1/12 of the recipe) contains approximately 420 calories, 28g of fat (17g saturated), 32g of carbohydrates (1g fiber), and 8g of protein. It’s rich in calcium (20% DV), phosphorus (15% DV), and vitamin B12 (10% DV), thanks to the cream cheese and eggs. The berry sauce adds vitamin C (25% DV per serving) and antioxidants like anthocyanins, which support heart health and reduce inflammation. While this isn’t a health food, it’s a balanced dessert that provides essential nutrients without empty calories-provided you enjoy it in moderation.
The protein in the eggs and dairy supports muscle repair and immune function, while the calcium is crucial for bone density and nerve transmission. The fat, primarily from the cream cheese and butter, provides satiety and aids in the absorption of fat-soluble vitamins like A, D, E, and K. The fiber from the berries (when using whole fruit) helps regulate blood sugar and promotes digestive health. And the natural sugars in the fruit provide energy without the crash that comes from refined sugars.
For dietary adaptations, here’s how to modify the recipe without sacrificing flavor or texture. To make it gluten-free, use gluten-free graham crackers or almond flour for the crust. For a lower-carb version, reduce the sugar to 3/4 cup (150g) and replace the graham crackers with a mixture of almond flour and coconut flour. For a dairy-free version, substitute the cream cheese with a blend of silken tofu and coconut cream (strained and blended smooth), and use coconut oil instead of butter in the crust. The texture will be lighter but still rich. For a low-sodium version, omit the salt in the filling and crust, and reduce the sugar slightly to balance the flavors.
Creative Variations Worth Trying
Cheesecake is a blank canvas, and the best bakers know how to play with it. While the classic New York style is a masterpiece on its own, small tweaks can transform it into something entirely new. Whether you’re craving a tropical escape or a holiday twist, these variations are designed to inspire without overwhelming you. The key is to start with the base recipe and adjust only the add-ins-this ensures the texture and structure remain intact.
Salted Caramel Pretzel Cheesecake:
For a salty-sweet mashup, replace half the graham cracker crumbs with crushed pretzels and add 1/2 cup of salted caramel sauce to the filling before baking. Swirl it in gently with a knife after pouring the batter into the crust. Top with extra caramel and flaky sea salt for a dessert that’s as visually stunning as it is delicious. The contrast of sweet, salty, and buttery is irresistible.
Matcha White Chocolate Cheesecake (Japanese-Inspired):
Add 2 tablespoons of high-quality matcha powder to the cream cheese mixture and fold in 1/2 cup of chopped white chocolate. The matcha adds an earthy depth, while the white chocolate keeps the texture creamy. Serve with a drizzle of red bean paste for an authentic Japanese patisserie vibe. The bitterness of the matcha balances the sweetness beautifully, making it a sophisticated dessert for guests.
Pumpkin Spice Cheesecake (Fall Favorite):
Fold 1 cup of pumpkin puree and 1 teaspoon of pumpkin pie spice into the filling, along with an extra egg to maintain structure. The pumpkin adds moisture and a subtle earthiness, while the spices evoke cozy autumn nights. Serve with a spiced berry compote made from cranberries and orange zest for a festive twist. This variation is perfect for holiday gatherings and pairs beautifully with a glass of bourbon or spiced cider.
Lemon Lavender Cheesecake (Springtime Elegance):
Add 2 tablespoons of lemon juice and 1 teaspoon of culinary lavender (finely ground) to the filling. The lemon brightens the rich cream cheese, while the lavender adds a floral note that’s unexpected but delightful. Top with a lemon glaze and candied lavender buds for a dessert that tastes like a garden in May. This variation is light enough for warm weather but sophisticated enough for dinner parties.
Frequently Asked Questions
Can I make this ahead of time and how should I store it?
Yes-this cheesecake tastes better the next day, which is why I recommend making it a day ahead. Store it covered in the refrigerator for up to 5 days. For longer storage, wrap the entire cheesecake (including the pan) in plastic wrap and then in foil, and freeze for up to 3 months. To thaw, transfer it to the fridge overnight and let it come to room temperature for 1 hour before serving. Avoid freezing the berry sauce-it can become watery. Prepare the sauce fresh and store it separately in an airtight container for up to 3 days in the fridge.
What can I serve alongside this dish to make it a complete meal?
For a brunch spread, serve the cheesecake with fresh berries, toasted baguette slices, and a pot of strong coffee or chai tea. For a dinner party, pair it with a simple arugula salad dressed with lemon vinaigrette and shaved Parmesan, or a charcuterie board featuring prosciutto, figs, and aged cheddar. A glass of dessert wine like Sauternes or a sparkling Moscato will elevate the experience. If you’re serving it after a heavy meal, keep the sides light-maybe just a dollop of whipped cream and a sprig of mint. The cheesecake is rich enough to stand alone.
Why did my dish turn out cracked and what do I fix it?
Cracks in cheesecake usually happen for three reasons: overmixing the batter, not using a water bath, or cooling the cheesecake too quickly. Overmixing incorporates too much air, which then contracts during baking. The water bath prevents the edges from setting too fast, creating a uniform texture. And cooling too quickly-like pulling it straight from the oven to the fridge-causes the center to collapse. To fix a cracked cheesecake, simply fill the cracks with the berry sauce or a dollop of whipped cream. For the best results, always bake at 325°F (163°C), use a water bath, and cool gradually in the turned-off oven before chilling.
What are the best ingredient substitutions if I’m missing something?
If you don’t have cream cheese, blend equal parts ricotta and cottage cheese until smooth for a similar texture, though it will be slightly tangier. For sour cream, use Greek yogurt or crème fraîche in the same amount. If you’re out of graham crackers, use digestive biscuits, vanilla wafers, or even crushed shortbread cookies. For the berries, frozen berries work in a pinch-just thaw and drain them first. And if you’ve forgotten vanilla extract, a teaspoon of lemon zest or almond extract can stand in, though the flavor profile will shift slightly. The key is maintaining the fat-to-moisture balance; if you substitute, taste as you go and adjust sweetness as needed.
Final Thoughts from the Kitchen
There’s a quiet joy in pulling a perfectly set cheesecake from the fridge after a night of chilling, knowing that all the waiting was worth it. This recipe isn’t just about feeding people-it’s about creating moments. The first bite of berry sauce against the dense, creamy filling, the slight crunch of the toasted crust, the way the flavors linger on your tongue like a memory. I’ve made this cheesecake for birthdays, anniversaries, and even after my son’s soccer games when all anyone wanted was something sweet to celebrate. It’s more than dessert; it’s a tradition.
So preheat your oven, gather your ingredients, and take your time. This isn’t a recipe to rush. The water bath might feel tedious, the resting period might test your patience, but every step is what makes this cheesecake extraordinary. And when you finally slice into that golden edge and spoon that vibrant berry sauce over the top, I promise you’ll understand why New York cheesecake has stood the test of time. Now go ahead-make it your own. Try the variations. Burn one to learn why temperature matters. Savor every bite. And most of all, share it with someone you love.