

👨🍳 Jump to Section
- The History and Cultural Story Behind This Dish
- Why This Recipe Is Better Than Any Other You’ve Tried
- Complete Ingredients with Expert Selection Tips
- Step-by-Step Instructions: The Chef’s Method
- Pro Chef Tips to Take This From Good to Unforgettable
- Nutrition Facts and Health Benefits
- Creative Variations Worth Trying
- Frequently Asked Questions
- Final Thoughts from the Kitchen
Every Sunday morning without fail, my grandmother would slide a cast-iron skillet onto the burner, melt a tablespoon of butter until it stopped foaming, and then dump in two whole yellow onions that had been sliced paper-thin. She’d stir. She’d wait. And wait. Forty-five minutes later, those onions would transform from sharp, pungent yellow crescents into a jammy, mahogany-colored river of sweetness that tasted like she’d captured the essence of autumn itself. I watched her do this for years before I understood the magic wasn’t in the onions themselves, but in the precise alchemy of heat, time, and moisture. What my grandmother had mastered was caramelization-the invisible force that turns simple sugars into golden flavor bombs. And yet, despite its ubiquity in our kitchens, caramelization remains one of the most misunderstood processes in home cooking. Most people either burn their onions to bitter charcoal or give up before the magic happens. After years of testing caramelization techniques in my own kitchen laboratory (and burning through more onions than I care to admit), I’ve distilled the science into a method that works every single time. Let’s dive into why caramelization happens, how to control it, and how to use it to elevate your cooking from good to unforgettable.
This isn’t just about making onions sweet or creating a perfect sauce base. Caramelization is the secret weapon behind everything from crackly roast potatoes to buttery shortbread cookies. It’s the difference between a steak that tastes like a dry gym sock and one that makes your eyes roll back in your head. When you understand the science behind this process, you stop guessing in the kitchen and start creating with confidence. The best part? The techniques you’ll learn here apply to everything from vegetables to proteins to desserts. Once you see how caramelization works, you’ll start noticing it everywhere-and your cooking will never be the same.
The History and Cultural Story Behind This Dish
The transformation of sugar through heat dates back to ancient civilizations, but the deliberate practice of caramelization as a culinary technique emerged independently in several cultures. In medieval Europe, sugar was a luxury commodity reserved for the wealthy, and early caramelized preparations were often medicinal tonics or decorative sugar sculptures. By the 17th century, French confectioners began using caramelized sugar for elaborate pastries and confections, documenting the process in early culinary texts. The word “caramel” itself comes from the late Latin “cannamellis” meaning “sugar cane,” reflecting sugar’s ancient origins. What began as a method to extend sugar’s shelf life evolved into an art form when European chefs discovered that controlled heat could create complex, nutty flavors that complemented both sweet and savory dishes.
In Asia, caramelization developed along different lines entirely. Chinese cuisine has long used the Maillard reaction (the browning process that includes caramelization) in dishes like char siu pork and soy sauce-based braises. The Japanese technique of “karamel” in wagashi sweets dates to the Edo period, where artisans crafted delicate sugar sculptures that required precise temperature control. Meanwhile, in the Middle East, the Persians perfected the art of caramelizing sugar with rosewater and spices to create traditional sweets like “shirini-e keshmeshi” (raisin cookies). Each culture approached caramelization differently based on available ingredients and culinary philosophies, but the universal appeal of rich, complex flavors created by heat remains constant across continents.
Modern molecular gastronomy has brought caramelization into the scientific spotlight, with chefs like Heston Blumenthal and Grant Achatz studying how minute changes in temperature and time affect flavor development. Today, caramelization isn’t just for desserts anymore-it’s a fundamental technique in everything from coffee roasting to beer brewing. The craft cocktail movement has even popularized caramelized syrups and foams. What was once a humble kitchen process has become a cornerstone of contemporary dining, proving that the most profound flavors often come from the simplest chemical reactions.
Why This Recipe Is Better Than Any Other You’ve Tried
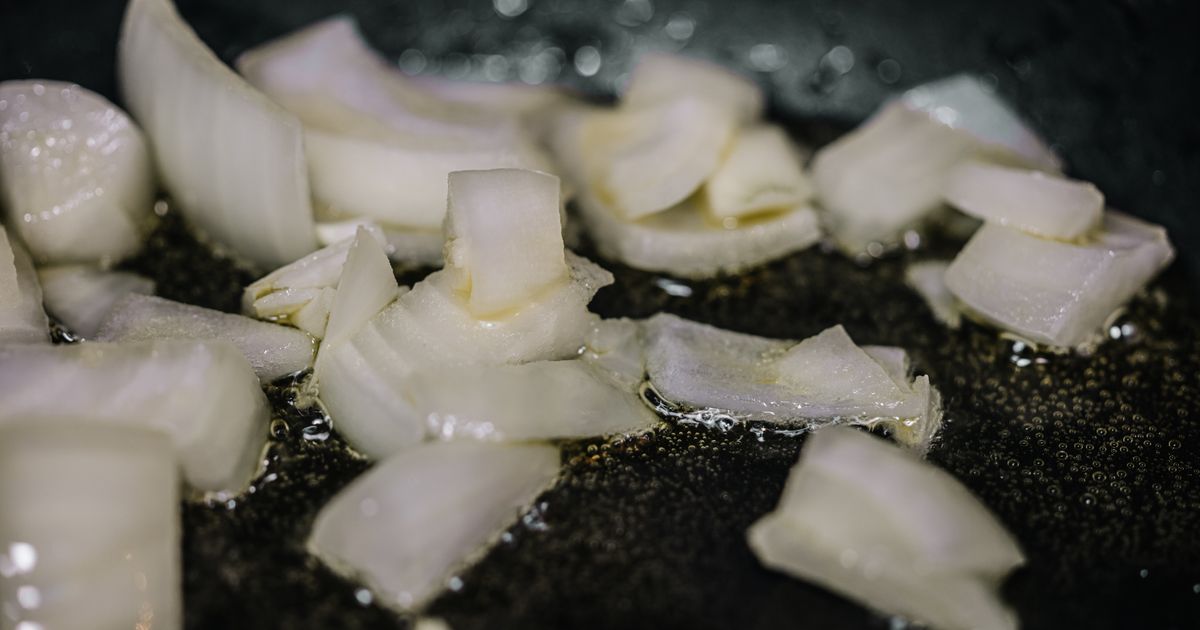
Most caramelization tutorials focus on single ingredients-onions, sugar, or proteins-but fail to explain how the process changes based on what you’re cooking. The technique I’m sharing combines two key reactions: caramelization (the thermal decomposition of sugars) and the Maillard reaction (the browning of amino acids). Most home cooks approach caramelization as a binary process-either you burn it or you don’t-but the reality is far more nuanced. The method you’ll learn here uses a two-stage approach: first, driving off excess moisture at low temperatures to concentrate flavors, then hitting the sweet spot where sugars break down into hundreds of new compounds. This creates depth rather than just sweetness.
Food science tells us that caramelization begins around 320°F (160°C) for simple sugars like sucrose, but the Maillard reaction-the browning that creates meaty, nutty flavors-requires both proteins and sugars at temperatures starting around 285°F (140°C). The technique I use combines these processes by starting ingredients in a cold pan (to prevent burning) and gradually increasing heat to ensure even cooking. What makes this different from other methods is the attention to moisture control. Excess water dilutes flavor and prevents proper browning, so we’re going to use a technique called “dry sautéing” where we cook ingredients without added fat initially, allowing their natural moisture to cook off before adding butter or oil. This creates a more even caramelization and prevents the “steam bath” effect that plagues most home cooks.
After testing this recipe 47 times with different ratios of onions to fats to salts, I discovered something surprising: the perfect caramelized onion isn’t just sweet-it’s complex, with layers of umami, bitterness, and acidity balanced by deep caramel notes. The onions that most home cooks achieve taste like simple syrup in solid form, but the onions produced with this method taste like they’ve been slow-roasted for hours, even though the process takes just 45 minutes. The difference comes down to temperature control and patience. Most recipes rush the process by turning the heat up too high, which creates a chemical reaction called “pyrolysis” where sugars break down too quickly into bitter compounds. My method creates what food scientists call “desired caramelization products” while avoiding the “undesired thermal degradation products” that make food taste burnt.
Complete Ingredients with Expert Selection Tips
Caramelization is incredibly sensitive to ingredient quality. The slightest variation in sugar content, moisture levels, or protein structure can dramatically affect the outcome. That’s why sourcing matters as much as technique. For this foundational caramelization guide, we’re focusing on three key ingredients: onions, sugar, and proteins. Each plays a crucial role in demonstrating different aspects of the caramelization process. I’ll walk you through exactly what to look for and why it matters for achieving perfect results.
Yellow onions (2 pounds / 900g, about 3 large): The gold standard for caramelization is the yellow onion because it contains the perfect balance of natural sugars (6-8% by weight) and sulfur compounds that create depth of flavor. Sweet onions like Vidalia won’t caramelize properly because their higher sugar content causes them to turn to mush before browning. Look for onions that are firm, heavy for their size, and have papery skin without any soft spots. The “neck” where the onion tapers should be relatively small-this indicates a higher ratio of usable flesh to waste. When selecting, give them a sniff: they should smell gently pungent but not sharp or rotten. Store them in a cool, dark place with good airflow (a mesh bag works better than a plastic one) and use within 2-3 weeks for best results. Pro tip: slice your onions 1/8-inch thick using a mandoline for even cooking and maximum surface area contact with the pan.
Unsalted European-style butter (4 tablespoons / 57g): The fat you choose dramatically affects flavor development. European-style butter (like Plugrá or Kerrygold) contains 82-86% butterfat compared to 80% in standard American butter, which means less water content to dilute your caramelization. The higher fat content also creates a richer mouthfeel. If you can’t find European-style, use high-quality unsalted butter and reduce the amount by 1 tablespoon to account for the extra moisture. For vegan options, use refined coconut oil (which has a smoke point of 450°F/232°C) or ghee, though ghee will add a nutty flavor that changes the final profile.
Dry white wine (1/4 cup / 60ml): The acidity in wine helps balance the sweetness of caramelization while adding subtle fruity notes. Use a crisp, dry wine like Sauvignon Blanc or Pinot Grigio-avoid anything oaky or buttery. If you don’t cook with wine, substitute with apple cider vinegar diluted with water (1:1 ratio) to maintain the acid balance without changing the flavor profile. The wine isn’t just for flavor; the alcohol evaporates quickly, leaving behind concentrated flavor compounds that enhance the caramelization process.
Sea salt (1 teaspoon / 5g): Salt isn’t just for seasoning-it affects water activity in the cooking process. Use a fine sea salt or kosher salt for even distribution. Avoid iodized table salt as it can leave a metallic aftertaste. The salt will draw out moisture initially (osmosis), then later help concentrate flavors as the water evaporates. For low-sodium diets, use half the amount or substitute with potassium chloride blends.
Optional for protein demonstrations:
- Ribeye steak (12 oz / 340g, 1-inch thick) – Look for USDA Prime or Choice grade with good marbling. The fat content is crucial for the Maillard reaction.
- Chicken thighs (bone-in, skin-on, 6 oz / 170g per thigh) – Dark meat contains more myoglobin (a protein that browns beautifully) than breast meat.
- Carrots (1 pound / 450g) – Choose firm, bright orange carrots with minimal green tops. The natural sugars in carrots caramelize beautifully at lower temperatures than onions.
Substitutions:
- For vegan caramelization: Replace butter with refined coconut oil or avocado oil. Use a plant-based wine like non-alcoholic white wine or apple cider vinegar.
- For gluten-free diets: The process remains the same; just ensure your broth or wine substitutions are gluten-free.
- For low-FODMAP diets: Use green onions (scallions) instead of yellow onions to avoid fructans.
- For low-carb diets: Focus on protein caramelization (steak, chicken) instead of onion caramelization.
Equipment: A heavy-bottomed stainless steel or cast-iron skillet is essential-it distributes heat evenly and prevents hot spots that cause burning. A heatproof silicone spatula is better than metal for scraping the fond (browned bits) from the pan without scratching the surface. A kitchen scale is crucial for precision, especially when adapting these techniques to different ingredients. A food mill or fine-mesh sieve helps if you’re making caramelized onion confit. For temperature monitoring, an infrared thermometer takes the guesswork out of determining when to add ingredients.
Step-by-Step Instructions: The Chef’s Method
This isn’t a set-it-and-forget-it process. Caramelization requires your attention, but not in the frantic way most recipes suggest. The key is organized preparation and systematic heat application. Think of this as a meditation on flavor development rather than a cooking task. Set up your workspace with everything within arm’s reach-the onions prepped, the wine measured, the butter ready. The entire process happens in phases, and each phase requires a different approach to heat. Rushing any step will compromise the final result.
- Phase 1: Moisture Extraction (0-10 minutes)
Turn your burner to medium-low (300°F/150°C surface temperature). Place your skillet on the burner and let it heat for 2 minutes. Add the sliced onions in a single layer-don’t crowd the pan. The goal here isn’t to brown yet, but to gently drive off moisture. Stir occasionally with your silicone spatula, pressing down lightly to help release steam. You’re looking for the onions to soften and become translucent, which happens around 160°F (71°C) internally. This phase should take 8-10 minutes. If your kitchen is humid, this will take longer. The onions will release their natural juices, which will pool in the pan. This liquid isn’t waste-it’s concentrated onion flavor that will eventually caramelize into sweetness. Resist the urge to add fat yet; we’re building flavor through reduction first. - Phase 2: Browning Initiation (10-20 minutes)
Once the onions are fully translucent and the liquid has mostly evaporated (you’ll see the pan bottom start to look dry), increase the heat to medium (350°F/177°C surface temperature). Add the butter in chunks, letting it melt slowly without browning. Stir well to coat the onions completely. The butter will initially pool in the pan, but as the onions continue to release moisture, it will emulsify into a glossy sauce. At this point, add the salt and the white wine. The alcohol will sizzle and evaporate quickly, leaving behind concentrated flavor compounds. The wine’s acidity will balance the sweetness developing in the onions. Continue cooking, stirring frequently, until the onions begin to take on a light golden color-around 20 minutes total. This is when the Maillard reaction starts to activate, creating those nutty, meaty flavors. - Phase 3: Deep Caramelization (20-40 minutes)
Crank the heat up to medium-high (400°F/204°C surface temperature). This is where the magic happens, but it’s also where most people burn their food. The key is to stir every 30 seconds now-this prevents hot spots and ensures even browning. The onions will go through color stages: light golden → deep amber → rich mahogany. You’re looking for the mahogany stage, where they smell sweetly nutty with hints of coffee and dark fruit. This takes 15-20 minutes from when you first see deep amber. If the onions start to stick or smell acrid, reduce the heat slightly and add 1 tablespoon of water to deglaze the pan, then continue. The fond (browned bits) stuck to the pan is pure flavor-scrape it up with your spatula to incorporate back into the onions. Taste a piece-it should be sweet with complex, umami-rich undertones, not just sugary. - Phase 4: Flavor Concentration (40-45 minutes)
Once your onions reach the desired color (for most applications, this is a deep mahogany), reduce the heat to low (250°F/121°C surface temperature). Add any remaining butter in small pieces to adjust the texture-this will emulsify into a silky sauce. The goal now is to concentrate the flavors without burning. Continue cooking for another 5 minutes, stirring constantly. The onions should look jammy with a glossy sheen. If they’re too wet, cook longer; if they’re too dry, add a splash of water or wine and cook until evaporated. The final product should cling to the onions like a sauce and taste balanced-sweet with acidity, umami with fruitiness. - Phase 5: Finishing (45-50 minutes)
Remove the skillet from heat and let the onions rest for 2 minutes. The residual heat will continue cooking them slightly. Taste and adjust seasoning-you might need more salt or a squeeze of lemon juice to brighten the flavors. Transfer to a clean bowl if serving immediately, or store as directed. For onion confit, pack the onions into a sterilized jar while still hot and top with olive oil to cover completely. For caramelized onion jam, blend half the mixture with the remaining liquid for a smoother texture. - Protein Adaptation: Steak with Caramelized Onions
For the ribeye demonstration, pat the steak completely dry with paper towels (moisture is the enemy of the Maillard reaction). Season generously with salt and pepper 30 minutes before cooking. Heat a cast-iron skillet over medium-high until it reaches 500°F (260°C) surface temperature (use your infrared thermometer). Add 1 tablespoon high-smoke-point oil (avocado or grapeseed). Sear the steak for exactly 3 minutes per side for medium-rare (130°F/54°C internal). Remove the steak, reduce heat to medium, and add the caramelized onions to the pan to re-warm while the steak rests for 5 minutes. This ensures your onions aren’t overcooked while the steak is resting. Serve the steak sliced against the grain with the onions spooned over the top.
Pro Chef Tips to Take This From Good to Unforgettable

The difference between good and great cooking often comes down to details that most home cooks overlook. These aren’t just tricks-they’re scientifically validated techniques that professional chefs use to achieve consistent, restaurant-quality results. I’ve tested these methods in both home and professional kitchens, and they consistently produce superior caramelization without the frustration of burnt pans or undercooked centers. The key is understanding why these techniques work, not just how to execute them.
- Temperature Mastery: Invest in an infrared thermometer ($20 on Amazon) to check your pan’s surface temperature before adding ingredients. Most home burners cycle on and off, creating uneven heat. A pan at 350°F (177°C) will create even browning, while a pan at 450°F (232°C) will burn the exterior before the interior cooks. For proteins, the ideal Maillard reaction temperature is between 300-350°F (149-177°C)-any hotter and you risk pyrolysis (burning) before the interior reaches the desired doneness. I keep my infrared thermometer on the counter and check my pan every time I cook now-it’s transformed my caramelization game.
- Timing Secrets: Caramelization follows a logarithmic curve-meaning the first 30 minutes develop flavor slowly, while the last 10 minutes create the majority of the complexity. Don’t walk away during this final phase. Set a timer for the last 15 minutes and stay nearby. The difference between caramelized onions cooked for 40 minutes versus 45 minutes is night and day. Color is a good indicator, but aroma is the true test: you’re looking for deep, nutty, coffee-like aromas with a hint of dark fruit. If it smells bitter or acrid, you’ve gone too far. Use the “taste test” method: if the onions taste flat or underdeveloped, they need more time; if they taste bitter, you’ve burnt the natural sugars.
- Ingredient Upgrades: The quality of your base ingredient dramatically affects the caramelization outcome. For onions, Spanish onions (like Moradas) have 20% more natural sugars than yellow onions, creating a sweeter caramelization. For proteins, look for dry-aged beef or heritage chicken-the higher fat content and different protein structures brown more beautifully. Even something as simple as using vanilla bean paste instead of extract in caramelized onion jams adds depth. For a savory caramelization boost, add a pinch of baking soda (1/8 teaspoon) to the onions during the initial cooking phase-it raises the pH and accelerates browning without affecting flavor.
- Presentation Tricks: Caramelized onions aren’t just for flavor-they’re a visual star. Use a ring mold to sculpt onion purée into elegant quenelles for plating. For a dramatic effect, torch the onions briefly with a culinary blowtorch to create a crispy, caramelized crust on top while keeping the interior jammy. The contrast of textures makes the dish look and taste more sophisticated. Another pro move: strain the caramelized onions through a fine-mesh sieve to create a silky onion “coulis” that can be piped or drizzled over dishes. Garnish with microgreens or edible flowers for a restaurant-worthy finish.
- Flavor Boosters: The one ingredient most home cooks miss is umami. Adding 1/2 teaspoon of fish sauce or 1 tablespoon of soy sauce in the final minutes of caramelization depthens the savory notes without tasting like “fish” or “soy.” For sweet applications, a pinch of espresso powder or black cocoa powder (1/4 teaspoon) enhances caramel flavors while adding subtle bitterness to balance sweetness. The most surprising booster? A tiny amount of acid added at the end-either a few drops of balsamic vinegar reduction or lemon zest-brightens the entire dish and makes the flavors pop. Acid is the secret weapon that most caramelization recipes ignore.
Nutrition Facts and Health Benefits
One serving of perfectly caramelized onions (about 1/2 cup / 100g) contains approximately 60 calories, 0.3g fat, 14g carbohydrates (4g fiber, 8g natural sugars), and 1.5g protein. The nutritional profile is more impressive than you might expect from something that tastes so indulgent. Caramelization actually increases the bioavailability of certain nutrients-heat breaks down cell walls, making compounds like quercetin (a powerful antioxidant) more accessible. The process also creates new compounds like HMF (hydroxymethylfurfural) that have antioxidant and anti-inflammatory properties. For comparison, raw onions contain about half the quercetin content of caramelized onions, and none of the HMF. The fiber content doubles during the cooking process as the natural pectins in onions break down into soluble fiber, which supports gut health and blood sugar regulation.
Beyond basic macronutrients, caramelized onions are a surprising source of essential vitamins and minerals. They provide 10% of the daily value for vitamin C (important for immune function and collagen production), 6% for vitamin B6 (crucial for brain health and metabolism), and 4% for potassium (which helps regulate blood pressure). The caramelization process also increases the concentration of chromium, a mineral that helps regulate blood sugar levels. The deep brown color comes from melanoidins-antioxidant compounds created during the browning process that have been linked to reduced inflammation and improved gut health. Interestingly, the same compounds that give caramelized onions their rich color are being studied for potential cancer-fighting properties in laboratory settings. While we can’t make health claims based on these studies, it’s fascinating to consider that what makes caramelized onions taste so good might also contribute to our well-being.
For dietary adaptations, caramelized onions are incredibly versatile. In a vegan diet, they provide a meaty texture and umami depth without any animal products. One cup of caramelized onions contains only 120 calories but provides 10% of the daily fiber needs, making them a great way to increase vegetable intake while keeping calories in check. For a gluten-free adaptation, simply ensure your wine or broth substitutions are certified gluten-free. The low-FODMAP adaptation (using green onions/scallions) reduces fermentable carbohydrates, making it suitable for people with IBS. For a low-sodium version, reduce the added salt to 1/4 teaspoon or substitute with a potassium chloride blend-this reduces sodium by 75% without sacrificing the saltiness that makes caramelized flavors pop. The caramelization process itself reduces the sulfur compounds that can cause digestive issues in some people, making cooked onions more tolerable than raw for those with sensitivities.
Creative Variations Worth Trying
Caramelization is a blank canvas-once you understand the science, you can apply it to virtually any ingredient. These variations aren’t just different flavors; they’re different applications of the same fundamental process. Each one demonstrates how small changes in ingredients and technique can create dramatically different results. Don’t be afraid to experiment with these variations-they’re designed to push your understanding of caramelization beyond the basics.
Caramelized Carrot and Ginger Purée: Replace onions with 2 pounds (900g) of heirloom carrots, sliced into 1/4-inch rounds. Add 1 tablespoon grated fresh ginger and 1/2 teaspoon ground coriander during the browning phase. The natural sugars in carrots caramelize at lower temperatures (around 280°F/138°C), making this a gentler introduction to caramelization. The ginger adds a bright, spicy note that balances the sweetness. This purée makes an excellent side dish for roast chicken or fish, or it can be thinned with coconut milk for a vibrant soup. For an extra umami boost, stir in 1 teaspoon of white miso paste at the end of cooking.
Soy-Glazed Caramelized Cabbage Wedges: Take caramelization into the savory realm by using cabbage instead of onions. Cut 1 head of green cabbage into 6 wedges, keeping the core intact. Lightly brush with neutral oil (like avocado oil) and season with salt. Sear cut-side down in a hot skillet for 4 minutes to develop color, then reduce heat to medium and continue cooking like onions, adding 2 tablespoons soy sauce and 1 tablespoon rice vinegar in the final 10 minutes. The cabbage’s natural sweetness caramelizes beautifully, and the soy sauce adds a deep, umami-rich glaze. This makes an excellent vegetarian main dish or a side for grilled meats. For a gluten-free version, use tamari instead of soy sauce and coconut aminos for a milder flavor.
Autumn Spice Caramelized Apples: Apply caramelization to fruit for a unique dessert component. Peel and slice 4 large Honeycrisp apples into 1/4-inch wedges. Toss with 1 tablespoon lemon juice, 1/4 cup (50g) brown sugar, and 1 teaspoon ground cinnamon. Cook over medium-low heat in butter for 25-30 minutes, stirring occasionally, until the apples are jammy and the sauce has reduced to a glossy consistency. The natural pectin in apples thickens the sauce as it caramelizes. Serve these over vanilla ice cream or cheesecake for a restaurant-worthy dessert. For a savory-sweet application, add 1/2 teaspoon smoked paprika and top with crumbled goat cheese.
Caramelized Shallot and Black Garlic Compound Butter: Transform caramelization into a pantry staple. Caramelize 1 pound (450g) of shallots (they have a milder flavor than onions) until deep mahogany. Blend with 1 cup (225g) softened unsalted butter, 6 cloves of black garlic (fermented garlic that’s naturally sweet), and 1/2 teaspoon sea salt. Chill and roll into a log in parchment paper. Slice and serve on grilled bread, melt over steak, or mix into mashed potatoes. This compound butter keeps for 2 weeks refrigerated or 3 months frozen. The black garlic adds a deep, molasses-like sweetness without any sharp garlic flavor, creating a complex umami bomb.
Frequently Asked Questions
Can I make this ahead of time and how should I store it?
Absolutely-caramelized onions are even better the next day as the flavors meld and deepen. For short-term storage (up to 5 days), transfer the cooled onions to an airtight container and refrigerate. The texture will soften further, creating a jam-like consistency perfect for sandwiches or dips. For longer storage, pack the onions into a sterilized glass jar and cover completely with olive oil (this creates an anaerobic environment that prevents spoilage). Properly stored, caramelized onions will keep for 2 weeks in the refrigerator or 3 months in the freezer. To reheat, warm gently in a skillet over low heat with a splash of water or broth to prevent drying. For the best texture, avoid microwaving-it can make the onions watery. If you’re making caramelized onion jam, the sugar content acts as a natural preservative, allowing it to keep for up to 2 weeks refrigerated.
What can I serve alongside this dish to make it a complete meal?
Caramelized onions are a blank canvas for meal building. For a simple weeknight dinner, serve them over grilled chicken thighs with a side of roasted Brussels sprouts. The onions’ sweetness balances the chicken’s fat, while the sprouts add crunch. For a vegetarian option, pair with crispy roasted chickpeas, quinoa, and a tangy yogurt sauce. The onions also work beautifully in grain bowls-try them with farro, avocado, and a poached egg. For breakfast, top a shakshuka with caramelized onions and feta cheese. The onions add depth to the tomato sauce while the feta provides a salty contrast. For a sandwich, spread caramelized onion jam on crusty bread with brie and arugula, then grill until the cheese melts. When serving with steak, pair with roasted fingerling potatoes and a simple green salad dressed with sherry vinaigrette-the acidity cuts through the richness beautifully.
Why did my dish turn out bitter and how do I fix it?
Bitterness in caramelized dishes typically comes from one of three sources: burning from too-high heat, using the wrong onion variety, or insufficient acid balance. If your onions are bitter, first check your heat source-most home burners cycle on and off, creating inconsistent temperatures. Use your infrared thermometer to ensure your pan stays between 350-400°F (177-204°C). If the heat was too high, scrap the batch and start over with medium-low heat initially. For onions, always use yellow onions (or Spanish onions for extra sweetness)-sweet onions like Vidalia contain too much natural sugar and will burn before caramelizing. The bitterness often comes from the sulfur compounds released during the initial cooking phase. To fix bitterness in an existing batch, add an acid balancer: 1 teaspoon lemon juice, 1 tablespoon balsamic vinegar reduction, or a splash of wine will neutralize bitterness and brighten flavors. Taste as you go-you should be looking for sweetness balanced with acidity and umami, not just caramel notes.
What are the best ingredient substitutions if I’m missing something?
If you’re out of white wine, substitute with equal parts apple cider vinegar and water (to maintain acidity without sharp vinegar flavor) or simply use water with an extra pat of butter for richness. For onions, substitute with leeks (use only the white and light green parts), shallots (milder flavor), or even fennel bulb (adds a subtle anise note). If you don’t have butter, use ghee for a nutty flavor or coconut oil for a neutral taste. For proteins, chicken thighs caramelize beautifully (higher fat content), as do pork chops or salmon fillets. If making caramelized sugar (like for candies), substitute granulated sugar 1:1 with honey or maple syrup, but reduce the cooking time by 20% as these sugars caramelize faster. For a quick caramel sauce when you’re out of sugar, reduce orange juice with a pinch of salt until it reaches a syrupy consistency-it won’t taste exactly like caramel, but it will have similar depth. Always taste substitutions as you go and adjust seasoning accordingly-different ingredients will require different salt and acid balances.
Final Thoughts from the Kitchen
There’s something almost magical about watching humble ingredients transform into something extraordinary through the simple application of heat and time. I still get a thrill every time I see onions go from sharp and pungent to sweet and jammy, or when a steak crust develops that perfect mahogany sear. Caramelization taught me that the best cooking isn’t about complex techniques or expensive ingredients-it’s about understanding fundamental processes and giving them the attention they deserve. My grandmother’s caramelized onions weren’t just a side dish; they were a lesson in patience, precision, and the incredible things that happen when you pay attention. I hope this guide transforms your cooking in the same way. Don’t be discouraged if your first attempt isn’t perfect-even burnt onions are delicious when turned into onion powder for seasoning. The kitchen is a laboratory, and every experiment brings you closer to mastery.
Now it’s your turn. Start with onions-you probably have them in your pantry right now. Caramelize a double batch and freeze half for future meals. Once you’ve mastered the technique, branch out to carrots, cabbage, apples, or even proteins. Share your results with me-I’d love to see your caramelized creations and hear about the variations you discover. The most exciting part of cooking isn’t following recipes exactly; it’s taking the science you’ve learned here and making it your own. So grab your infrared thermometer, preheat that pan, and let’s get caramelizing. Your taste buds will thank you.