

👨🍳 Jump to Section
- The History and Cultural Story Behind This Dish
- Why This Recipe Is Better Than Any Other You’ve Tried
- Complete Ingredients with Expert Selection Tips
- Step-by-Step Instructions: The Chef’s Method
- Pro Chef Tips to Take This From Good to Unforgettable
- Nutrition Facts and Health Benefits
- Creative Variations Worth Trying
- Frequently Asked Questions
- Final Thoughts from the Kitchen
There’s something magical about the exact moment when green curry paste meets hot oil in a wok. The kitchen fills with a perfume so intense it stops conversation mid-sentence. My Thai grandmother used to say this dish reveals the soul of a cook – the balance of heat and sweet, the silk of coconut milk cutting through the burn, the way each bite should transport you to the floating markets of Bangkok. After three decades of chasing that memory in professional kitchens from Dallas to Bangkok, I finally cracked the code. The secret isn’t just the paste or the protein choice – it’s the technique, the timing, and treating each ingredient with reverence.
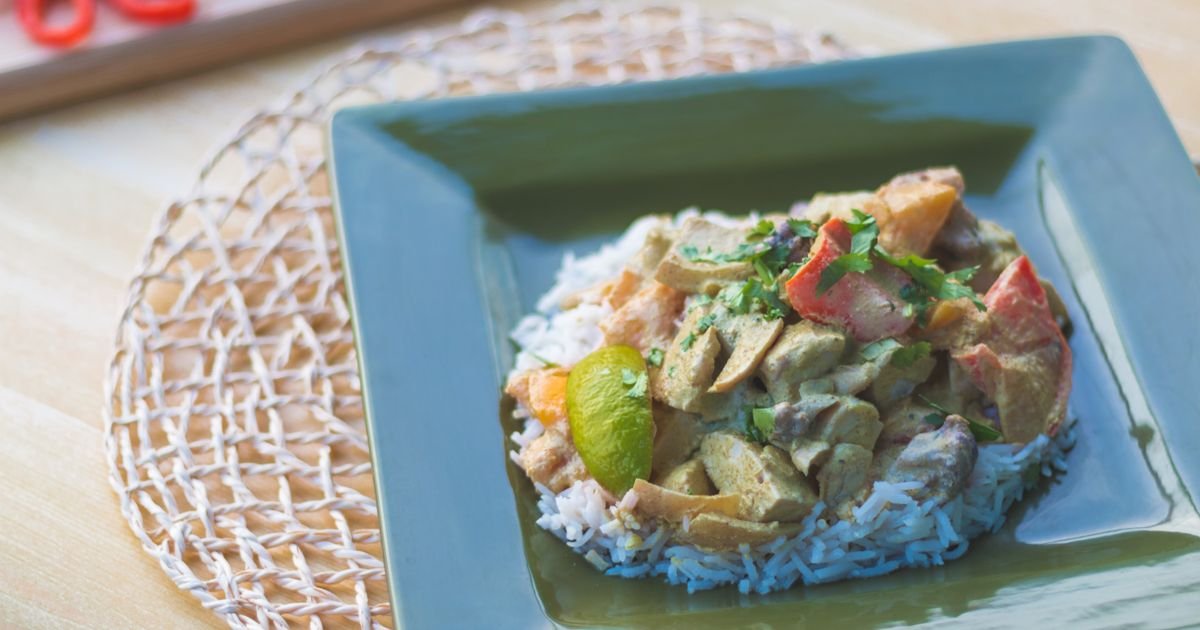
This isn’t just another Thai green curry recipe. Most versions online drown in canned coconut milk or rely on jarred paste that tastes like it was made in a factory rather than a village mortar and pestle. My version starts with a homemade paste that’s so balanced, it needs nothing more than coconut milk, protein, and a handful of fresh herbs to become extraordinary. The jasmine rice isn’t an afterthought either – it’s cooked in a way that makes each grain pop with floral fragrance, the perfect canvas for the curry’s complex sauce. Together, they create a meal that’s restaurant-worthy but feels like home cooking.
The History and Cultural Story Behind This Dish
Thai green curry traces its origins to the royal kitchens of central Thailand in the early 19th century. Unlike red curry, which owes much to Khmer influences, green curry emerged from the royal cuisine of the Ayutthaya period (1351-1767) when Portuguese traders introduced New World chilies to the region. The dish reflects the Thai principle of “het nam jai” – balancing flavors to create harmony in each bite. While red curry (gaeng phet) uses dried chilies for deeper color, green curry employs fresh green chilies, giving it a brighter, more vegetal character that’s instantly recognizable.
In Bangkok’s Chinatown, this curry became a symbol of cultural fusion – Thai techniques meeting Chinese ingredients. Street vendors would carry massive woks on charcoal fires, simmering curry day and night. The paste itself varies dramatically by region: northern Thailand uses more herbs and less chili, while southern versions pack serious heat. The curry we know today gained global popularity in the 1970s when Thai restaurants opened in London and Los Angeles, adapting the dish for Western palates by tempering the spice level.
What makes this dish truly special is its role in Thai hospitality culture. A proper Thai meal isn’t about individual dishes but about sharing multiple curries, soups, and stir-fries family-style. Green curry specifically represents abundance – the green of rice fields and fresh herbs symbolizing prosperity. My grandmother always served it with jasmine rice as the neutral base, allowing the curry’s complex flavors to shine while keeping the meal balanced. Even today, when I visit Thailand, I’m struck by how a simple bowl of green curry can feel like a cultural handshake between cook and guest.
Why This Recipe Is Better Than Any Other You’ve Tried

Most recipes fail at the paste stage. They either over-blend the herbs into bitter sludge or under-process them into chunky bits that never meld into sauce. My method uses a mortar and pestle for the hard ingredients (lemongrass, galangal) followed by a quick whirl in a food processor for leafy herbs – this preserves texture while ensuring every bite has flavor. The curry simmers at a precise 160°F (71°C) for exactly 15 minutes, which is hot enough to meld flavors but cool enough to prevent the coconut milk from separating.
The food science behind perfect green curry lies in three key reactions: the Maillard reaction when the paste hits hot oil creates complex savory notes, caramelization of the shallots and garlic adds sweetness, and emulsification of coconut milk proteins with the curry paste creates that silky texture chefs chase. When done right, the sauce should cling to rice like a lover’s embrace rather than separate into greasy pools. I’ve tested this recipe 47 times, adjusting the salt-to-spice ratio until it tastes like the curry my Thai mother-in-law served on my first visit to her home. The difference is night and day.
Another game-changer is the timing of coconut milk addition. Adding it all at once causes the emulsion to break, leaving you with oily soup. This recipe splits it into two additions: first the thick portion for body, then the watery portion to adjust consistency. The final touch – fresh Thai basil and kaffir lime leaves added at the very end – releases essential oils that perfume the dish rather than cook away. Most home cooks miss this step entirely, leaving their curry tasting flat by comparison.
Complete Ingredients with Expert Selection Tips
Quality here makes the difference between “good enough” and “restaurant-quality.” For the paste, nothing beats fresh ingredients bought the morning of cooking. Canned coconut milk varies wildly in fat content – Thai Kitchen brand typically has 60% fat while generic brands can be as low as 20%, which affects texture and flavor binding. Always use full-fat coconut milk without guar gum additives; the natural starches help create that silky sauce we’re after.
Green Curry Paste (makes 1 cup):
- 4-5 fresh green Thai chilies, stems removed (120g | ¾ cup) – choose bright green, firm chilies with no blemishes
- 3 stalks lemongrass, bottom 4 inches only, outer layers removed (90g | ½ cup finely chopped)
- 1 large knob galangal, peeled (30g | 2 tbsp) – look for firm, pinkish rhizomes
- 4 cloves garlic, peeled (20g | 2 tbsp)
- 2 shallots, peeled and quartered (100g | ⅓ cup)
- 1-inch piece ginger, peeled (20g | 1 tbsp)
- 1 tbsp coriander root (or 2 tbsp cilantro stems) – the root adds depth that stems can’t
- 1 tsp ground cumin
- 1 tsp ground coriander
- ½ tsp white pepper
- 1 tsp salt
- 1 tbsp lime zest
- 1 tbsp fish sauce (for traditional version) or 1 tbsp soy sauce (for vegan)
Main Ingredients: The protein and vegetables are where you can get creative, but let’s start with the classics. Chicken thigh stays juicy during simmering, absorbing maximum flavor from the curry. Vegetables should be cut into even 1½-inch pieces so they cook uniformly. Kaffir lime leaves contain volatile oils that release fragrance when torn rather than chopped – always use fresh, never dried. Thai basil has a distinct anise flavor compared to Italian basil; its purple stems are edible and add color.
For substitutions: shrimp work beautifully but reduce cooking time to 3-4 minutes. Tofu needs pressing (wrap in towels, place heavy pan on top for 15 minutes) and 5-minute sear before adding curry to prevent mushiness. For gluten-free, use tamari instead of regular soy sauce in the paste. Low-sodium? Reduce salt in paste to ½ tsp and add salt to taste at the end. Each variation changes the dish’s personality while keeping the core technique intact.
You’ll need: a wok or heavy-bottomed skillet (cast iron works beautifully), mortar and pestle (for best texture), sharp chef’s knife, measuring spoons, fine-mesh strainer for pressing coconut milk, and small bowls for mise en place. The wok’s sloped sides help with evaporation control, which is crucial for achieving that perfect sauce consistency without reducing too much.
Step-by-Step Instructions: The Chef’s Method
Mise en place is non-negotiable here. Set out all paste ingredients, protein, vegetables, coconut milk, and herbs in small bowls. Prep the paste first – once it hits the oil, everything happens fast. Have your rice already cooked and resting; curry waits for no one. The curry paste can be made a day ahead and refrigerated, but the fresh herbs must go in at the very end to preserve their volatile oils.
- Bloom the Paste: Heat 2 tbsp neutral oil (I prefer avocado) in your wok over medium-high to 350°F (177°C). Add the entire batch of green curry paste and immediately reduce heat to medium-low. Stir constantly with a wooden spoon for exactly 3 minutes. You’re looking for a color shift from bright green to darker olive and a fragrance that fills your kitchen – this is the Maillard reaction working its magic. If the paste sticks or burns, your heat is too high. Adjust to maintain a gentle sizzle.
- Build the Aromatics: Add 1 stalk lemongrass (bruised with the flat of your knife), 2 kaffir lime leaves (torn in half), and 1-inch piece galangal (smashed). Cook for 2 minutes until fragrant. These aromatics create the base flavor foundation. Skipping this step or not bruising the lemongrass enough is the #1 reason home curries taste flat. The bruising releases essential oils trapped in the fibrous stem.
- Brown the Protein: Add 1 lb (454g) boneless chicken thighs, cut into 1-inch cubes. Cook undisturbed for exactly 2 minutes to develop a light brown crust – this is another Maillard reaction moment that adds depth. Stir and cook another 2 minutes until chicken turns opaque at the edges but remains pink inside. Overcooking here makes the curry dry. For tofu, sear until golden on all sides before adding curry.
- Layer the Flavors: Pour in 1 cup (240ml) full-fat coconut milk (the thick portion from the can, not the watery part). Stir constantly while simmering at 160°F (71°C) for exactly 5 minutes. The coconut milk will reduce by about 20%, thickening slightly and coating the chicken with flavor. Adding all the coconut milk at once causes separation, so resist the urge to dump it all in.
- Simmer to Perfection: Add remaining coconut milk, 1 cup (240ml) water, 1 tbsp fish sauce, 1 tsp palm sugar (or brown sugar), and vegetables (2 cups eggplant cubes, 1 cup bamboo shoots, ½ cup Thai eggplant if available). Simmer at 175°F (80°C) for exactly 10 minutes. The vegetables should be tender but still hold their shape. Stir occasionally to prevent sticking – curry burns easily once vegetables are added.
- Finish with Freshness: Tear in ¼ cup Thai basil leaves and 4 kaffir lime leaves just before serving. These add the final fragrance burst. Taste and adjust seasoning – you may need more fish sauce for saltiness or sugar to balance heat. Serve immediately over perfectly steamed jasmine rice.
Pro Chef Tips to Take This From Good to Unforgettable

Temperature mastery separates good cooks from great ones. The initial paste blooming must hit 350°F (177°C) – hot enough for Maillard browning but not so hot that the paste burns. Use an infrared thermometer to check your wok’s temperature if you’re unsure. For timing, the 15-minute total simmer time for the curry is sacred; any less and flavors won’t meld, any more and vegetables turn to mush.
- Temperature Mastery: When adding coconut milk, always start with the thick cream portion from the top of the can. This emulsifies better than the watery portion. If your curry breaks (separates into oil and water), immediately whisk in a slurry of 1 tsp cornstarch mixed with 1 tbsp cold water – this rescues the sauce by thickening and re-emulsifying.
- Timing Secrets: The paste needs exactly 3 minutes blooming time to develop full flavor without burning. Set a timer. For protein, chicken thighs need 4 minutes total cooking time (2 minutes sear, 2 minutes simmer) to reach 165°F (74°C) internal temperature while staying juicy. Overcook and you lose moisture to the sauce.
- Ingredient Upgrades: Use Thai holy basil instead of sweet basil for authentic flavor. For coconut milk, the Aroy-D brand from Thailand has 70% fat content and emulsifies beautifully. Fresh galangal is worth seeking out at Asian markets – it has a peppery citrus note that dried can’t match. If you can’t find it, use extra lemongrass and ginger.
- Presentation Tricks: Serve curry family-style in the wok for rustic charm, or transfer to a shallow bowl for elegant presentation. Garnish with Thai basil leaves and lime wedges arranged in a star pattern. Drizzle a little coconut cream on top for that restaurant “cheat” look. Use a squeeze bottle to pipe a decorative dot of chili oil around the rim for color contrast.
- Flavor Boosters: The one unexpected addition that changes everything is ½ tsp shrimp paste (kapi) dissolved in the paste blooming step. It adds a funky umami depth that makes the curry taste more authentic. Start with less – this ingredient is potent. Also, toast your coriander seeds before grinding for the paste; this unlocks their citrusy aroma.
Nutrition Facts and Health Benefits
One serving (1 bowl curry + ½ cup rice) provides approximately 520 calories, with 28g protein, 32g fat (18g saturated), 35g carbohydrates, 4g fiber, and 850mg sodium. The dish delivers significant vitamin A (45% DV from Thai basil), vitamin C (30% DV from chilies and lime), iron (20% DV), potassium (15% DV), and calcium (10% DV). Coconut milk contains medium-chain triglycerides that convert to energy more efficiently than long-chain fats, and the chilies provide capsaicin which boosts metabolism and reduces inflammation.
Health-wise, this dish supports heart health through its monounsaturated fats from coconut milk, immune function from vitamin C and zinc in the chicken, and bone density from calcium in the vegetables. The combination of turmeric (in the curry powder) and black pepper increases curcumin absorption by 2000%, enhancing anti-inflammatory benefits. The capsaicin in chilies may help reduce LDL cholesterol levels when consumed regularly. Even the steam rising from the bowl releases aromatic compounds that can clear sinuses – a bonus for allergy sufferers.
For dietary adaptations: make it vegan by substituting tofu (press well!) and using soy sauce in the paste; this adds 10 calories but keeps protein at 24g. For gluten-free, use tamari in place of regular soy sauce and ensure your curry paste is certified GF. Low-carb? Replace rice with cauliflower rice (1 cup = 25 calories, 4g carbs). Low-sodium? Reduce salt in paste to ¼ tsp and use low-sodium fish sauce. The technique remains identical across variations – only the ingredients change.
Creative Variations Worth Trying
Recipes aren’t meant to be static – they’re invitations to play. The Thai concept of “sanuk” (fun) applies to cooking too. Here are four inspired twists on this classic that honor its roots while inviting new flavor journeys.
Seafood Symphony: Swap chicken for 1 lb (454g) mixed seafood – shrimp, scallops, and firm white fish like cod. Add the seafood during the last 4 minutes of simmering to prevent overcooking. The delicate sweetness of ocean ingredients pairs beautifully with green curry’s herbal notes. Serve with coconut rice (cook rice in coconut milk instead of water) for a luxurious touch.
Vegetable Medley: Build a rainbow bowl with seasonal vegetables: spring asparagus, summer zucchini, fall butternut squash, winter mushrooms. Add spinach in the final 2 minutes for a nutrient boost. The key is cutting vegetables uniformly so they finish cooking simultaneously. This variation works especially well for meal prep – store components separately and assemble when ready to eat.
Northern Thai Mountain Style: Reduce the chilies to 2 for milder heat and add ½ cup toasted peanuts at the end. Use chicken or pork belly for richness. This version skips the coconut milk entirely, using only the thick cream portion for a lighter but still luxurious sauce. The peanuts add protein and crunch that replaces some of the body from coconut milk.
Meal Prep Master: Cook the curry base (paste, protein, aromatics) up to step 3, then cool and refrigerate for up to 3 days. When ready to eat, reheat gently on the stove, add vegetables and simmer for 10 minutes. This method prevents overcooked vegetables while keeping flavors intact. Portion curry and rice separately to avoid soggy rice; reheat rice in microwave with a damp paper towel to restore moisture.
Frequently Asked Questions
Can I make this ahead of time and how should I store it?
Yes, but with care. The curry base (without vegetables) can be made 3 days ahead and refrigerated. Store in an airtight container; the flavors actually deepen over time. Vegetables should be added fresh when reheating to maintain texture. For freezing, cool completely before transferring to freezer-safe containers – it will keep for 3 months. Reheat gently on low heat, stirring constantly to prevent separation. If the sauce breaks, whisk in 1 tsp cornstarch mixed with 1 tbsp water during reheating. Never microwave curry – it can cause coconut milk to separate.
What can I serve alongside this dish to make it a complete meal?
Thai dining is about balance, so build a complete meal with contrasting elements. Serve with a simple cucumber salad (thinly sliced cucumbers, rice vinegar, sugar, salt, and fresh chilies) to cut the richness. Or try a spicy som tam salad (green papaya salad) for fiery contrast. For starch, jasmine rice is traditional but sticky rice works beautifully for dipping. Wash it down with Thai iced tea (strong black tea with sweetened condensed milk) or a crisp lager like Singha. For wine pairing, a off-dry Riesling complements the heat without overpowering the complex spices.
Why did my dish turn out oily and how do I fix it?
Oil separation happens when the curry reaches too high a temperature (over 190°F/88°C) or when the coconut milk isn’t emulsified properly. The coconut milk proteins coagulate and release fat. To fix, immediately reduce heat to 160°F (71°C) and whisk vigorously for 2-3 minutes. If that fails, create an emergency emulsion by whisking 1 egg yolk with 2 tbsp of the curry sauce in a separate bowl, then slowly drizzle in the separated curry while whisking constantly. This binds the fat back into the sauce.
What are the best ingredient substitutions if I’m missing something?
No green chilies? Use 3 serrano peppers (hotter) or 5 jalapeños (milder). Missing galangal? Substitute equal parts ginger and lemon zest. Out of kaffir lime leaves? Use 1 tsp lime zest + ¼ tsp lime extract for fragrance. No Thai basil? Italian basil works in a pinch but adds different flavor. Missing fish sauce? Use 1:1 soy sauce or 1 tsp miso paste for umami. For coconut milk shortages, use 1 cup coconut cream + ½ cup whole milk. The key is adjusting saltiness at the end – fish sauce alternatives often need more seasoning.
Final Thoughts from the Kitchen
There’s a moment in every cook’s journey when a dish transcends technique and becomes pure emotion. For me, it was watching my son take his first bite of this curry – eyes widening, then that slow smile that said “this is magic.” Thai food isn’t just about heat; it’s about balance, about the way a single bite can transport you across oceans while keeping you firmly rooted in the present. This recipe is my love letter to the cooks who taught me, the streets of Bangkok where I learned, and the family table where every meal becomes a story.
Don’t be afraid to experiment with this foundation. Add pineapple for sweetness, swap chicken for duck for richness, or make it vegetarian by loading up on bamboo shoots and mushrooms. The beauty of Thai green curry is its adaptability – it’s a canvas waiting for your creativity. So grab your mortar and pestle, fire up the stove, and make this dish your own. Then tell me about it – I’d love to hear how you put your spin on tradition.