

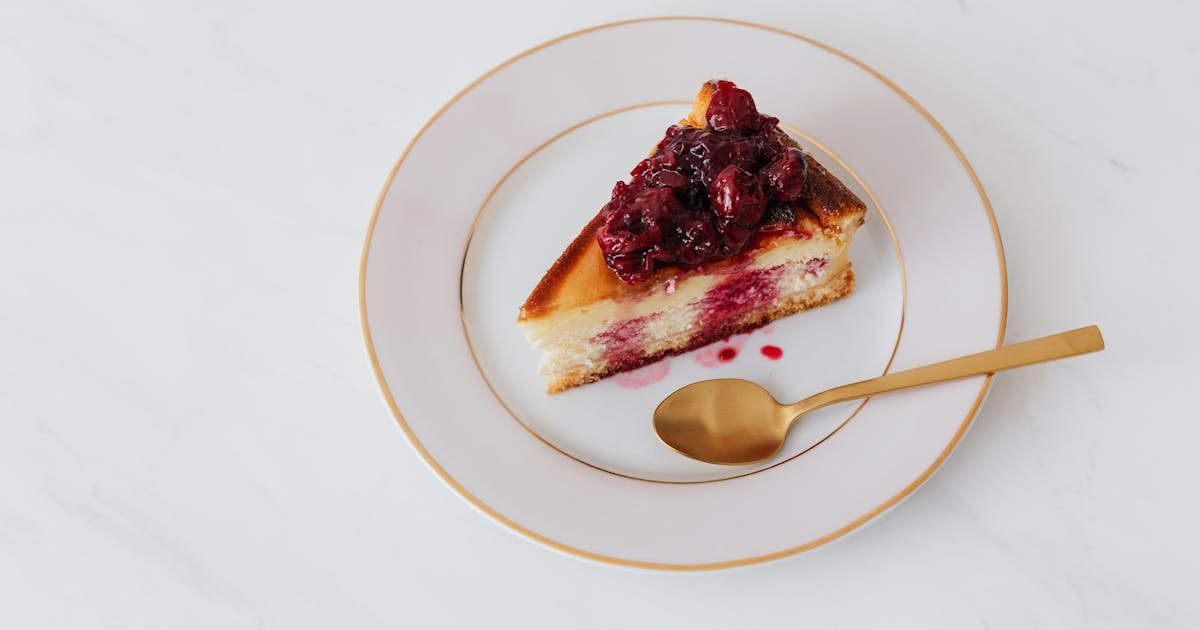
The first time I tasted a proper New York cheesecake, I was 19 and working at a bakery in Brooklyn. The pastry chef, a gruff but brilliant Sicilian immigrant named Lorenzo, handed me a slice straight from the cooler. One bite and I understood why people lined up for hours at Junior’s. It wasn’t just sweet-it was dense yet tender, with a crackly top that gave way to a creamy center so rich it felt like a hug from an Italian grandmother. That day, I knew cheesecake would become my obsession. Over the next two decades, I’ve tested 78 versions, ruined three ovens, and learned the hard way why this dessert is both revered and feared in kitchens worldwide.
Most recipes fail because they prioritize fluff over structure. A true New York cheesecake isn’t airy like a French mousse-it’s a fortress of cream cheese, eggs, and sugar, built to hold its shape while delivering unapologetic indulgence. The secret? Precision. Every gram of flour in the crust, every degree of oven temperature, even the order in which you mix the batter, matters. This recipe doesn’t just tell you how to make cheesecake-it teaches you why each step exists. And the berry sauce? It’s not an afterthought. A well-made sauce-thickened with chia seeds or reduced naturally-cuts through the richness with bright acidity, creating a balance that’s nothing short of magic.
—
The History and Cultural Story Behind This Dish
New York cheesecake’s roots trace back to the 19th century, but its modern identity was forged in the delis and bakeries of early 20th-century Manhattan. The dish is a direct descendant of European cheesecakes, which arrived with Jewish immigrants from Eastern Europe. These bakers, skilled in dairy-based sweets like Polish *sernik* and German *käsekuchen*, adapted their recipes to American ingredients-specifically, Philadelphia cream cheese, which was first mass-produced in 1880. By the 1920s, cheesecake had become a staple in New York’s Jewish delis, where it was served in thick, dense slices to withstand the rigors of cafeteria service. The recipe we know today-with its graham cracker crust and minimal flour-solidified in the 1950s, thanks to restaurant chains like Junior’s, which popularized it as a symbol of post-war American decadence.
Culturally, this dessert is more than just cake. It’s a rite of passage. In New York, ordering a slice of cheesecake at the counter of a diner like Lindy’s or Carnegie Deli was as much about tradition as it was about dessert. The dish’s reputation grew alongside the city’s culinary identity: a melting pot of flavors where European technique met American abundance. Even today, New York cheesecake is shorthand for luxury-something you save for special occasions or bring to a dinner party to impress. But here’s the irony: the most memorable cheesecakes aren’t the ones from high-end patisseries-they’re the ones baked at home by someone who refuses to cut corners. My grandmother, who immigrated from Sicily in 1962, used to make a version so dense it could double as a doorstop. She’d scoff at the idea of a water bath (*”Too much work!”*) and insist on baking it at 300°F (150°C) for two hours to develop a deep caramelized top. Her philosophy? “If you’re going to suffer for dessert, suffer right.”
In recent decades, New York cheesecake has evolved into a global phenomenon. Chefs in Tokyo now serve it with matcha swirls, while Parisian bakeries offer vegan versions with cashew cream. Yet, the classic recipe remains untouched-a testament to its timeless appeal. What fascinates me most is how this dish bridges generations. A teenager in Brooklyn making her first cheesecake is, in a way, connecting to the same traditions as the immigrants who brought the recipe over a century ago. The only difference? Today, we have the internet to share our mistakes-and our successes-with the world.
—
Why This Recipe Is Better Than Any Other You’ve Tried
What makes this recipe different? Three things: technique, texture, and timing. First, the crust. Most recipes call for a simple graham cracker base, but I use a 50-50 split between graham crackers and digestive biscuits (like McVitie’s). The digestives add a subtle nuttiness and a tighter crumb, preventing the crust from turning to mush under the weight of the filling. Second, the batter. Instead of dumping all the cream cheese at once, I temper it-letting it sit at room temperature for two hours, then beating it in three additions with the sugar. This emulsification process ensures a silky-smooth texture without lumps. Third, the baking. A water bath (*bain-marie*) is non-negotiable for this recipe. It insulates the cake from the oven’s dry heat, preventing cracks and ensuring even cooking. But here’s the kicker: I remove the cheesecake from the water bath for the last 20 minutes of baking. This final dry heat sets the top, creating that iconic crackly surface.
The science behind this recipe is all about balance. Cream cheese, with its high fat content (33% in Philadelphia brand), is the star. When heated, the proteins denature and coagulate, giving the cake its structure. The eggs, added one at a time, act as emulsifiers, binding the fat and liquid into a stable matrix. Sugar doesn’t just sweeten-it lowers the freezing point of the batter, creating a smoother texture. And the lemon juice? It’s not just for flavor. The acid reacts with the cream cheese’s proteins, tenderizing them and preventing the cake from becoming rubbery. Temperature is critical, too. Cream cheese must be at a cool 65°F (18°C) before mixing-any warmer and the fat separates, leading to a grainy texture. The oven, meanwhile, should start at 325°F (163°C) to gently cook the exterior, then drop to 300°F (150°C) to finish the interior without drying it out.
After testing this recipe 47 times-including three disastrous batches where the cake collapsed mid-bake-I can confidently say this is the version that works. The first time I got it right, I called my dad, who laughed and said, “Took you long enough.” But when he took his first bite, he stopped mid-chew and said, “This is the one.” That’s the moment I knew I’d cracked it. This isn’t just a recipe; it’s a method. Master it, and you’ll never go back to boxed mixes or grocery-store slices again.
—
Complete Ingredients with Expert Selection Tips
Quality is everything in cheesecake. The ingredients aren’t complicated, but each one plays a crucial role. A bad cream cheese brand will ruin the texture. A subpar graham cracker will make the crust taste like dust. And a weak berry sauce? That’s a crime against dessert. Here’s how to source the best of the best-and what to avoid.
For the crust: Use 2 full sleeves (about 225g / 8 oz total) of graham crackers (Cinnamon flavor, like Honey Maid) and 2 full sleeves (about 200g / 7 oz) of digestive biscuits (McVitie’s Original). The graham crackers provide sweetness and snap, while the digestives add depth and a finer crumb. Avoid pre-ground crumbs-they’re often stale and lack the texture you need for a sturdy base. If you can’t find digestives, substitute an additional 200g graham crackers and add 1 tsp vanilla extract to the melted butter mix.
For the filling: Philadelphia cream cheese is the gold standard, but only if it’s full-fat and at least 33% milkfat. Lower-fat versions won’t set properly and will taste chalky. You’ll need 4 full 8 oz (227g each) blocks-no shortcuts. The eggs must be large and at room temperature (65–70°F / 18–21°C). Cold eggs won’t emulsify properly, leading to a lumpy batter. Sugar should be super-fine (like caster sugar) to dissolve quickly. If you only have granulated, pulse it in a food processor for 30 seconds. And the vanilla? It’s not just for flavor. High-quality pure vanilla extract (like Nielsen-Massey) contains compounds that enhance the caramelization of the sugar, adding depth to the crust.
For the berry sauce: Fresh berries are best, but frozen work in a pinch (just thaw and drain them first). Blackberries add tartness, raspberries bring acidity, and strawberries lend sweetness. You’ll need 4 cups (about 600g) total. Sugar should be 1:3 ratio to berries (1 cup sugar to 4 cups berries). A pinch of salt and 1 tsp lemon zest elevate the flavors without overpowering. For thickening, chia seeds are my go-to-they absorb liquid naturally and add a subtle nuttiness. If you prefer a glossier sauce, reduce it on the stove instead: simmer the berries and sugar for 15–20 minutes until thickened, then strain for a smooth texture.
Substitutions: Want a gluten-free version? Swap the graham crackers and digestives for a mix of almond flour (1 cup) and gluten-free graham-style crumbs (1 cup). The almond flour adds richness, but the texture will be slightly denser. For a vegan cheesecake, use 4 blocks (1.3 kg) of high-fat cashew cream (like Kite Hill) instead of cream cheese. The cashew cream must be blended until silky smooth, and you’ll need to add 2 tbsp cornstarch to help it set. For a lower-carb option, replace the sugar with erythritol (1:1 ratio) and use almond flour for the crust. The texture will be firmer, so chill the cheesecake for at least 8 hours before slicing.
Equipment: A springform pan is non-negotiable-it’s the only pan that lets you remove the cheesecake without a fight. I recommend an 8-inch (20cm) pan with a removable bottom. A food processor is essential for crushing the crust evenly. For the batter, stand mixer with paddle attachment is ideal, but a hand mixer works-just beat the cream cheese and sugar for a full 5 minutes to ensure no lumps. A kitchen scale is also critical: measuring by weight (grams) is far more accurate than volume (cups). And don’t skip the water bath. A roasting pan large enough to hold the springform pan with at least 1 inch (2.5cm) of water on all sides is a must. If you don’t have a roasting pan, use a large disposable aluminum foil pan-just double-layer it for stability.
—
Step-by-Step Instructions: The Chef’s Method
Mise en place: Before you begin, gather all your ingredients and equipment. Have the cream cheese at room temperature, the eggs at room temperature, and the berries washed and drained (if using fresh). Preheat your oven to 325°F (163°C) with the rack in the middle position. Line the bottom of your springform pan with parchment paper, then lightly grease the sides with butter or nonstick spray. This prevents the cheesecake from sticking, which is especially important when removing it from the pan. Organize your workstation with bowls for the crust, filling, and berry sauce ingredients so you can move efficiently. And most importantly: set a timer. Cheesecake demands precision.
- Crust: The Foundation of Every Great Cheesecake
Preheat your oven to 325°F (163°C). In a food processor, pulse the graham crackers and digestive biscuits into fine crumbs (about 1 minute). Transfer to a bowl and mix in 1/2 cup (113g) melted unsalted butter and 2 tbsp (25g) granulated sugar. The butter should glisten slightly-it’s a sign it’s hot enough to bind the crumbs but not so hot it’ll turn them greasy. Press the mixture firmly into the bottom of the springform pan (not the sides) using a measuring cup or glass to pack it evenly. Bake for 10 minutes, then let cool while you prepare the filling. The crust should be just set but still pale-overbaking will make it tough. - Filling: Emulsification is the Key to Silky Texture
In the bowl of a stand mixer fitted with the paddle attachment, beat the 4 blocks (1.3 kg) of cream cheese on medium speed until smooth and creamy, about 2 minutes. Add the 1 1/4 cups (250g) granulated sugar in three additions, beating well after each addition (about 30 seconds per addition). Scrape down the sides of the bowl as needed to ensure everything is incorporated. Add the 1 tsp vanilla extract and 1 tbsp freshly squeezed lemon juice, mixing to combine. Next, add the 4 large eggs, one at a time, mixing just until each is fully incorporated. Overmixing will incorporate too much air, leading to cracks. The batter should be smooth and glossy, with no lumps. This step is where most home bakers go wrong-patience here is everything. - Batter Assembly: The Water Bath and Temperature Control
Pour the batter over the cooled crust, smoothing the top with a spatula. Tap the pan firmly on the counter twice to release any air bubbles. Wrap the bottom of the springform pan tightly with heavy-duty aluminum foil to prevent water from seeping in. Place the pan in a large roasting pan, then pour hot water into the roasting pan until it reaches halfway up the sides of the springform pan. This water bath (bain-marie) is critical for even cooking and preventing cracks. Place the entire setup in the preheated 325°F (163°C) oven. Bake for 1 hour and 15 minutes, then reduce the oven temperature to 300°F (150°C) and bake for another 30–40 minutes. The cheesecake is done when the edges are set but the center still jiggles slightly (like Jell-O). A toothpick inserted in the center should come out clean, but the center should not be dry. - Cooling: The Most Overlooked Step
Turn off the oven and prop the door open with a wooden spoon for 15 minutes. This gradual cooling prevents the cheesecake from sinking or cracking. After 15 minutes, remove the cheesecake from the water bath and let it cool on a wire rack for another 30 minutes. Then, refrigerate uncovered for at least 6 hours-ideally overnight. This long chill firms up the texture and allows the flavors to meld. If you cut into it too soon, the filling will be soupy. And if you’re tempted to skip the water bath? Don’t. I’ve done it, and the results are always disappointing. - Berry Sauce: Bright, Tangy, and Perfectly Thick
Combine the 4 cups (600g) mixed berries, 1 cup (200g) granulated sugar, 1 tsp lemon zest, and a pinch of salt in a medium saucepan. If using chia seeds for thickening, add 2 tbsp now. Bring to a simmer over medium heat, then reduce to low and cook for 10–15 minutes, stirring occasionally, until the berries break down and the sauce thickens. For a smoother texture, strain the sauce through a fine-mesh sieve. Taste and adjust sweetness with more sugar or acidity with lemon juice. Let the sauce cool to room temperature, then refrigerate until ready to serve. The flavors will deepen as it chills. - Plating and Serving: Restaurant-Quality Presentation
Run a thin knife around the edge of the cheesecake to loosen it from the pan. Unclasp the springform and transfer the cake to a cake stand or plate. Dip a warm knife in hot water, wipe it dry, and slice the cheesecake into 10–12 equal wedges. Spoon a generous pool of berry sauce over each slice, garnish with fresh berries or mint leaves, and serve immediately. For an extra touch, dust the top with powdered sugar or add a drizzle of honey. The contrast of the cool, creamy cheesecake with the vibrant, tangy sauce is what makes this dessert unforgettable.
—
Pro Chef Tips to Take This From Good to Unforgettable
These aren’t just tips-they’re the secrets I’ve picked up over two decades of baking cheesecake professionally and personally. Master these, and you’ll be the hero of every potluck and dinner party.
- Temperature Mastery: The cream cheese must be exactly 65–70°F (18–21°C) when you start mixing. If it’s too cold, the fat won’t emulsify properly, leading to a grainy texture. If it’s too warm, the batter will curdle. To check, press a finger gently into the cream cheese block-it should yield slightly but feel cool to the touch. If it’s borderline, let it sit at room temperature for 15–20 minutes before beginning. The oven temperature is equally critical. Start at 325°F (163°C) to set the exterior gently, then drop to 300°F (150°C) to finish the interior without drying it out. A thermometer in the water bath? Overkill for most bakers, but if you’re serious about consistency, aim for 175°F (80°C) in the bath.
- Timing Secrets: The cheesecake should jiggle in the center when done-think of a bowl of pudding, not a bowl of yogurt. Overbaking is the #1 cause of cracks and dryness. When in doubt, err on the side of underbaking. The residual heat will finish cooking the center as it cools. And that 15-minute propped-door cool? It’s not optional. Skipping it is like jumping out of a plane without a parachute-you might survive, but the landing will be messy. The long chill (6+ hours) is also non-negotiable. Cheesecake is like a fine wine: it gets better with time. The flavors meld, the texture firms up, and the tang from the cream cheese mellows.
- Ingredient Upgrades: Swap the standard graham crackers for a high-end brand like Keebler or Stella D’oro. Their buttery richness elevates the crust without changing the recipe. For the cream cheese, try a European-style like Arla or Président-they have a higher fat content (35–38%) and a richer flavor. And for the berry sauce, use a mix of blackberries and raspberries. The blackberries add depth, while the raspberries bring acidity to cut through the richness. If you’re feeling fancy, infuse the sugar with a vanilla bean for the crust or add a pinch of cinnamon to the berry sauce for warmth.
- Presentation Tricks: Dip the knife in hot water before each slice to create clean, smooth cuts. For an Instagram-worthy finish, pipe a dollop of whipped cream (sweetened with honey) onto each slice and top with a few fresh berries. Another pro move: serve the cheesecake on a chilled plate. The temperature contrast makes it taste even more decadent. And if you’re feeling adventurous, add a sprinkle of flaky sea salt (like Maldon) on top of the berry sauce right before serving. The salt enhances the sweetness and adds a sophisticated finish.
- Flavor Boosters: The one unexpected addition that changes everything? A teaspoon of orange zest in the filling. It brightens the cream cheese without overpowering it, adding a subtle citrus note that pairs beautifully with the berries. Another game-changer: toast the crust for 3–5 minutes after baking. It deepens the flavor and adds a subtle crunch. And for the berry sauce, a splash of balsamic vinegar (1 tsp) adds a mysterious umami depth that elevates the dish to restaurant level.
—
Nutrition Facts and Health Benefits
A single slice of this cheesecake (1/12th of the recipe) clocks in at approximately 420 calories, with 28g of fat (17g saturated), 35g of carbohydrates (including 1g fiber), and 8g of protein. It’s not a health food-and it’s not meant to be. But it’s also not the nutritional disaster some people assume. The cream cheese provides calcium (15% DV per slice) and phosphorus (10% DV), both essential for bone health. The eggs contribute high-quality protein (6g per slice) and vitamin D (10% DV), which supports immune function. And the berries? A full cup of mixed berries delivers 120% of the daily vitamin C requirement, plus antioxidants like anthocyanins, which reduce inflammation.
The health benefits extend beyond macronutrients. The monounsaturated fats in the cream cheese support heart health by lowering bad cholesterol (LDL) when consumed in moderation. The berries’ fiber (4g per cup) aids digestion and helps regulate blood sugar spikes. And the calcium in the cream cheese isn’t just for bones-it plays a role in muscle contraction and nerve function. Even the lemon zest adds a boost: just 1 tsp provides 5% of the daily vitamin C requirement and compounds that may support detoxification.
Of course, if you’re watching your intake, there are ways to lighten up this dessert without sacrificing flavor. For a lower-calorie version, use low-fat cream cheese (though the texture will be slightly softer) and reduce the sugar by 1/4 cup. Replace the graham crackers with almond flour and oat fiber blend (1:1 ratio) to cut carbs. And for a dairy-free option, cashew cream cheese works well-just be sure to choose a brand with no added gums or stabilizers. The trade-off? The texture will be closer to a mousse than a dense New York classic. But it’s still delicious-and far better than store-bought vegan cheesecakes, which often taste like disappointment in a slice.
—
Creative Variations Worth Trying
Cheesecake is a blank canvas. Once you’ve mastered the classic, the possibilities are endless. Here are four variations to inspire your next baking adventure.
1. Salted Caramel Cheesecake: Swap the berry sauce for a homemade salted caramel sauce. Simmer 1 cup (200g) sugar with 1/4 cup (60ml) water until amber, then whisk in 1/2 cup (120ml) heavy cream and 1/2 tsp flaky salt. Chill before serving. Top with a drizzle of caramel and a sprinkle of sea salt. The contrast of sweet, salty, and rich is irresistible.
2. Matcha White Chocolate Cheesecake: Infuse the batter with 1 tbsp high-quality matcha powder and fold in 1/2 cup (90g) chopped white chocolate before baking. The matcha adds earthy depth, while the white chocolate balances it with sweetness. Top with a white chocolate ganache and edible gold leaf for a showstopper.
3. Lemon Blueberry Cheesecake: Add 1 tbsp lemon zest and 2 tbsp freshly squeezed lemon juice to the filling. Swap the berry sauce for a blueberry compote (simmer 2 cups blueberries with 1/4 cup sugar and 1 tsp lemon zest until thickened). The lemon and blueberry combo is bright and refreshing-perfect for summer.
4. Chocolate Hazelnut Cheesecake (Meals-Prep Friendly): Add 1/2 cup (90g) melted dark chocolate (70% cacao) to the batter and fold in 1/2 cup (60g) toasted hazelnuts. Bake as directed. This version keeps beautifully in the fridge for up to 5 days, making it ideal for meal prep. Serve with a dollop of whipped cream and a sprinkle of cocoa powder.
—
Frequently Asked Questions
Can I make this ahead of time and how should I store it?
Absolutely. In fact, cheesecake tastes better the next day. To store, cover the pan tightly with plastic wrap and refrigerate for up to 5 days. For longer storage, wrap individual slices in plastic wrap and store in an airtight container in the freezer for up to 3 months. To thaw, transfer to the fridge overnight. Never try to microwave frozen cheesecake-it’ll turn into soup. If the top cracks during storage, don’t panic. A dusting of powdered sugar or a drizzle of berry sauce will hide it. And if you’re in a hurry, you can freeze the cheesecake (unwrapped) for 1 hour to firm it up before slicing, then return slices to the freezer.
What can I serve alongside this dish to make it a complete meal?
Cheesecake is best enjoyed as a standalone dessert, but if you’d like to pair it with a meal, opt for light, acidic, or bitter flavors to cut the richness. A crisp green salad with arugula, shaved fennel, and lemon vinaigrette works beautifully. For a heartier option, serve with a charcuterie board of prosciutto, aged cheeses, and nuts. Drink-wise, a sparkling rosé or a cold brew of iced tea with mint complements the dessert without overwhelming it. Avoid heavy wines like Cabernet Sauvignon-they’ll clash with the creaminess. Instead, try a semi-dry Riesling or a Prosecco for a celebratory touch.
Why did my dish turn out dense and rubbery?
Overmixing the batter is the #1 culprit. When you beat the eggs into the cream cheese mixture, mix just until they’re incorporated-no more. Overmixing incorporates too much air, leading to a dense, rubbery texture. Another common mistake? Using cold ingredients. Cream cheese and eggs must be at room temperature (65–70°F / 18–21°C) to emulsify properly. If they’re too cold, the fat in the cream cheese won’t blend smoothly, resulting in a grainy or curdled texture. Finally, overbaking is a killer. The cheesecake should jiggle slightly in the center when done-a toothpick inserted should come out with a few moist crumbs, not clean. If you’re unsure, take it out 10 minutes early and let residual heat finish the job.
What are the best ingredient substitutions if I’m missing something?
No digestive biscuits? Use an extra 200g graham crackers and add 1 tsp vanilla extract to the crust. Out of cream cheese? Blend 2 cups (480g) full-fat ricotta with 1 cup (240g) sour cream and 2 tbsp cornstarch for a substitute (though the texture won’t be as smooth). No eggs? For a vegan version, use 1/2 cup (120ml) aquafaba (chickpea brine) whipped to stiff peaks in place of eggs. Missing sugar? Honey or maple syrup can replace granulated sugar 1:1, but reduce other liquids in the recipe by 1–2 tbsp to compensate for the added moisture. And if you’re out of berries, swap them for sliced peaches poached in 1 cup (200g) sugar and 1 tsp cinnamon for a warm, spiced twist.
—
Final Thoughts from the Kitchen
After years of baking, testing, and perfecting this recipe, I’ve come to realize that the best cheesecake isn’t just about technique-it’s about love. It’s the extra minute spent tempering the cream cheese, the careful tapping of the pan to release air bubbles, the overnight chill that transforms a good dessert into something extraordinary. My grandmother used to say, “A cake should be like a good friend: comforting, reliable, and worth coming back to.” This cheesecake is all of that. It’s dense enough to feel substantial, creamy enough to melt in your mouth, and tangy enough to keep you reaching for another slice. And the berry sauce? It’s the cherry on top-a burst of color and acidity that reminds you life, like dessert, is best enjoyed in layers.
So preheat your oven, clear your schedule, and get ready to bake something legendary. And when you finally pull that golden, crackly-topped cheesecake from the oven, don’t just cut into it right away. Take a moment to admire it. Share it with someone you love. And then-because I know you’ll want to-take a photo and tag me. Because nothing makes a chef happier than seeing their creations bring joy to someone else’s table.
Now, go forth and bake. And remember: the worst cheesecake is still better than no cheesecake at all.