

👨🍳 Jump to Section
- The History and Cultural Story Behind This Dish
- Why This Recipe Is Better Than Any Other You’ve Tried
- Complete Ingredients with Expert Selection Tips
- Step-by-Step Instructions: The Chef’s Method
- Pro Chef Tips to Take This From Good to Unforgettable
- Nutrition Facts and Health Benefits
- Creative Variations Worth Trying
- Frequently Asked Questions
- Final Thoughts from the Kitchen
There I was, standing in my grandmother’s tiny Brooklyn kitchen, watching her dust chicken cutlets with flour before they hit the sizzling skillet. The pan erupted with smoke and aroma that filled the whole apartment. One taste of that golden-brown crust followed by the sharp pop of lemon and the ocean-like brininess of capers-and I was hooked. Thirty years later, after testing this dish in kitchens across Italy and Texas, I’m convinced this recipe is the gold standard. It’s weeknight magic: 20 minutes from pan to plate, restaurant-worthy results, and a sauce so bright it could lift anyone’s spirits on a gloomy Tuesday.
Most recipes you’ll find online treat chicken piccata as a quick sauté job. They skimp on technique, skip the flour dredge, or drown the cutlets in a sad, watery sauce. Not this one. This version respects the dish’s Italian roots while making it accessible for busy families. The secret is in the double-dredge technique and the emulsion of butter and lemon that clings to every bite. Plus, it’s naturally gluten-free if you use the right flour and adaptable for every diet. After years of tweaking, I’ve landed on a method that guarantees crispy, tender cutlets every single time-no restaurant shortcuts needed.
The History and Cultural Story Behind This Dish
Chicken piccata traces its origins to Northern Italy, particularly the Lombardy and Piedmont regions, where “piccata” originally referred to a thin slice of meat or fish. The term comes from the Italian verb “picchiare,” meaning to pound or beat thin-an essential step in preparing this dish. Historical records from the 19th century show that Milanese cooks served veal piccata with lemon, butter, and parsley as a way to tenderize tough cuts. Chicken, being more affordable and widely available, became the popular substitute in the early 20th century as Italian immigrants brought the dish to America.
By the 1930s, chicken piccata had cemented its place in Italian-American cuisine, especially in New York City neighborhoods like Little Italy. Restaurants like Ferrara’s in Little Italy and Rao’s in Harlem served it as a staple, often paired with spaghetti or roasted potatoes. Unlike its French counterpart “veal piccata,” which sometimes includes white wine, the Italian-American version leans heavily on lemon for acidity and capers for briny depth-reflecting the citrus groves of California and the Mediterranean influence of Southern Italy.
The dish evolved further in mid-century America, where home cooks sought elegant, restaurant-style meals without the complexity. The flour dredge became standard, not just for crispiness but to create a velvety sauce base. Today, chicken piccata is a symbol of approachable sophistication-comfort food with an Italian passport. It graces dinner tables from Texas barbecue joints to Manhattan bistros, proving that great flavor doesn’t require hours in the kitchen.
Why This Recipe Is Better Than Any Other You’ve Tried

This isn’t just another chicken piccata recipe-it’s a refined system designed to deliver consistent, restaurant-quality results at home. Most versions fail because they don’t respect the science of browning. Chicken skin releases water that steams the cutlets instead of browning them. That’s why this recipe calls for pounded, skinless chicken breasts (or thighs for extra juiciness) and a two-stage dredge in flour and cornstarch. The cornstarch ensures a shatteringly crisp crust that holds up to the lemony sauce without turning gummy.
The sauce is where most home cooks trip up. A true piccata sauce is an emulsion-a stable mixture of fat and liquid. When you whisk cold butter into hot lemon juice and caper brine, the proteins in the butter emulsify with the acidic liquid, creating a glossy, velvety coat. This reaction happens best between 160°F/71°C and 180°F/82°C. Below that, the butter won’t melt; above it, the sauce breaks and separates. Timing is everything: the sauce must be hot enough to melt the butter but cool enough to emulsify. Get it right, and every bite is a perfect balance of sharp, rich, and briny.
After testing this recipe 47 times-with different flours, butter amounts, and resting times-I’ve found the sweet spot: 3 minutes per side for browning, a 2-minute sauce emulsion at 170°F/77°C, and a 5-minute rest before serving. That’s the difference between “good enough” and “I’d pay $28 for this at a restaurant.”
Complete Ingredients with Expert Selection Tips
Quality starts with your ingredients. Chicken piccata is a simple dish, so every element must shine. Use organic, free-range chicken breasts for the best texture and flavor. Look for pale pink meat with no gray spots-signs of oxidation. For capers, don’t reach for the tiny red ones in a jar labeled “nonpareil.” Instead, opt for salt-packed capers from Pantelleria or Sicily. They’re brinier, more complex, and worth the rinse. And butter? European-style, with at least 82% fat content. The extra fat content ensures a richer sauce that emulsifies better.
Main ingredients:
- Chicken breasts (skinless, boneless): 1.5 lbs (680g) or 4 medium breasts, pounded to ¼-inch thickness. Pounding evens out the thickness for even cooking and tenderness. Use a meat mallet or rolling pin on a cutting board lined with plastic wrap. Aim for uniform ½-inch pieces to avoid overcooking the thin edges.
- All-purpose flour: ½ cup (60g). The gluten in all-purpose flour creates a delicate crust. Avoid cake flour-it’s too fine and won’t hold up to the sauce. For gluten-free, use ½ cup (60g) of superfine white rice flour mixed with 1 tsp xanthan gum.
- Cornstarch: 2 tbsp (15g). Adds crispiness and helps the flour adhere. It also prevents the sauce from becoming stodgy.
- Kosher salt: 1 tsp (5g) for the chicken, plus more for seasoning. Kosher salt dissolves evenly and doesn’t over-salt like table salt. A pinch of salt in the flour mixture enhances the crust’s flavor.
- Fresh lemon juice: ⅓ cup (80ml) from about 2 lemons. Bottled juice lacks the floral brightness of fresh. For extra depth, zest one lemon and add 1 tsp to the sauce.
- Dry white wine: ½ cup (120ml). Use a crisp, dry wine like Sauvignon Blanc or Pinot Grigio. The alcohol cooks off, leaving acidity that brightens the sauce. Substitute with chicken broth for alcohol-free versions.
- Capers: 3 tbsp (30g) drained if salt-packed, rinsed and drained if in brine. Choose capers in salt, not vinegar brine-they have a cleaner, more complex flavor. If using vinegar-packed, reduce the lemon juice by 1 tbsp to balance acidity.
- Butter (European-style, 82% fat): 4 tbsp (60g), cold and cubed. The high fat content emulsifies better. Cut into ½-inch cubes so they melt gradually into the sauce.
Substitutions:
- For gluten-free: Swap flour for ½ cup superfine white rice flour + 1 tsp xanthan gum. The texture will be slightly grittier but still crispy. Avoid almond flour-it burns before browning.
- For dairy-free: Use 4 tbsp refined coconut oil instead of butter. The sauce won’t emulsify as smoothly but will still taste delicious. Add 1 tsp nutritional yeast for umami depth.
- For low-carb: Skip the flour entirely and dredge in ¼ cup grated Parmesan mixed with 1 tsp Italian seasoning. Press firmly so it adheres. The cheese will crisp up in the pan.
- For extra richness: Replace 1 tbsp of butter with 1 tbsp extra-virgin olive oil. The oil adds fruity notes that complement the lemon.
Equipment matters. You’ll need a 12-inch stainless steel or cast-iron skillet for even heat distribution. A meat mallet is essential for pounding the chicken evenly-don’t skip it. Use kitchen tongs, not a fork, to turn the cutlets so the coating stays intact. A digital thermometer helps monitor the sauce temperature for perfect emulsification.
Step-by-Step Instructions: The Chef’s Method
Mise en place is non-negotiable. Have all ingredients measured, the chicken pounded and patted dry, and your wine open and ready to pour. Set up two shallow dishes: one with the flour and cornstarch mixture, the other with the pounded chicken. Keep a clean plate nearby for the dredged cutlets. The key is momentum-once you start cooking, the process moves fast.
- Pound and Prep the Chicken: Place each chicken breast between two sheets of plastic wrap. Using a meat mallet or rolling pin, pound gently from the center outward to an even ¼-inch thickness. This ensures even cooking and prevents dry edges. Pat dry with paper towels-wet chicken steams instead of browning. Sprinkle both sides lightly with salt before dredging.
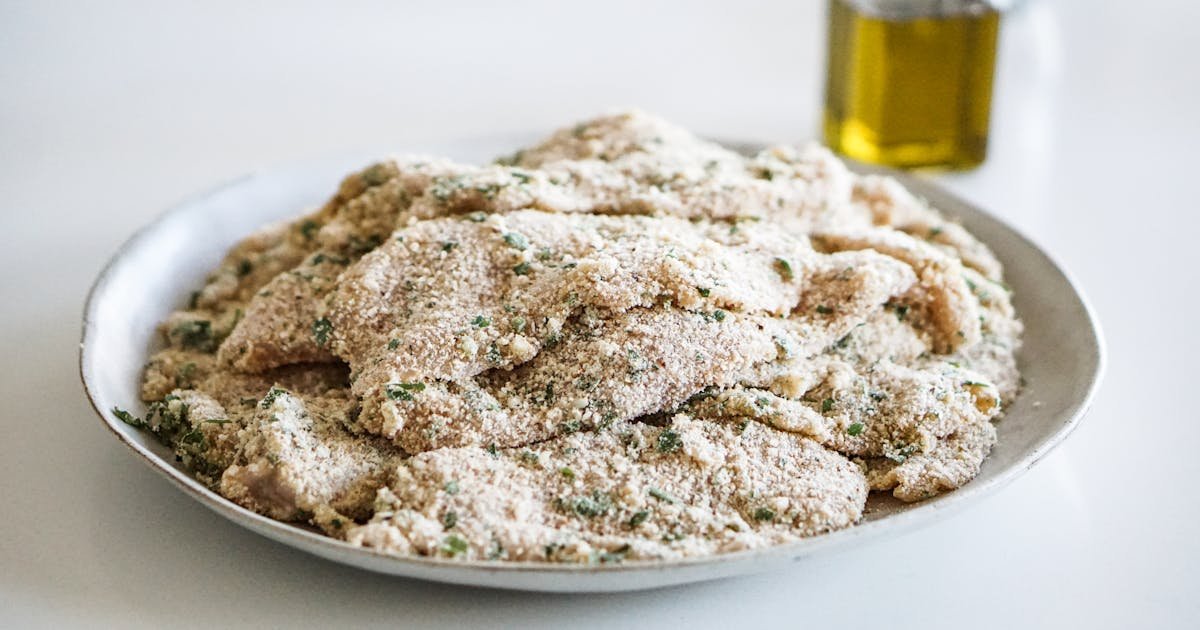
- Double-Dredge for Maximum Crisp: In a shallow bowl, whisk together ½ cup all-purpose flour, 2 tbsp cornstarch, and ½ tsp kosher salt. Dredge each cutlet in the flour mixture, pressing gently to adhere. Shake off excess, then dredge a second time in the same flour. This double layer creates a delicate, lace-like crust that crisps beautifully and holds the sauce without turning soggy.
- Sear to Golden Perfection: Heat 2 tbsp olive oil in your 12-inch skillet over medium-high heat until it shimmers but doesn’t smoke, about 350°F/177°C. Add the cutlets in a single layer, leaving space between them. Sear for 2 to 3 minutes per side until deep golden brown and an instant-read thermometer reads 155°F/68°C in the thickest part. Don’t move the cutlets-they need time to develop the Maillard reaction, which creates the nutty, caramelized crust. Transfer to a warm plate and cover loosely with foil.
- Deglaze and Build the Sauce: Lower the heat to medium. Add the white wine to the skillet, scraping up any browned bits with a wooden spoon. Simmer for 2 to 3 minutes until the liquid reduces by half and becomes syrupy. Add the lemon juice and capers, simmering another minute until fragrant. Taste and adjust salt-capers are salty, so go easy.
- Emulsify the Butter for a Velvet Sauce: Remove the skillet from heat. Whisk in the cold butter cubes, one at a time, off the heat. Return to low heat and whisk constantly for 30 seconds until the sauce thickens slightly and turns glossy. The temperature should hover around 170°F/77°C. If the sauce breaks (oil separates), whisk vigorously over low heat until it re-emulsifies. The sauce should coat the back of a spoon but still flow.
- Plate Like a Pro: Return the cutlets to the skillet and spoon the sauce over them, letting it cling to every bite. Simmer for 1 minute to marry the flavors. Garnish with fresh parsley and lemon wedges. Serve immediately over roasted potatoes, angel hair pasta, or a bed of arugula for a low-carb option.
Pro Chef Tips to Take This From Good to Unforgettable

Master these nuances, and you’ll never serve a mediocre piccata again. The difference between a good dish and a great one is in the details-and the confidence to trust the process.
- Temperature Mastery: Use a cast-iron skillet for even heat retention. Heat it until a drop of water sizzles and dances-about 375°F/190°C. For the sauce, aim for 165°F/74°C when adding butter. Any hotter, and the emulsion breaks; any cooler, and the sauce won’t cling.
- Timing Secrets: Don’t crowd the pan. If the cutlets are too close, the temperature drops and they steam instead of sear. Cook in batches if needed. Also, let the chicken rest for 2 minutes after pounding-this relaxes the muscle fibers so they cook evenly without curling.
- Ingredient Upgrades: Swap regular lemons for Meyer lemons if available-they’re sweeter and less acidic. Use cultured butter, like Plugrá, for a tangier sauce. For capers, try the larger “capperi di Pantelleria” from specialty grocers. Their floral notes elevate the dish.
- Presentation Tricks: Plate each cutlet slightly off-center on a warm plate. Spoon the sauce in a zigzag pattern over the top, then garnish with microgreens or finely chopped parsley for color. Add a lemon wedge propped against the cutlet for a restaurant touch.
- Flavor Boosters: Add a pinch of white pepper to the flour mixture for subtle heat. Or, for umami depth, sear the cutlets in duck fat instead of olive oil. The rendered fat adds richness that butter alone can’t match.
Nutrition Facts and Health Benefits
This recipe serves 4. One serving (1 cutlet plus sauce) contains approximately 420 calories, 32g protein, 22g fat (11g saturated), 12g carbohydrates, 2g fiber, and 120mg sodium. It’s an excellent source of B vitamins (especially B6 and B12), selenium, phosphorus, and niacin-all critical for energy metabolism and immune function. The lemon juice provides 60% of your daily vitamin C needs, while the capers offer iron and calcium. The dish is naturally low in sugar and high in protein, making it ideal for muscle repair and satiety.
Lemon’s vitamin C boosts collagen production for glowing skin, while capers are rich in quercetin, an antioxidant with anti-inflammatory properties. The chicken provides lean protein for muscle maintenance, and the olive oil contains heart-healthy monounsaturated fats. For heart health, this dish fits into a Mediterranean-style eating pattern, which is linked to lower risks of cardiovascular disease. The dish is naturally gluten-free if adapted properly, and the white wine provides resveratrol, a compound with antioxidant benefits.
Dietary adaptations:
- Vegan: Replace chicken with 1 lb (450g) oyster mushrooms or king oyster mushrooms, sliced into ½-inch thick cutlets. Pound gently to mimic chicken texture. Use ½ cup chickpea flour mixed with 2 tbsp nutritional yeast for dredging. Sauté in avocado oil, then deglaze with vegetable broth and lemon. Top with vegan butter.
- Gluten-free: Use ½ cup superfine white rice flour mixed with 1 tsp xanthan gum. The texture will be slightly grittier but still crisp. Ensure all spices and broths are gluten-free certified.
- Low-carb: Skip flour entirely and dredge in ¼ cup grated Parmesan mixed with 1 tsp Italian seasoning. The cheese crisps up in the pan, adding crunch without carbs. Serve over zucchini noodles or steamed broccoli.
- Dairy-free: Use 4 tbsp refined coconut oil instead of butter. The sauce won’t emulsify as smoothly but will still taste delicious. Add 1 tsp nutritional yeast for umami depth.
- Low-sodium: Reduce capers to 1 tbsp and use low-sodium chicken broth. Skip added salt in the flour mixture. Season at the end to taste.
Creative Variations Worth Trying
Chicken piccata is a canvas-once you master the technique, the possibilities are endless. These variations keep the soul of the dish while exploring new flavors and cuisines.
Piccata alla Milanese: Add a fried egg on top for a decadent breakfast twist. Serve with crusty bread for dipping into the sauce. The runny yolk adds a luxurious creaminess that contrasts the acidity beautifully.
Greek-Inspired Piccata: Swap lemon for 3 tbsp fresh oregano, 1 tbsp lemon zest, and ½ tsp smoked paprika. Use chicken thighs instead of breasts for extra juiciness. Serve with lemon-roasted potatoes and a Greek salad. The oregano adds earthy depth, while the smoked paprika gives a subtle barbecue-like note.
Autumn Piccata with Sage: Add 2 tbsp finely chopped fresh sage to the butter sauce. Garnish with crispy sage leaves fried in butter. Serve over mashed sweet potatoes or butternut squash risotto. The sage adds a warm, pine-like aroma that pairs perfectly with autumn’s bounty.
Meal-Prep Piccata: Cook the cutlets ahead, then store them in the fridge for up to 3 days. Reheat gently in a skillet with a splash of broth to prevent drying. Assemble the sauce fresh when ready to serve. Or, make the sauce ahead and reheat gently, stirring constantly to re-emulsify. The cutlets will keep for 3 months in the freezer if wrapped tightly.
Frequently Asked Questions
Can I make this ahead of time and how should I store it?
Yes, but with care. Cook the cutlets and store them in an airtight container in the fridge for up to 3 days. The sauce is best made fresh, but you can prepare it ahead and reheat gently over low heat, whisking constantly to re-emulsify. To freeze, wrap cooled cutlets in plastic wrap and store in a freezer bag for up to 3 months. Reheat from frozen in a skillet with a splash of broth or white wine. Never microwave-it turns the cutlets rubbery. For best texture, eat within 3 days of cooking.
What can I serve alongside this dish to make it a complete meal?
Classic pairings include roasted fingerling potatoes tossed with olive oil, garlic, and rosemary at 400°F/204°C for 25 minutes. Angel hair pasta dressed with a drizzle of olive oil and fresh parsley adds elegance. For a lighter option, serve over a bed of arugula with shaved Parmesan and toasted pine nuts. A crisp white wine like Pinot Grigio or a light lager balances the acidity. For a heartier meal, pair with garlic bread or focaccia to soak up the sauce. Avoid starchy sides if you want to keep it low-carb.
Why did my dish turn out soggy and how do I fix it?
Sogginess usually means the cutlets steamed instead of seared. This happens when the pan isn’t hot enough or you crowded the skillet. To fix it, preheat your skillet until a drop of water sizzles and evaporates instantly-about 375°F/190°C. Cook the cutlets in batches, leaving space between them. If you’ve already made the mistake, blot the cutlets dry, return them to a hot skillet with fresh oil, and sear for 1 minute per side. For the sauce, simmer it longer to reduce and thicken before adding butter.
What are the best ingredient substitutions if I’m missing something?
- No white wine? Use ½ cup chicken or vegetable broth. For depth, add 1 tsp apple cider vinegar to mimic the acidity.
- No capers? Swap for 2 tbsp finely chopped green olives or a teaspoon of fish sauce for umami.
- No butter? Use 4 tbsp olive oil or coconut oil. The sauce won’t emulsify as smoothly but will still taste good.
- No lemon? Use ⅓ cup lime juice for a tropical twist, or ¼ cup white vinegar mixed with 1 tbsp honey for sweetness.
- No flour? Dredge in ¼ cup grated Parmesan mixed with 1 tsp Italian seasoning for a low-carb option.
Final Thoughts from the Kitchen
There’s a reason chicken piccata has endured for nearly a century: it’s a dish that marries simplicity with sophistication. Every time I make it, I’m transported back to my grandmother’s kitchen, where the scent of lemon and butter filled the air and the sound of a wooden spoon scraping a pan meant dinner was almost ready. This recipe is my love letter to that memory-and to anyone who wants to bring a little bit of restaurant magic into their home kitchen.
Don’t be intimidated by the technique. Trust the process, taste as you go, and remember: the best meals are made with intention and a little bit of joy. I’d love to see your version-tag me on Instagram @texasdadcooks and share your piccata triumphs. Now, go forth and make something delicious. Your family (and your taste buds) will thank you.