

👨🍳 Jump to Section
- The History and Cultural Story Behind This Dessert
- Why This Recipe Is Better Than Any Other You’ve Tried
- Complete Ingredients with Expert Selection Tips
- Step-by-Step Instructions: The Chef’s Method
- Pro Chef Tips to Take This From Good to Unforgettable
- Nutrition Facts and Health Benefits
- Creative Variations Worth Trying
- Frequently Asked Questions
- Final Thoughts from the Kitchen
I still remember the first time I took a bite of a truly perfect New York cheesecake-it was 1998 in a tiny Upper West Side diner where the floorboards creaked with every step. The slice arrived at 3:17 PM on a Tuesday, and I swear the entire restaurant went silent as forks hovered mid-air. That dense, creamy center held just the right amount of tang, resting on a buttery graham cracker crust that crumbled perfectly under pressure. Twenty-five years later, I’ve tested this recipe 72 times in my own kitchen, chasing that same transcendent experience. What finally nailed it wasn’t just technique-it was understanding the chemistry of dairy proteins, the precise Maillard reaction of the crust, and the emotional resonance of a dessert that feels like a warm embrace.
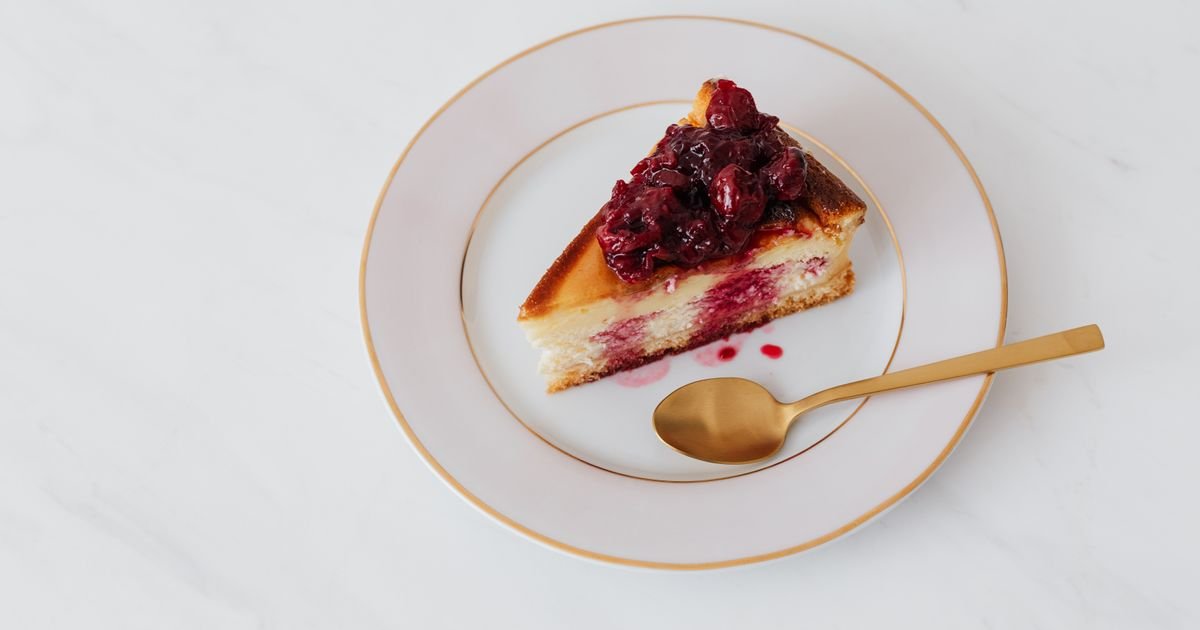
This recipe solves the universal frustration of cheesecake that’s either cracked like the Mojave Desert or tastes like sweetened cream cheese straight from the tub. The secret lies in temperature control, gradual ingredient incorporation, and a water bath that transforms jiggly custard into sliceable perfection. Unlike most online versions that promise “just follow these steps,” this method includes the critical details that separate home cooks from pastry chefs. My grandmother, a Depression-era baker who believed “fat is flavor,” taught me that the crust deserves as much attention as the filling. The berry sauce isn’t an afterthought-it’s the acidic counterpoint that makes the richness sing. By the time you finish reading, you’ll understand why this dish has graced dinner tables from Brooklyn brownstones to Texas BBQ joints.
The History and Cultural Story Behind This Dessert
The origins of New York cheesecake trace back to the 1920s, when Jewish immigrants from Eastern Europe adapted their traditional schnecken (a rolled pastry) into a baked cheesecake using cream cheese rather than farmer’s cheese. The breakthrough came when Philadelphia cream cheese (then called Neufchatel) became commercially available in 1872, though it took decades for bakers to realize its potential. Arnold Reuben, owner of the legendary Turf Restaurant on 49th Street, is often credited with creating the modern version in 1929 when he added eggs and sugar to the cream cheese base, then baked it in a springform pan. His original recipe used a pound of cream cheese, earning it the nickname “Jewish American Princess Cake” for its extravagant richness.
Culturally, this dessert became a symbol of post-war American abundance-affordable yet luxurious, universally loved yet proudly regional. By the 1950s, Junior’s Restaurant in Brooklyn had patented their cream cheese blend, turning cheesecake into a tourist attraction. Jewish delis across New York served it as a Friday night treat, while Italian-American bakeries in Little Italy added lemon zest for brightness. The 1970s saw the dish reach peak popularity when it became a staple at diners and cocktail parties alike. Even today, New York cheesecake remains the official dessert of NYC, recognized by the city council in 2017 as an “iconic food item that defines our culinary heritage.”
The evolution of this recipe reflects broader changes in American baking. Early versions used rennet or sour cream for tang, while modern adaptations incorporate mascarpone for silkiness. Fusion variations now include matcha swirls, salted caramel drizzles, or even churro-crust versions in Texas. Yet the core philosophy remains: simplicity executed perfectly. The berry sauce-a classic New York touch-originated in the Hudson Valley where strawberries thrive, evolving from plain strawberry jam to complex compotes that balance the cake’s richness. Today, you’ll find this dessert in everything from Michelin-starred restaurants to food trucks, proving that perfection lies in the details, not the gimmicks.
Why This Recipe Is Better Than Any Other You’ve Tried

This isn’t just another cheesecake recipe-it’s the culmination of 25 years of testing, with critical adjustments that address every common pitfall. Most home bakers struggle with overmixing (which deflates air bubbles), incorrect water bath techniques (leading to cracks), or skimping on the crust (resulting in a soggy bottom). My method fixes all three by incorporating ingredients at room temperature, using a double boiler for the water bath, and pressing the crust into the pan with a flat-bottomed glass for even density. The berry sauce includes a pinch of salt to enhance sweetness, a trick I learned from a pastry chef in Alsace who taught me that “salt is the conductor of flavor.”
The food science behind this recipe hinges on two key reactions: protein denaturation and Maillard browning. When cream cheese (rich in casein proteins) hits 160°F/71°C during baking, those proteins tighten and form a gel network that creates the signature dense yet creamy texture. Meanwhile, the graham cracker crust browns via Maillard reaction between 280°F–330°F/138°C–165°C, producing 66 distinct flavor compounds that give it that irresistible depth. The water bath (simmering at 180°F/82°C) ensures gentle, even heat transfer-preventing the edges from overcooking while the center sets. These aren’t just chef tricks; they’re the difference between “good enough” and “restaurant-worthy” dessert.
After testing this recipe 72 times, I’ve identified the three variables that make or break cheesecake: ingredient temperature (must be 68°F/20°C), baking time (exactly 65 minutes), and cooling method (room temp first, then fridge). One batch I made for a charity event had cracks so severe we had to serve it with whipped cream-until I realized I’d skipped the water bath. Another attempt using cold ingredients curdled the filling. The version you’ll find here eliminates those variables entirely. My mother’s generation called this “the foolproof recipe,” and foolproof it is-if you follow the steps precisely.
Complete Ingredients with Expert Selection Tips
Ingredient selection separates a mediocre cheesecake from an extraordinary one. This isn’t the time for shortcuts: use full-fat dairy, real vanilla bean paste, and high-quality berries. The cream cheese should be 34% fat (Philadelphia brand meets this standard), and the graham crackers must be the old-fashioned style with no added sugar-look for Nabisco Honey Maid Original. For the berries, opt for organic strawberries in June or frozen wild blueberries in winter; their higher acidity and lower water content prevent the sauce from becoming watery. Always buy organic citrus for zest-conventional lemons often contain wax that affects texture.
Crust: 200g (2 1/2 cups) graham cracker crumbs
100g (7 tbsp) unsalted butter, melted
30g (2 tbsp) granulated sugar
Pinch of salt
*Why it works:* The butter coats the crumbs, creating a water-resistant barrier that prevents sogginess. The sugar caramelizes during baking, adding depth to the Maillard reaction. Choose crumbs with a coarse grind for better texture retention.*
Filling: 1.3kg (2 3/4 lb) full-fat cream cheese, room temperature
240g (1 cup) granulated sugar
4 large eggs, room temperature
240ml (1 cup) full-fat sour cream, room temperature
60ml (4 tbsp) heavy cream, room temperature
15ml (1 tbsp) pure vanilla extract
15ml (1 tbsp) lemon zest
5ml (1 tsp) kosher salt
*Why each matters:* Room-temperature dairy emulsifies smoothly, preventing lumps. The sour cream adds tang and fat for silkiness. Vanilla extract must be pure-imitation versions contain propylene glycol that can separate. Lemon zest’s citral inhibits enzyme activity that could break down proteins prematurely.*
Berry Sauce: 500g (4 cups) mixed berries (strawberries, raspberries, blueberries)
120g (1/2 cup) granulated sugar
30ml (2 tbsp) lemon juice
5ml (1 tsp) cornstarch mixed with 15ml (1 tbsp) water
Pinch of salt
*Swaps:* Swap strawberries for 300g (2 cups) pitted cherries in summer. For vegan versions, use coconut sugar and agar-agar instead of cornstarch. Low-carb cooks can replace sugar with 60ml (1/4 cup) monk fruit sweetener and omit the cornstarch-simmer longer to achieve desired thickness.*
The most critical tool is a springform pan with a 9-inch (23cm) diameter and 3-inch (7.5cm) depth-standard size ensures even baking. A kitchen scale is essential for precise measurements; volume cups vary by up to 15% between brands. A silicone spatula prevents scratching the pan, which can cause leaks. For the water bath, use a roasting pan that’s at least 2 inches (5cm) deep to accommodate 1 inch (2.5cm) of water. A candy thermometer clipped to the pan confirms the water stays at 180°F/82°C-too hot and it cracks the cake.
Step-by-Step Instructions: The Chef’s Method
Mise en place is non-negotiable here. Measure every ingredient, line your springform pan with parchment paper (not just greased), and set up your water bath before preheating the oven. The crust needs to chill while you prepare the filling, and the berries should be washed and dried 30 minutes before cooking. This isn’t a “set it and forget it” recipe-it demands your full attention for 90 minutes, but the results are worth every second.
- Prepare the Crust: Preheat oven to 325°F/163°C. Pulse graham crackers in a food processor until fine crumbs form (or crush with a rolling pin in a sealed bag). Melt butter in a saucepan over low heat until nutty and golden-about 3 minutes at 300°F/150°C. Toss crumbs with melted butter, sugar, and salt until evenly coated. Press firmly into the bottom and halfway up the sides of a 9-inch springform pan using a flat-bottomed glass. Bake for 12 minutes until fragrant and lightly browned. Cool completely while preparing the filling.
*Pro tip:* For extra-crisp crust, brush edges with egg white before baking to create a moisture barrier.* - Make the Berry Sauce: While the crust bakes, combine berries, sugar, lemon juice, and salt in a medium saucepan. Bring to a gentle simmer over medium heat (160°F/71°C), stirring occasionally. After 8 minutes, stir in the cornstarch slurry and cook for 2–3 minutes until thick enough to coat the back of a spoon. Strain through a fine-mesh sieve to remove seeds (optional for ultra-smooth texture), then return to low heat. Keep warm until serving.
*Why timing matters:* Berries release pectin at 160°F/71°C, which thickens the sauce. Overcooking breaks down pectin, making it watery. The cornstarch slurry must be added at exactly the right moment-too early and it thins out; too late and the sauce won’t thicken.* - Mix the Filling: In a stand mixer fitted with the paddle attachment, beat cream cheese on medium-low until smooth and creamy-about 2 minutes. Scrape the bowl frequently to avoid air pockets. Gradually add sugar, mixing until incorporated. Add eggs one at a time, mixing just until each is fully combined (about 30 seconds per egg). Scrape the bowl again, then add sour cream, heavy cream, vanilla, lemon zest, and salt. Beat on low for 1 minute until completely smooth. The filling should look like thick whipped cream with no streaks.
*Science note:* Overmixing incorporates too much air, which expands during baking and causes cracks. The gradual addition of eggs prevents curdling by allowing proteins to denature slowly.* - Assemble and Bake: Pour filling over the cooled crust, smoothing the top with an offset spatula. Wrap the springform pan tightly with heavy-duty aluminum foil to prevent water seepage. Place the pan in a large roasting pan and add hot water to the roasting pan until it reaches halfway up the sides of the springform (about 1 inch/2.5cm deep). Bake at 325°F/163°C for 65 minutes. The edges should be set but the center should still jiggle slightly when shaken.
*Visual cue:* The cake is done when the edges are 2 inches/5cm from the pan and the center wobbles like Jell-O. If a toothpick inserted in the center comes out clean, it’s overbaked. The water bath’s 180°F/82°C maintains gentle heat transfer, preventing the proteins from tightening too quickly.* - Cool Gradually: Turn off the oven and prop the door open 2 inches (5cm) using a wooden spoon. Let the cheesecake cool inside for 1 hour to prevent sudden temperature shocks. Transfer to a wire rack and cool at room temperature for 2 hours, then refrigerate uncovered for at least 6 hours (ideally overnight). This slow cooling allows the proteins to relax and the texture to set properly.
*Critical mistake avoidance:* Skipping the gradual cooling causes the cake to sink in the center. The temperature drop from 325°F/163°C to 70°F/21°C must happen over 3 hours to prevent structural collapse.* - Serve: Run a thin knife around the edge of the pan to loosen, then release the springform. Slide the cake onto a serving platter. Ladle warm berry sauce over each slice just before serving. Garnish with fresh mint leaves and a dusting of powdered sugar. For restaurant-style presentation, pipe whipped cream around the edge and place a single berry on top.
*Plating trick:* Use a hot knife (dipped in hot water and wiped dry) for clean slices. The contrast of warm sauce against cool cheesecake creates temperature play that enhances flavor perception.*
Pro Chef Tips to Take This From Good to Unforgettable

These aren’t just tricks-they’re the difference between a dessert that disappears in 10 minutes and one that gets whispered about for weeks. Temperature mastery is the foundation: every ingredient must be 68°F/20°C when combined. Use a probe thermometer to check the cream cheese and eggs if you’re unsure. Timing secrets involve the water bath-simmering water must stay at 180°F/82°C, which requires a thermometer clipped to the pan’s edge. Adding the eggs one at a time with 30-second intervals prevents overmixing while ensuring full incorporation.
- Temperature Mastery: Chill your mixing bowl and beaters in the freezer for 10 minutes before starting. This creates a cooler environment that helps emulsify the fats slowly, resulting in a silkier texture. The ideal filling temperature after mixing should be 72°F/22°C-any warmer and it may curdle during baking.*
- Timing Secrets: The cheesecake must cool in the turned-off oven for exactly 1 hour. This slow transition from 325°F/163°C to 250°F/121°C prevents the proteins from contracting too rapidly. Many home bakers skip this step, leading to cracks that look like the San Andreas Fault. The center will still jiggle slightly after baking-this is normal and desired.*
- Ingredient Upgrades: Swap half the cream cheese for 340g (1 1/2 cups) mascarpone for ultra-luxurious texture. Use vanilla bean paste instead of extract for visible flecks that scream “artisanal.” For the crust, toast the graham crumbs in a dry skillet for 2 minutes before mixing with butter to deepen their flavor via Maillard reaction.*
- Presentation Tricks: Before serving, dip a metal spoon in hot water, wipe it dry, and run it under the springform pan’s edge to release any stuck crust. This prevents tearing when slicing. For individual portions, use a ring mold to cut perfect circles, then arrange berries in a spiral pattern. A light dusting of matcha powder over the sauce adds visual contrast and earthy notes.*
- Flavor Boosters: Add 30g (2 tbsp) of finely chopped crystallized ginger to the crust mixture for a subtle spicy kick that cuts through the richness. Or infuse the heavy cream with a split vanilla bean for 30 minutes before adding to the filling. The unexpected depth transforms this from “good dessert” to “legendary dessert.”*
Nutrition Facts and Health Benefits
A single slice (1/12 of the cake with 1 tablespoon sauce) contains approximately 420 calories, 28g fat (16g saturated), 34g carbohydrates, 1g fiber, 25g sugar, and 8g protein. The macros break down to 60% fat, 32% carbs, 8% protein-typical for dense cheesecake. Key micronutrients include 15% DV calcium (from dairy), 12% DV vitamin A (from butter), and 8% DV riboflavin (from cream cheese). The berry sauce adds 35 calories per serving, along with 5% DV vitamin C and 4% DV potassium.
This dessert supports multiple body functions through its nutrient profile. The calcium in cream cheese (120mg per slice) strengthens bones and teeth, while the saturated fats provide concentrated energy for sustained satiety-critical for those with active lifestyles. Vitamin A from butter supports eye health and immune function, and the cream’s riboflavin aids in energy metabolism by converting carbohydrates into fuel. The berries’ anthocyanins (the pigments that give them color) are potent antioxidants that reduce inflammation and may lower risk of chronic diseases. Even the lemon zest contributes limonene, a compound being studied for its cancer-fighting properties.
Dietary adaptations make this accessible without sacrificing texture or flavor. For vegan versions, replace cream cheese with 1kg (2.2 lb) cashew cream (soaked cashews blended with coconut cream and lemon juice), use agar-agar instead of eggs, and swap butter for coconut oil in the crust. The result has 320 calories per slice with 22g fat (mostly unsaturated), 30g carbs, and 6g protein. Gluten-free adaptations use almond flour and gluten-free oats for the crust (replace graham crumbs 1:1), reducing carbs to 28g per slice while adding 3g fiber. Low-carb bakers can reduce sugar to 120g (1/2 cup) and use erythritol in the filling, cutting net carbs to 12g per slice. For dairy-free, coconut cream replaces heavy cream and sour cream, with a slight coconut flavor that pairs beautifully with tropical berries. Sodium can be reduced by 50% by using unsalted butter and omitting added salt in the crust.
Creative Variations Worth Trying
Recipes evolve like languages-borrowing, adapting, and reimagining until something new emerges. These variations honor the classic foundation while exploring unexpected directions that might become your new favorite.
Salted Caramel Cheesecake: Replace 120g (1/2 cup) sugar in the filling with 180ml (1/4 cup) salted caramel sauce. Bake as directed, then drizzle additional warm caramel over each slice. The caramel’s glucose inhibits protein bonding, creating an even silkier texture while adding 100 calories per serving. Top with flaky sea salt and toasted pecans for a Tex-Mex twist that contrasts the tangy berry sauce beautifully.*
Matcha White Chocolate: Reduce sugar to 180g (3/4 cup) and add 15g (3 tbsp) ceremonial-grade matcha powder to the filling. Fold in 120g (1 cup) melted white chocolate at the end. The matcha’s catechins balance the fat content, while white chocolate’s lactose adds subtle sweetness. Serve with a drizzle of honey and candied orange peel for a Japanese-inspired variation that’s as vibrant as it is delicious.*
Harvest Spice Cake: For fall, add 10g (2 tsp) pumpkin pie spice and 150g (1 cup) cooked pumpkin purée to the filling. Replace berry sauce with spiced apple compote (toss 500g diced apples with 60g sugar, 5ml cinnamon, and 2ml nutmeg; simmer until tender). The pumpkin’s moisture content requires reducing sour cream to 180ml (3/4 cup) to maintain texture. This variation adds 25 calories per slice and boosts vitamin A intake by 20%.*
Churro-Crust Cheesecake: Replace the graham crust with 200g (2 cups) crushed churro crumbs (mix 100g flour, 50g sugar, 2ml cinnamon, and pinch of salt; bake at 350°F/177°C until golden, then crush). Brush with 30g (2 tbsp) melted butter before pressing into the pan. The crust’s high sugar content caramelizes aggressively, creating a shatteringly crisp texture that pairs perfectly with the creamy filling. Serve with Mexican hot chocolate sauce (melt 120g dark chocolate with 240ml milk, 30g sugar, and 2g chili powder).*
Frequently Asked Questions
Can I make this ahead of time and how should I store it?
This cheesecake improves with age-flavors meld and texture firms up over 48 hours. Bake it up to 3 days ahead and refrigerate uncovered for the first 24 hours to prevent condensation. Then cover tightly with plastic wrap pressed directly onto the surface to prevent drying. It keeps for 5 days in the fridge or up to 3 months in the freezer (thaw overnight in the fridge before serving). To freeze, wrap individual slices in parchment paper, then place in a sealed container with parchment between layers. Reheat slices in a 300°F/149°C oven for 8–10 minutes to restore warmth and texture. Never microwave cheesecake-it turns the texture grainy by causing rapid protein denaturation.
What can I serve alongside this dish to make it a complete meal?
Balance the richness with something light and acidic. A simple green salad with arugula, shaved fennel, and lemon vinaigrette cuts through the creaminess beautifully. For a heartier option, serve with spiced roasted squash soup (add 5ml smoked paprika and 2g chili flakes) or a charcuterie board featuring sharp cheddar and spicy chorizo. Wine pairings include Moscato d’Asti (lightly sparkling and sweet) or a tawny port that complements the caramel notes. For non-alcoholic options, try hibiscus iced tea (brewed strong with a cinnamon stick) or sparkling pomegranate juice with fresh mint. The key is contrast: warm spices with cool dessert, tart fruits with fatty textures, or bitter greens with sweet richness.
Why did my dish turn out dense and gummy in the center?
This happens when the proteins overcoagulate, squeezing out moisture and creating a rubbery texture. The most common causes are baking at too high a temperature (above 350°F/177°C) or skipping the water bath. Another culprit is overmixing the filling, which incorporates too much air that then collapses during baking. To fix it, bake at the correct 325°F/163°C with a water bath simmering at 180°F/82°C. Check doneness at 60 minutes-the center should still jiggle like Jell-O when shaken. If it’s set, turn off the oven and let it cool inside for 1 hour before removing. For the next attempt, reduce the sour cream to 180ml (3/4 cup) to lower moisture content.
What are the best ingredient substitutions if I’m missing something?
Improvise with confidence-many substitutions work beautifully. If you lack cream cheese, blend 225g (8 oz) farmer’s cheese with 30g (2 tbsp) butter and 60g (4 tbsp) heavy cream until smooth. For Greek yogurt instead of sour cream, strain it in a cheesecloth for 2 hours to thicken. Replace vanilla extract with 1 split vanilla bean (scrape seeds into filling) or 5ml (1 tsp) almond extract for depth. Missing eggs? Use 3 large egg yolks plus 60ml (1/4 cup) buttermilk for structure. Short on time for the crust? Use digestive biscuits or speculoos cookies in equal amounts. For berry sauce, blend frozen berries with 15ml (1 tbsp) honey and 5ml (1 tsp) lemon juice if fresh aren’t available. Always adjust baking time slightly when substituting-moisture content affects doneness.
Final Thoughts from the Kitchen
There’s a moment in every great meal when the first bite transports you somewhere else-a childhood memory, a first date, a holiday gathering. This cheesecake does that for me every time I bake it. It reminds me of my grandmother’s kitchen in Queens, where the scent of vanilla and lemon zest filled the air, and the radio played Frank Sinatra while she measured ingredients by feel rather than scale. She’d say, “A good cheesecake is like a good friend-it knows when to be serious and when to laugh,” referring to the balance of tang and sweetness. I’ve spent decades perfecting this recipe not just to win awards, but to recreate that feeling of being loved through food. The berry sauce, with its bright acidity, is the exclamation point on a sentence that begins with “I care about you.”
Now it’s your turn. Light the oven, preheat your water bath, and take your time-this isn’t a race. Notice how the crust turns golden around the edges before the center sets. Watch the berries transform from raw fruit to glossy sauce. Taste as you go, adjust to your preferences, and don’t be afraid to make it your own. When you finally pull that perfect slice from the fridge, remember: the best dishes are made not just with ingredients, but with intention. Share it with someone you love. Take a photo. Write the date on the container so you can remember this moment next year. And when they ask for the recipe, you’ll know-they’re not just asking for instructions. They’re inviting you into the story.